We get a great amount of interest from our existing PDF Converter customers for the Workflow Power Pack for SharePoint. I am not really surprised as there is a lot of of synergy between the two.
Last week I described how to configure PDF Security settings from a SharePoint workflow. This time I’ll describe another common request; adding a watermark to a PDF File.
A quick introduction for those not familiar with the product: The Muhimbi Workflow Power Pack for SharePoint allows custom C# or VB.NET code to be embedded in SharePoint Designer Workflows without the need to resort to complex Visual Studio based workflows, the development of bespoke Workflow Activities or long development cycles.
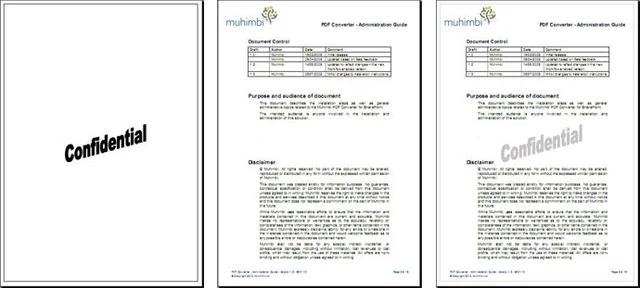
The solution presented below executes a workflow whenever a PDF file is added or updated. As part of the workflow it loads portrait and landscape based watermarks and applies the relevant template to each page of the document. The workflow author can specify if the watermark goes in the foreground or the background, the SharePoint location of the watermarks as well as the level of transparency. As the code is well documented it is easy to make further changes and customisations, e.g. the PDF file that needs to be watermarked may not be the file the workflow is acting on.
Update: An article describing the use of dynamic text in the watermark is now available as well . As of version 3.5 the PDF Conversion Service also supports a native watermarking interface.
Create the workflow as follows:
-
Download and install the Muhimbi Workflow Power Pack for SharePoint.
-
Download and install the Muhimbi PDF Converter for SharePoint.
Note that you need version 3.1.2.18 or newer, older versions do not allow watermarking.
-
We need to be able to access functionality in the Muhimbi.SharePoint.DocumentConverter.PDF and System.Drawing assemblies. Add these references to the relevant Web Application using the Workflow Power Pack Central Administration screens as described in the Administration Guide. Make sure to place each reference on a new line.
-
Make sure you have the appropriate privileges to create workflows on a site collection.
-
Create a new workflow using SharePoint Designer.
-
On the Workflow definition screen associate the workflow with the Shared Documents library, tick the boxes next to both ‘ Automatically start….’ options and proceed to the next screen.
-
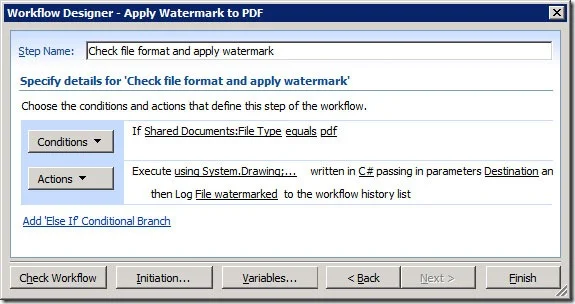
We only want to act on files of type PDF. Although we could have put this validation in the code, in this example we use a workflow condition for it so add a Compare Any Data Source condition and:
a. Click on the first value followed by the display data binding (fx) button.
b. Select Current Item as the Source and select File Type in the Field. Click the OK button to continue.
d. Click on the second value and enter pdf. (Use lower case as the compare option is case sensitive).
-
Click the Actions button and insert the Execute Custom Code action .
-
Optionally click parameter 1 and enter a relative or absolute destination path. Leave the parameter empty to save the watermarked file on top of the existing PDF file. For details about how paths are handled, see this post and search for the words ‘this url’.
-
Insert the C# based code embedded in step #3’s download (also listed below) by clicking this code.
/********************************************************************************************* Muhimbi PDF Converter - Watermarking Copyright 2010, Muhimbi Ltd - www.muhimbi.com - All rights reserved The following code shows a simple way of adding a watermark to existing PDF Files. Error and permission checking as well as other minor features have been omitted for the sake of brevity and clarity. Ideally PDF Conversion, applying security and watermarking is executed in the same step, see /blog/configure-pdf-security-from-a-sharepoint-workflow/ This code requires Muhimbi’s PDF Converter and Workflow Power Pack to be installed. *********************************************************************************************/ using System.Drawing; using System.IO; using Syncfusion.Pdf; using Syncfusion.Pdf.Parsing; using Syncfusion.Pdf.Graphics; using Muhimbi.SharePoint.DocumentConverter.PDF; SPFile spSourceDocument = MyWorkflow.Item.File; string destinationFileName = spSourceDocument.Name; string destinationFolderName = MyWorkflow.Parameter1 as string; string watermarkDocumentPortraitPath = @"Shared Documents/Watermarks/WatermarkA4Portrait.pdf"; string watermarkDocumentLandscapePath = @"Shared Documents/Watermarks/WatermarkA4Landscape.pdf"; // ** z-order and transparency of the watermark bool watermarkInBackground = true; float watermarkTransparancy = 0.25f; // ** Load the document and watermarks PdfLoadedDocument sourceDocument = new PdfLoadedDocument(spSourceDocument.OpenBinary()); SPFile spWatermarkDocumentPortrait = MyWorkflow.Web.GetFile(watermarkDocumentPortraitPath); PdfLoadedDocument watermarkDocumentPortrait = new PdfLoadedDocument( spWatermarkDocumentPortrait.OpenBinary()); SPFile spWatermarkDocumentLandscape = MyWorkflow.Web.GetFile(watermarkDocumentLandscapePath); PdfLoadedDocument watermarkDocumentLandscape = new PdfLoadedDocument spWatermarkDocumentLandscape.OpenBinary(); // ** Create the PDF Templates PdfTemplate watermarkTemplatePortrait = watermarkDocumentPortrait.Pages[0].CreateTemplate(); PdfTemplate watermarkTemplateLandscape = watermarkDocumentLandscape.Pages[0].CreateTemplate(); // ** Iterate over all pages and apply watermark foreach (PdfPageBase page in sourceDocument.Pages) // ** Is the current page portrait or landscape? PdfTemplate watermarkTemplate = null; if (page.Size.Width > page.Size.Height) watermarkTemplate = watermarkTemplateLandscape; else watermarkTemplate = watermarkTemplatePortrait; // ** Place watermark behind or in front of text? if (watermarkInBackground == true) { PdfTemplate pageTemplate = page.CreateTemplate(); page.Layers.Clear(); PdfGraphics g = page.Graphics; g.SetTransparency(watermarkTransparancy); g.DrawPdfTemplate(watermarkTemplate, PointF.Empty, page.Size); g.SetTransparency(1f); g.DrawPdfTemplate(pageTemplate, PointF.Empty, page.Size); } else { PdfGraphics g = page.Graphics; g.SetTransparency(watermarkTransparancy); g.DrawPdfTemplate(watermarkTemplate, PointF.Empty, page.Size); } } // ** Construct the path and file to write the watermarked PDF file to. if (string.IsNullOrEmpty(destinationFolderName) == true) destinationFolderName = spSourceDocument.ParentFolder.Url; SPFolder destinationFolder = Utility.GetSPFolder(destinationFolderName, MyWorkflow.Web); string destinationFilePath = string.Format("{0}/{1}", destinationFolder.Url, destinationFileName); SPWeb destinationWeb = destinationFolder.ParentWeb; SPFile spDestinationFile = destinationWeb.GetFile(destinationFilePath); // ** If a document library requires manual checkout and the file is not checked out, then // ** check the file out before uploading. if (spDestinationFile.Exists && spDestinationFile.Item.ParentList.ForceCheckout && spDestinationFile.CheckOutStatus == SPFile.SPCheckOutStatus.None) { spDestinationFile.CheckOut(); } // ** Add the file to the site including the meta data using (MemoryStream watermarkedFile = new MemoryStream()) { sourceDocument.Save(watermarkedFile); spDestinationFile = destinationWeb.Files.Add(destinationFilePath, watermarkedFile, spSourceDocument.Item.Properties, true); } // ** Check the file back in if this script was responsible for checking it out. if (spDestinationFile.Item.ParentList.ForceCheckout == true) { spDestinationFile.CheckIn("Auto check-in after PDF watermarking."); } -
Click the Actions button, select Log to History List, click this message and enter File watermarked.
-
Close the Workflow Designer.
-
In the Shared Documents library create a sub folder named Watermarks and copy the 2 watermark files that are part of step #3’s download into it. If the watermarks are named differently or stored in a different location then update the paths in the script accordingly. Note that the sample watermarks are exactly A4 sized but they work fine on differently sized documents.
-
Update an existing PDF or add a new PDF file to your library to trigger the workflow and apply the watermarks.
Naturally this is just a simple example. Feel free to play around with the code, change which parameters are passed into the workflow, modify where watermarked files are written to or add dynamic text as a watermark. Leave a comment below if you are trying to do anything specific.
.

Clavin is a Microsoft Business Applications MVP who supports 1,000+ high-level enterprise customers with challenges related to PDF conversion in combination with SharePoint on-premises Office 365, Azure, Nintex, K2, and Power Platform mostly no-code solutions.