Although at the time of writing (October 2016) Microsoft’s cool new Flow platform is not yet officially available, our support team is quickly turning into Flow junkies. Problems that are difficult to solve using regular SharePoint Designer workflows are absolutely trivial to crack using Flow.
Today we are describing a solution to what is a top 5 support request, at least for our support team, which is to automatically convert a file to PDF using a workflow and sending the result via email as an attachment. You’d think this is easy to achieve in a SharePoint Designer workflow as that comes with an e-mail action, however that action does not support attachments. Bummer!
Read on to find out how easy it is to solve this problem.
-
If not already done so, sign up for Microsoft Flow (Free).
-
If not already done so, in Flow navigate to My Connections and set up a SharePoint connection.
-
Install the Muhimbi PDF Converter for SharePoint Online App (add-in) and separate Workflow Actions.
-
In SharePoint Online (or on-premise if you have configured a gateway) make sure you have access to two different Document Libraries. This example can be combined to use only a single library, but things are slightly easier when using two. Let’s name our libraries Auto Convert Files and Email Files.
-
As at the time of writing Muhimbi’s workflow actions are not (yet) available in Flow, we need to create a SharePoint Designer workflow to carry out the conversion to PDF. Navigate to the Auto Convert Files Library and create a new SharePoint Designer Workflow ( Library tab / Workflow Settings / Create a Workflow in SharePoint Designer).
-
Name your workflow Convert to PDF, set it to automatically start when a new file is created, convert the Current Item to Email Files/ (including the trailing slash), in PDF format and Exclude metadata. Too cryptic, have a look at this demo video (that uses slightly different parameters, but illustrates the concept).
-
Close SharePoint Designer and check that the new workflow works by uploading a new file to Auto Convert Files. After a few seconds the PDF rendition should be placed in the Email Files Document Library.
-
It is time to create the Flow that picks up the newly converted file and send it via email. On the My Flows screen select the option to create a New flow from blank.
-
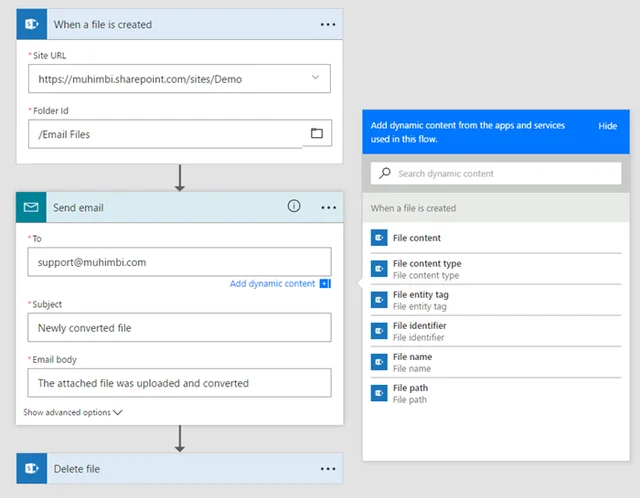
The trigger that starts the flow must be defined first, enter SharePoint when a file is created and select the displayed trigger. Enter the site collection and Email Files document library (use the Library picker if needed).
-
With the fields filled out, click New Step followed by Add an Action.
-
There are several built in email related actions (Outlook, Office 365 Outlook, SMTP), but in this example we use the basic Mail – Send email action. Select it and accept the terms & conditions if needed.
-
Fill out the recipient, subject etc and click Show Advanced options. Select the Attachment field and select File content from the Dynamic content picker. Similarly for the Attachment file name, select File name.
That is it, enter an appropriate name for the flow at the top of the screen and click the Create Flow option. You can later extend the flow by adding a SharePoint Delete File action to delete the original file if that is no longer needed.
On the My Flows screen make sure the newly created flow is enabled. Upload a file to Auto Convert Files and after a few seconds an email will be delivered with a copy of the converted file.
Naturally this is not limited to PDF Conversion, it works with any file generated by our various workflow actions including Merge, Watermark, Secure and OCR operations. The current flow always sends the email to the same recipient, this can easily be extended to take the recipient from a separate column by querying that column in Flow.
Any questions or remarks? Leave an update below or contact our friendly support team.
.

Clavin is a Microsoft Business Applications MVP who supports 1,000+ high-level enterprise customers with challenges related to PDF conversion in combination with SharePoint on-premises Office 365, Azure, Nintex, K2, and Power Platform mostly no-code solutions.


