One of the more popular features of the Muhimbi PDF Converter for SharePoint is the ability to execute PDF conversion and manipulation activities as part of a SharePoint Designer Workflow or Nintex Workflow. Quite often these workflows are as basic as ‘ when a document is created in location A, convert it to PDF in location B’. However, as the PDF Converter has been deployed on thousands of servers all over the world, we see more complex workflows as well, especially when part of a larger automated business process. ( Have a look at these case studies).
Over the years we have written extensively about the various workflow activities that ship with the PDF Converter for SharePoint, and although we have touched on the ability to target documents other than the one that started the workflow, this topic deserves its own blog post.
Introduction
Muhimbi’s workflow activities are designed to be chained together. This means that the output generated by one workflow activity (e.g. a PDF file) can be passed into a second workflow activity for further processing (e.g. watermarking). This allows the common scenario to convert a typical MS-Office file to PDF, Watermark it with meta-data and then Secure it using our PDF security and encryption facilities.
Although there are subtle differences between the various workflow environments (SharePoint Designer, Nintex workflow 2007, 2010 and 2013), the principle is the same between all of them. By default our workflow activities act on the file that triggered the workflow, however each activity accepts optional List ID and Item ID variables to act on a different file. Once a file has been processed it is written to whatever path / file name was specified. The List ID and Item ID of that processed file are optionally stored in workflow variables that can be passed into a secondary workflow activity as the Source List ID and List Item ID.
Even though this mechanism is easy to understand, there are a few differences between Nintex Workflow versions and workflow activities, especially where it comes to workflow variable data types. A summary can be found below:
-
List ID: This is the same for all Muhimbi workflow activities and SharePoint versions. The data type is always string / text and contains the GUID that identifies the associated list / library.
-
Item ID (SharePoint 2007): On this platform use the type named ‘List Item ID’ for the workflow variable.
-
Item ID (SharePoint 2010/13): On this platform use the type named ‘Integer’ for the workflow variable.
As always, there is one exception to the rule, which is the Convert Document Workflow Action. This action allows files to be converted to file formats other than just PDF. The Item ID returned by this workflow action is always of type string / text. The reason for this is that a future version of our software may return multiple, comma separated, values for certain file types. In order to pass the Item ID generated into another workflow action, its type may need to be converted first using the Convert Value workflow action.
Example - Item ID type is Integer / List Item ID
Let’s illustrate the concept of combining multiple workflow actions using a simple Nintex Workflow example. The steps described below show how to convert a document to PDF and then watermark it. In this case we use the Convert to PDF Workflow Action so the Item ID will be stored in a workflow variable of type Integer.
The screenshots show Nintex Workflow 2010 in action, but the steps are identical in Nintex Workflow 2013. The only difference when using Nintex Workflow 2007 is that the data type for the Item ID is List Item ID rather than Integer.
The steps for creating the workflow are as follows:
-
Create a blank Nintex Workflow.
-
Open the Workflow Settings / Variables screen using the Ribbon.
-
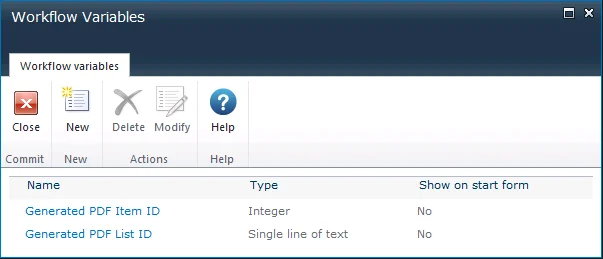
Create a workflow variable named Generated PDF Item ID of type Integer.
-
Create a workflow variable named Generated PDF List ID of type Single Line of Text.
-
Close the Workflow Variables window and add the Muhimbi Convert file to PDF activity to the workflow and double click it to open the configuration window.
-
Specify the appropriate workflow variables as per the screenshot below, do not change any of the other settings. As a result the PDF file will be generated in the same folder as the source file.
-
Save and close the workflow activity and add the Watermark PDF activity just below the Convert file to PDF activity. Double click it to open the configuration window. Accept the default settings except for the following:
-
Content: This is a Watermark
-
Font Size: 18
-
Layer: Foreground
-
Height: 300
-
Width: 300
-
Source List ID: Generated PDF List ID
-
Source List Item: Generated PDF Item ID
-
-
Save and close the workflow activity.
-
Publish the workflow and execute it on a simple MS-Word file. After a few seconds a watermarked PDF file should be present in the same location as the MS-Word file.
If you wish to carry out further steps, e.g. secure the PDF file, then you can re-use the Generated PDF List ID and Generated PDF Item ID variables providing the same file name and path is used by all activities
A copy of this workflow is available for download here.
Example - Item ID type is string / text
The previous example uses the Convert File to PDF workflow activity, which uses the default data types for workflow variables. In the following example we’ll show how to use the Convert Document workflow activity, which returns an Item ID of type string / text, and pass that into the Watermarking Activity.
The steps for creating the workflow are as follows:
-
Create a blank Nintex Workflow.
-
Open the Workflow Settings / Variables screen using the Ribbon.
-
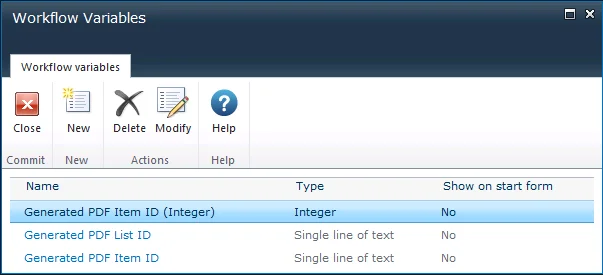
Create a workflow variable named Generated PDF Item ID (Integer) of type Integer.
-
Create a workflow variable named Generated PDF Item ID of type Single Line of Text.
-
Create a workflow variable named Generated PDF List ID of type Single Line of Text.
-
Close the Workflow Variables window and add the Muhimbi Convert Document activity to the workflow and double click it to open the configuration window.
-
Specify the appropriate workflow variables as per the screenshot below, do not change any of the other settings. As a result the PDF file will be generated in the same folder as the source file.
-
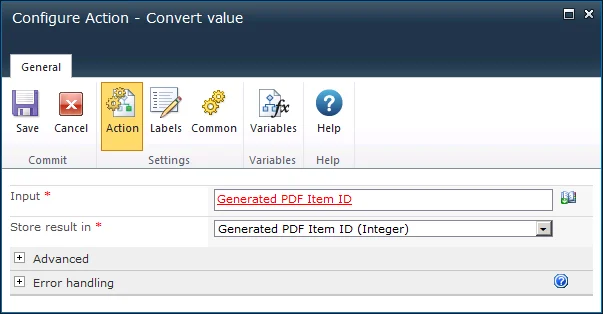
Save and close the workflow activity and add the Convert Value activity just below the Convert Document activity. Double click it to open the configuration window and configure it as per the following screenshot.
-
Save and close the workflow activity and add the Watermark PDF activity just below the Convert Value activity. Double click it to open the configuration window. Accept the default settings except for the following:
-
Content: This is a Watermark
-
Font Size: 18
-
Layer: Foreground
-
Height: 300
-
Width: 300
-
Source List ID: Generated PDF List ID
-
Source List Item: Generated PDF Item ID (Integer)
-
-
Save and close the workflow activity.
-
Publish the workflow and execute it on a simple MS-Word file. After a few seconds a watermarked PDF file should be present in the same location as the MS-Word file.
If you wish to carry out further steps, e.g. secure the PDF file, then you can re-use the Generated PDF List ID and Generated PDF Item ID (Integer) variables providing the same file name and path is used by all activities
A copy of this workflow is available for download here.
A more complex Nintex Workflow example that uses the ability to target different source files for PDF Conversion is available in this example.
Are you working on a complex workflow and struggling to make it work? If so then please leave a comment below or contact our support desk.

Clavin is a Microsoft Business Applications MVP who supports 1,000+ high-level enterprise customers with challenges related to PDF conversion in combination with SharePoint on-premises Office 365, Azure, Nintex, K2, and Power Platform mostly no-code solutions.


