Print only watermarks in SharePoint Online
Table of contents

Our range of PDF Conversions products(opens in a new tab) does a lot more than 'just PDF Conversion'. Over the years we have added many additional features including support for watermarking (stamping) documents with various content. Text, Images, even barcodes and QR codes. These watermarks can be applied via SharePoint Designer Workflows, Nintex Workflow, Microsoft Power Automate, API Calls and even automatically the moment a file is accessed by a user.
This is all nice and well, but our customers are insatiable. They just can't help themselves; they keep asking for more, More, MORE!
The 'MORE' that we are happy to announce today is the ability to apply watermarks that are only visible when a document is sent to the printer. Everything looks nice and tidy when viewing a document on screen, but as soon as it is sent to the printer watermarks appear, being it barcodes, the path where the document is stored, other metadata, or even details of the person who downloaded the document - and who is about to leak it to a competitor (Name, IP, Date, Time, Login name, etc).
Although we make light of our customers' constant requests, we absolutely understand how valuable a facility like this can be. As a result we have spent a lot of time on adding support for print-only watermarks. This new facility is now available everywhere, being it in the workflow actions for the various platforms, the SharePoint on-premises and Online user interface, or our API.
- SharePoint Designer Workflows on-premises (using SP2010 Workflow platform)
- SharePoint Designer Workflows on-premises (using Workflow Manager platform)
- SharePoint Designer Workflows Online (using Workflow Manager / 2013 platform)(opens in a new tab)
- Nintex Workflow 2007-2019
- Microsoft Flow / Power Automate
- Azure Logic Apps
- PowerApps
- 'Watermark on Open' for SharePoint on-premises
- 'Watermark on Open' for SharePoint Online
- SOAP API(opens in a new tab)
- REST API(opens in a new tab)
Wow, that is quite the list, but let's have a look at what this actually looks like for SharePoint Designer workflows, Nintex Workflow, Microsoft Flow, Muhimbi Watermark On Open, XML Watermarks and for APIs.
Details are provided below, but TL;DR, all Muhimbi's existing watermarking facilities continue to work exactly as before, but now have an extra option to control if the watermark should only be present when the document is sent to the printer.
SharePoint Designer Workflows (on-premises and Online)
Regardless of the platform, all SharePoint Designer workflows pretty much look and behave the same, so the following example is the same for SharePoint on-premises, Online, the SP2010 workflow Engine and the 2013 one.
The Text Watermark action now looks as follows. All other watermark actions, including images, barcodes and rich text provide the new 'display' element as well

Nintex Workflow
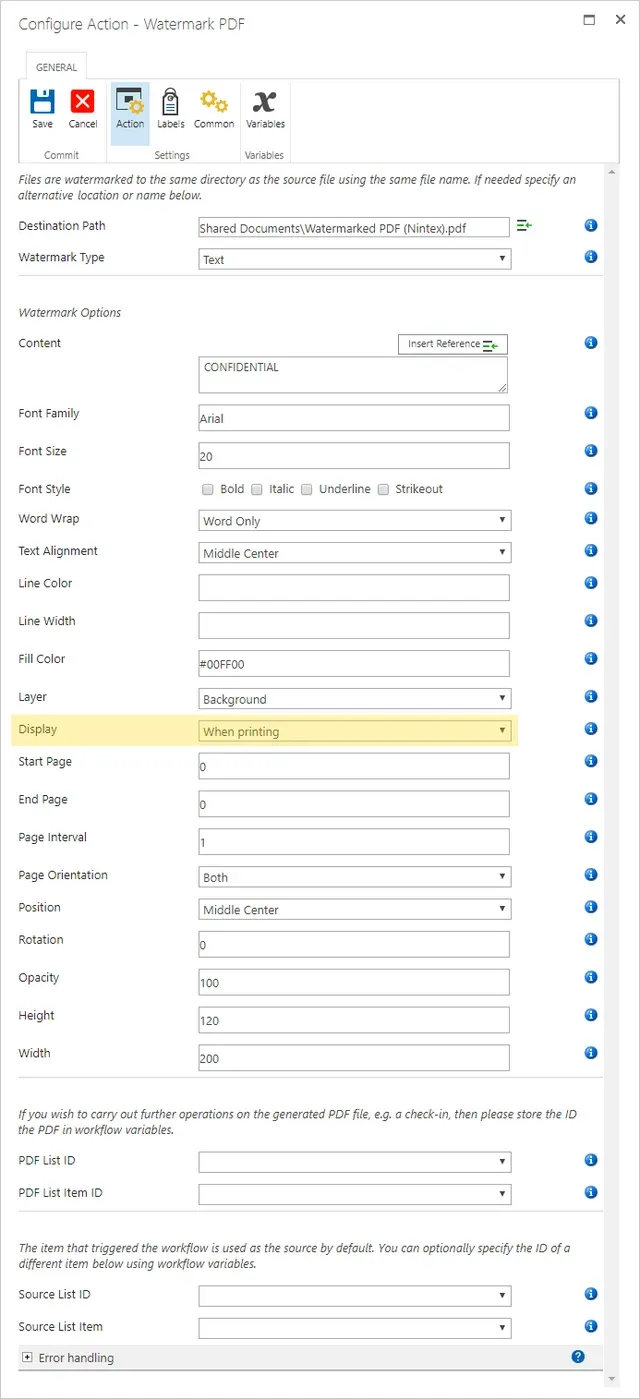
In Nintex Workflow there is only one watermark activity. It shows different parameters depending on the watermark type selected. An example for a simple Text based watermark can be found below. Make sure you enable the Muhimbi Nintex actions first.
Microsoft Flow (Power Automate) / Azure Logic Apps
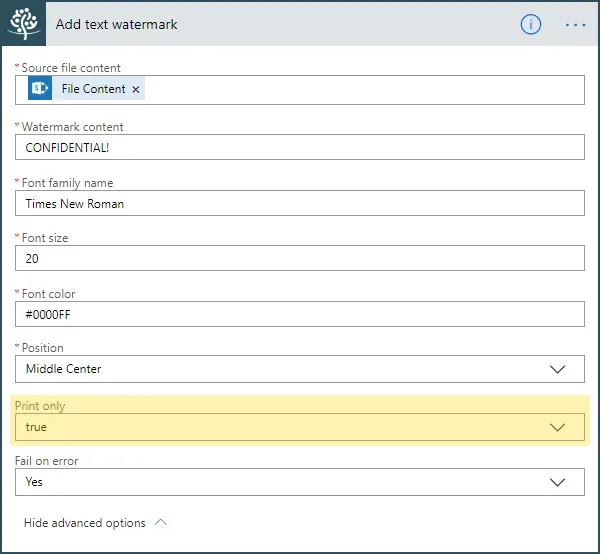
All individual watermark actions in Microsoft Flow (Power Automate) support the new 'print only' facility as well. Various tutorials can be found here.
Watermark On Open
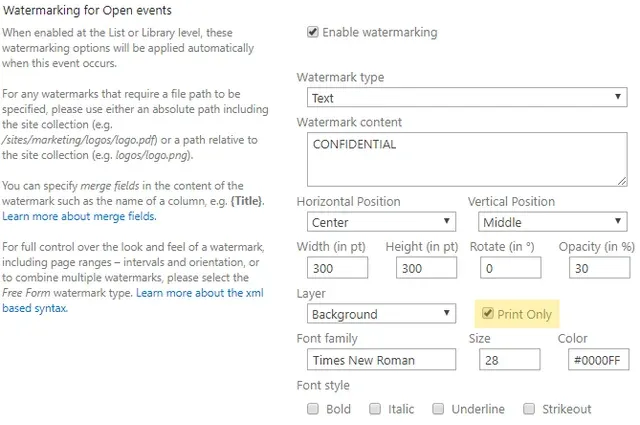
Muhimbi's SharePoint products come with this awesome feature to automatically add watermarks when files are opened (See SharePoint on-premises and SharePoint Online details). Naturally we have also added support for print-only watermarks to this facility.
XML Watermarks
Although various facilities are available to add one watermark at a time, when multiple watermarks need to be applied to a single document it is recommended to apply all watermarks in a single operation using Muhimbi's XML based watermarking syntax(opens in a new tab).
An example, which shows a barcode watermark when the document is printed, can be found below:
<watermark hPosition="right" vPosition="top" width="200" height="100" zOrder="1" opacity="100" printOnly="true" pageOrientation="both"> <linearBarcode width="200" height="100" text="1234567890" barcodeType="Codabar" omitStartStopSymbols="false" disableCheckDigit="false" showCheckDigit="true" textLocation="Bottom" barcodeToTextGapHeight="3" fontFamilyName="Arial" FontSize="8" fontStyle="regular" textAlignment="Center" margin="5" /></watermark>REST / API
All Muhimbi's Online facilities can be accessed via a REST API call. You can find details about the various actions in the API Docs(opens in a new tab). The on-premises versions of the product support the same functionality using the built-in SOAP Webservice interface(opens in a new tab).
In the following example we use Curl to make a POST request. Note how we are passing in the source PDF file using the base64 command (Ours is called test.pdf). The output JSON is fed into the jq command (sudo apt install jq), which extracts the output file. This output file - which is Base64 encoded - is then decoded into a binary PDF file.
REST calls can be executed via most modern programming languages, including Python, Java, JavaScript, C#, and PHP. Various examples can be found in our GitHub repository(opens in a new tab).
Make sure you enter your API_KEY in the example below. You can get one for free by signing up for the Muhimbi PDF Converter REST-based API for Server Platform(opens in a new tab).
echo "{\"source_file_name\":\"Testing.pdf\",\"use_async_pattern\":false, \ \"source_file_content\": \"$(base64 -w 0 test.pdf)\" ,\"content\":\"1234567890\", \ \"barcode_type\":\"Codabar\",\"omit_start_stop_symbols\":\"false\",\ \"disable_checkdigit\":\"false\",\"show_checkdigit\":\"true\",\"margin\":\"5\", \ \"font_family_name\":\"Arial\",\"font_size\":\"8\",\"font_style\":\"Regular\", \ \"label_placement\":\"Bottom Center\",\"position\":\"Top Center\",\"width\":\"200\", \ \"height\":\"100\",\"opacity\":\"100\",\"start_page\":0,\"end_page\":0,\"page_interval\":0, \ \"page_orientation\":\"Portrait\",\"print_only\":\"true\",\"fail_on_error\":true}" \| curl "https://api.muhimbi.com/api/v1/operations/linear_barcode_watermark" \ -d @- \ -H "API_Key: [INSERT API KEY HERE]" \ -H "Content-Type: application/json" \ | jq -r '.processed_file_content' | base64 --decode > watermarked.pdfWhen executing this command using Bash, or a similar shell, you may want to copy it into a text editor first. Then make sure all line endings are saved using the Unix format (LF).
Any questions? Leave a comment below or contact our support desk(opens in a new tab), we love to help.


