In this post, we provide you with a step-by-step guide outlining how to deploy PSPDFKit’s Nuxt.js image viewer.
Nuxt.js is a framework built on top of Vue.js that offers server-side rendering for Vue applications. This allows the creation of universal Vue applications, where the HTML content is generated on the server and served to the client. This affects SEO optimization positively and can speed up your page.
It also supports automatic routing with zero configuration for every page and simplifies the development of Vue.js applications.
What Is a Nuxt.js Image Viewer?
A Nuxt.js image viewer lets you render and view image documents in a web browser without the need to download it to your hard drive or use an external application like an image reader.
PSPDFKit Nuxt.js Image Viewer
We offer a commercial Nuxt.js image viewer library that can easily be integrated into your web application. It comes with 30+ features that let you view, annotate, edit, and sign documents directly in your browser. Out of the box, it has a polished and flexible UI that you can extend or simplify based on your unique use case.
- A prebuilt and polished UI for an improved user experience
- 15+ prebuilt annotation tools to enable document collaboration
- Support for more file types with client-side PDF, MS Office, and image viewing
- Dedicated support from engineers to speed up integration
Example of Our Nuxt.js Image Viewer
To see our image viewer in action, upload a JPG, PNG, or TIFF file by selecting Choose Example > Open Document (if you don’t see this, switch to the Standalone option). Once your image is displayed in the viewer, you can try drawing freehand, adding a note, or applying a crop or an e-signature.
Requirements to Get Started
To get started, you’ll need:
- Node.js (this post uses version 16.13.0)
- A package manager for installing packages — you can use npm or Yarn
Creating the Project
Now you’ll see how to integrate PSPDFKit into your Nuxt.js project. Open a terminal and navigate to the place where you want to create the project.
-
Create a new Nuxt.js project with
create-nuxt-app:
npx create-nuxt-app pspdfkit-nuxtjs-project
Here, you’re using the create-nuxt-app option with the name of the project you want to create (pspdfkit-nuxtjs-project).
-
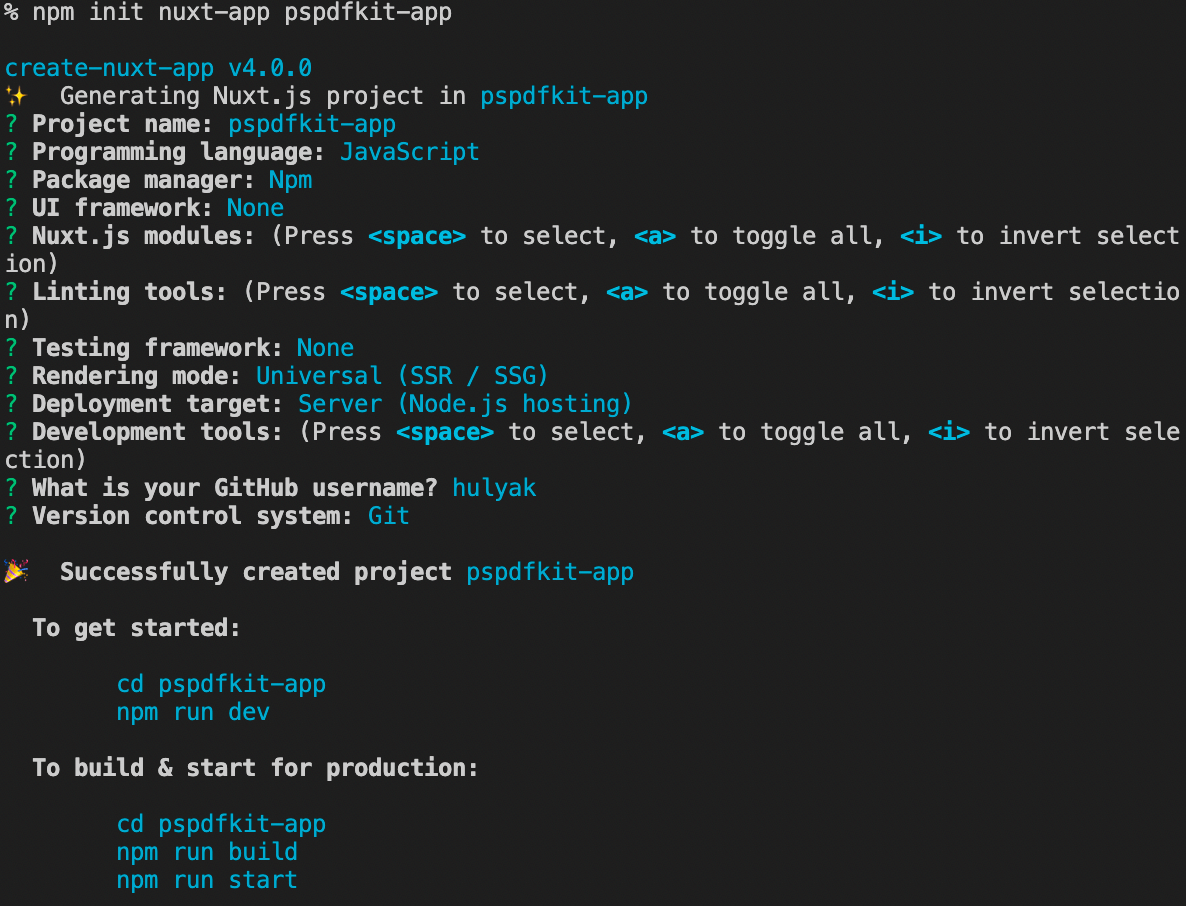
This will ask you some questions. Choose the default options by pressing Enter. Once you answer all the questions, it’ll install the dependencies and create a new Nuxt.js project.

-
Now, change your directory to
pspdfkit-nuxtjs-project:
cd pspdfkit-nuxtjs-project
Adding PSPDFKit
-
Install
pspdfkitas a dependency withnpm:
npm install pspdfkit
-
Copy the PSPDFKit for Web library assets to the
staticdirectory:
cp -R ./node_modules/pspdfkit/dist/pspdfkit-lib static/pspdfkit-lib
This will copy the pspdfkit-lib directory from within node_modules/ into the static/ directory to make it available to the SDK at runtime.
Displaying an Image Document
-
Add the image you want to display to the
staticdirectory. You can use our demo image as an example. -
Add a component wrapper for the PSPDFKit library and save it as
components/PSPDFKitContainer.vue:
// components/PSPDFKitContainer.vue

<template>
	<div class="image-container"></div>
</template>

<script>
/**
 * PSPDFKit for Web example component.
 */
export default {
	name: 'PSPDFKit',
	/**
	 * The component receives `pdfFile` as a prop, which is type of `String` and is required.
	 */
	props: {
		imageFile: {
			type: String,
			required: true,
		},
	},
	PSPDFKit: null,
	/**
	 * Wait until the template has been rendered to load the document into the library.
	 */
	mounted() {
		this.loadPSPDFKit().then((instance) => {
			this.$emit('loaded', instance);
		});
	},
	/**
	 * Watch for `imageFile` prop changes and trigger unloading and loading when there's a new document to load.
	 */
	watch: {
		imageFile(val) {
			if (val) {
				this.loadPSPDFKit();
			}
		},
	},
	/**
	 * Our component has the `loadPSPDFKit` method. This unloads and cleans up the component and triggers document loading.
	 */
	methods: {
		async loadPSPDFKit() {
			import('pspdfkit')
				.then((PSPDFKit) => {
					this.PSPDFKit = PSPDFKit;
					PSPDFKit.unload('.image-container');

					return PSPDFKit.load({
						document: this.imageFile,
						container: '.image-container',
						baseUrl: 'http://localhost:3000/',
					});
				})
				.catch((error) => {
					console.error(error);
				});
		},
	},
};
</script>

<style scoped>
.image-container {
	height: 100vh;
}
</style>
Here’s what’s happening in the component:
-
The
templatesection is rendering adivwith theimage-containerclass. This will help you declaratively bind the rendered DOM to the underlying component instance’s data. -
The
scriptsection is defining a Nuxt.js instance namedPSPDFKitand creating methods for mounting and loading PDF files into theimage-container. -
The
stylesection is defining the height of the container.
-
Include the newly created component in
pages/index.vue:
// pages/index.vue

<template>
	<div id="app">
		<label for="image-upload" class="custom-image-upload">
			Open Image
		</label>
		<input
			id="image-upload"
			type="file"
			@change="openDocument"
			class="btn"
		/>
		<PSPDFKitContainer
			:imageFile="imageFile"
			@loaded="handleLoaded"
		/>
	</div>
</template>

<script>
import PSPDFKitContainer from '../components/PSPDFKitContainer.vue';

export default {
	name: 'app',
	/**
	 * Render the `PSPDFKitContainer` component.
	 */
	components: {
		PSPDFKitContainer,
	},

	data() {
		return {
			imageFile: this.imageFile || '/image.png',
		};
	},

	/**
	 * The component has two methods — one to check when the document is loaded, and the other to open the document.
	 */
	methods: {
		handleLoaded(instance) {
			console.log('PSPDFKit has loaded: ', instance);
			// Do something.
		},

		openDocument(event) {
			if (this.imageFile && this.imageFile.startsWith('blob:')) {
				window.URL.revokeObjectURL(this.imageFile);
			}
			this.imageFile = window.URL.createObjectURL(
				event.target.files[0],
			);
		},
	},
};
</script>

<style>
#app {
	font-family: Avenir, Helvetica, Arial, sans-serif;
	text-align: center;
	color: #2c3e50;
}

body {
	margin: 0;
}

input[type='file'] {
	display: none;
}

.custom-image-upload {
	border: 1px solid #ccc;
	border-radius: 4px;
	display: inline-block;
	padding: 6px 12px;
	cursor: pointer;
	background: #4a8fed;
	padding: 10px;
	color: #fff;
	font: inherit;
	font-size: 16px;
	font-weight: bold;
}
</style>
-
In the
templatesection, you have a file upload input and thePSPDFKitContainercomponent.
Similar to the input field, for the PSPDFKitContainer component, you’re using the v-bind directive to bind the imageFile property to the imageFile property of the component and attaching an event listener for the loaded event:
<PSPDFKitContainer :imageFile="imageFile" @loaded="handleLoaded" />
-
In the
scriptsection, you can see the implementation of thehandleLoadedandopenDocumentmethods. Also, there’s a data function that returns theimageFileproperty. -
In the
stylesection, there are styles for custom file input and general styles for theapp.
-
Start the app:
npm run dev
You can see the application running on http://localhost:3000.
In the demo application, you can open different image files by clicking the Open Image button. You can add signatures, annotations, stamps, and more.

You can find the example on GitHub.
Adding Even More Capabilities
Once you’ve deployed your viewer, you can start customizing it to meet your specific requirements or easily add more capabilities. To help you get started, here are some of our most popular Nuxt.js guides:
- Adding annotations
- Editing documents
- Filling PDF forms
- Adding signatures to documents
- Real-time collaboration
- Redaction
- UI customization
Conclusion
You should now have our Nuxt.js image viewer up and running in your web application. If you hit any snags, don’t hesitate to reach out to our Support team for help.
You can also integrate our JavaScript image viewer using web frameworks like Angular and React.js. To see a list of all web frameworks, start your free trial. Or, launch our demo to see our viewer in action.


