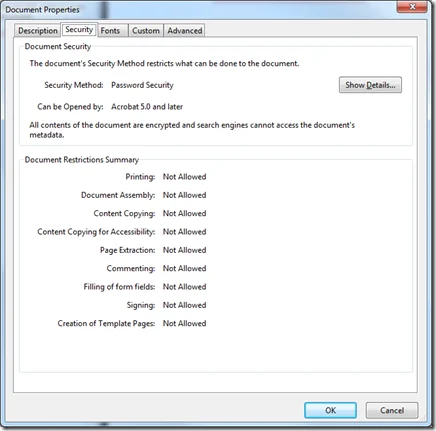
The Muhimbi PDF Converter for SharePoint has had the ability to secure PDF files for quite some time, but it always required a separate product, which increased complexity, and more importantly cost.
We are happy to announce that as of version 4.1 the product now ships with a native SharePoint Designer Workflow Activity that allows security settings such as the Open Password, Owner Password and document restrictions such as Printing and Content Copying to be applied from a friendly SharePoint Designer workflow.
Update: As of version 6.0 it is possible to use the SharePoint User Interface to apply user specific security when a file is opened .
The best way to show how this works is by example. What follows is a walkthrough of how to create a SharePoint Designer Workflow to automatically apply security settings to any new or modified PDF file in a Document Library. In this example we use SharePoint Designer 2010, but it works just as well in SharePoint Designer 2007.
Before we begin, let’s have a look at the options provided by the new Secure PDF workflow activity.
In typical Muhimbi fashion, the workflow sentence is consistent with our other Workflow Activities (e.g. Converting / watermarking), and is largely self-describing.
-
this document: The document to apply the security settings to. For most workflows selecting Current Item will suffice, but some custom scenarios may require the look up of a different item. You may also want to check that the file type of the document is ‘ pdf’ before trying to apply security.
-
this file: The name and location of the secured file. Leave this field empty to overwrite the source file with the secured copy. Enter a path, including the Document Library and any folder names, to write the secured file to a separate location. E.g. “ shared documents/secured files/confidential.pdf”. You can even specify a different site collection.
-
open password: When specified, anyone who wants to open the PDF file will need to enter this password.
-
owner password: When specified, anyone who wants to change the security settings on the PDF file will need to enter this password.
-
disable options: One or more restrictions to apply to the PDF file, separated by a pipe ‘|’ character . By default it applies all restrictions ( Print|HighResolutionPrint|ContentCopy|Annotations|FormFields|ContentAccessibility|DocumentAssembly), but any combination is allowed. Enter the word Nothing to not apply any restrictions. In order to activate these settings you must supply an owner password.
-
List ID: The ID of the list the secured file was written to. This can later in the workflow be used to perform additional tasks on the file such as a check-in or out.
-
Item ID: The ID of the secured file. Can be used with the List ID.

Create the workflow as follows:
-
Download and install the Muhimbi PDF Converter for SharePoint.
-
Make sure you have the appropriate privileges to create workflows on a site collection.
-
Create a new workflow using SharePoint Designer.
-
Associate the workflow with the library of your choice, tick the boxes next to both ‘ Automatically start….’ options and proceed to the next screen.
-
Because we are running the workflow when PDF files are created as well as modified, a new Yes/No column named Secured will need to be added to the document library using a default value of No. This way we can mark a document as secured and stop workflows from recursively triggering. Alternatively, if files are secured in place, you can decide to just trigger the workflow when new files are added.
-
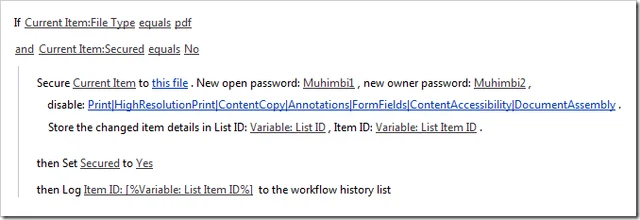
Design the workflow as per the following screen. In summary it does the following:
-
Check if the file is in PDF format. Otherwise security cannot be applied.
-
Check if the file has already been secured. If it has then it doesn’t need to be secured again.
-
The PDF File is secured in place. Both Open and Owner passwords are applied and all restrictions are set.
-
The file is marked as Secured so the workflow doesn’t repeatedly run.
-
A status message is written to the workflow history.
-
Publish the workflow and create / convert / upload a new PDF file in the Document Library. After a few seconds the workflow column will change to Completed, indicating that the file has been secured successfully.

Clavin is a Microsoft Business Applications MVP who supports 1,000+ high-level enterprise customers with challenges related to PDF conversion in combination with SharePoint on-premises Office 365, Azure, Nintex, K2, and Power Platform mostly no-code solutions.


