InfoPath to PDF Conversion: Troubleshooting Guide
Table of contents

When we started the development cycle for version 3 of our PDF Converter for SharePoint(opens in a new tab), we decided to make ‘reliable InfoPath to PDF Conversion’ one of the main deliveries of the new version. There has been a lot of customer demand for it and well…. how difficult can it be…?
… pretty difficult it turned out. InfoPath is a complex product that is much more than a simple forms designer. It allows connectivity with external data sources such as SharePoint Lists and Web Services as well as forms to be hosted and filled out inside SharePoint using Forms Services.
With the release of version 3.0(opens in a new tab) I believe we have delivered a great product that has already been implemented by many of our customers. Deployment, however, may require some planning depending on your environment and settings. This article provides an architectural overview of how we deal with InfoPath to PDF conversion and provides some helpful pointers to troubleshoot InfoPath conversion in your environment.
PDF Converter Architecture
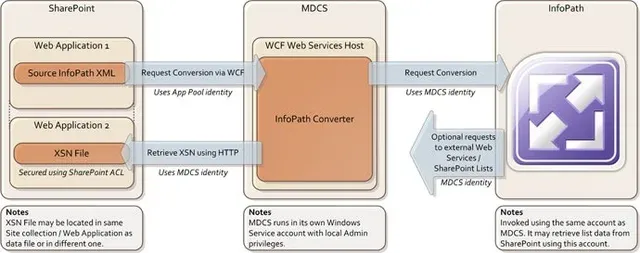
The architecture behind the PDF converter is relatively straight forward. There are 2 main components:
- SharePoint Front End: A SharePoint WSP solution that is deployed to all Web Front End Servers. This contains all SharePoint related logic including end user screens as well as Central Administration screens and Workflow Actions. The Front End doesn’t carry out any conversion, instead it offloads all conversion to the Muhimbi Document Converter Windows Service.
- Muhimbi Document Converter Windows Service (MDCS): A Windows service which can be hosted on the actual Web Front End server or on a completely separate (virtual) machine. This service accepts conversion requests via WCF Web Service calls from the SharePoint server and carries out the actual conversion.

Although the following is a simplification, when MDCS receives a request for conversion of an InfoPath form it carries out the following steps:
- Load the XSN file that is associated with the InfoPath data file.
- Pass the InfoPath data and XSN files to InfoPath for conversion.
- Depending on the complexity of the form, InfoPath may make requests to external data sources such as SharePoint Lists or Web Services.
Step #1 may fail for a number of reasons, most notably:
- The XSN file is not in the expected location. This may happen when the InfoPath data file is copied from a completely different environment. Many users don’t realise that without the XSN file an InfoPath data file does not know how to visually represent itself.
- The service account that MDCS is running under does not have the privileges to load the XSN file from SharePoint.
- A 401 (Access Denied) error is logged as the service is not allowed to connect to the specified hostname due to loopback checking. To disable loopback checking see this post.
- A 401 (Access denied) error is logged as integrated Windows Authentication is not enabled on the application pool used by the Web Application.
Step #2 may fail for different reasons, for example:
- InfoPath is not installed on the machine that hosts MDCS.
- MDCS is running using an account that does not have local Administration rights.
- InfoPath has never been launched by the MDCS Service account using an interactive session.
- The XSN file and data sources are hosted at locations that are not ‘trusted’.
Troubleshooting steps
The Administration Guide(opens in a new tab) that ships with the product contains a comprehensive troubleshooting section. A separate Troubleshooting Guide is available as well. The main points are repeated below.
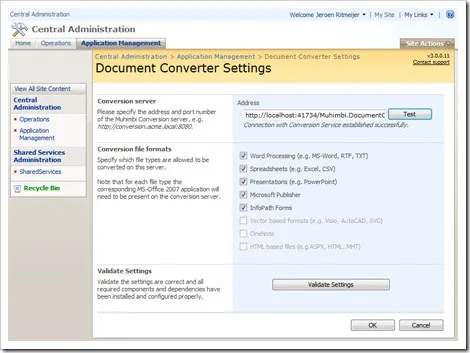
Connectivity test: The first test to carry out is to verify connectivity and authentication between SharePoint and the Document Converter Service. Navigate to Central Admin / Application Management / Muhimbi Document Converter Settings, verify the Address of the Web Service and click the Test Button.

Validate Converters: Once the connectivity and authentication test has completed successfully, select the converters to validate and click the Validate Settings button. The result of the test are displayed underneath the button. If any of the converters failed then the Windows Application Event Log will contain additional details.
Printer Spooler & Drivers: InfoPath requires the Printer Spooler service to be started as well as a single printer driver to be installed. Although in general it doesn’t matter which driver is installed, some drivers such as VMWare’s Virtual Printer or the OneNote printer will cause problems. Windows Server 2003 R2 and Windows Server 2008 automatically install the XPS Document Writer driver and the Muhimbi Service installer attempts to start the Spooler Service. Unless you have taken specific actions to disable the Spooler Service and removed all printer drivers, all should work as expected. Note that printers connected via a remote desktop session do not count as they disappear after the session is disconnected.
If you are experiencing problems then please double check that the local XPS Document Writer is the default printer.
Service Packs: Please make sure the latest Office Service packs have been installed. At the time of writing SP2 is available for Office 2007. The version number as well as Service Pack level can be found in InfoPath under the Help / About Microsoft Office InfoPath menu.
Check the form works: Perhaps obvious, but make sure the form itself opens in InfoPath without errors or warnings.
Check Trust settings: When an InfoPath document containing external connections, e.g. a dropdown list with the contents of a SharePoint list, fails to convert then this may be caused by the location of the XSN file not being trusted or the Access data sources across domains setting not being enabled for the trusted site. You may need to disable / uninstall Internet Explorer Enhanced Security Configuration as well.
Full details about how to check these settings can be found in section 3.5.8 of the Administration Guide(opens in a new tab).
Verify access to XSN file: If the log files contain messages listing ‘Access denied’, ‘Unauthorized’ or ‘401’ related errors then MDCS was unable to retrieve the XSN file. Make sure the MDCS Service account can access the XSN file using the following steps:
- Open the InfoPath XML data file in notepad and retrieve the address of the XSN file from the first line.
- Log-in interactively using the MDCS Service Account.
- Try to open the XSN file in a web browser.
If these steps don’t make it clear what the problem is behind the Access Denied messages then it is worth checking the following:
- Check the privileges on the XSN file. The MDCS account requires Read Access. You may want to consider applying Web Application wide Read Access for this account using a SharePoint Policy (https://<your_central_admin/_admin/policy.aspx)
- Are there any proxy settings defined? You probably want MDCS to bypass any proxies.
- Are there any hints in the IIS log file about the reason why access to the XSN file is denied?
Check automatic log-on settings: When an InfoPath form contains references to external sources, e.g. images in SharePoint libraries or external data connections, then you have to make sure that InfoPath carries out an automatic log-on when accessing those resources. InfoPath uses the Internet Explorer Security settings for this so configure these settings as follows.
Log-in to the Windows Desktop of the Conversion Server using the account the Conversion Service runs under. Open Internet Explorer / Internet Options / Security tab. Then select the security zone for the domain where the images are stored / data connections are made to. If this isn't already configured then add this domain to the 'Local Intranet' or 'Trusted Sites' zone. With the relevant zone selected click 'Custom Level' and scroll all the way till the end. Once there, set 'Logon' to any of the 'Automatic' options.
These setting can (and should) be configured using a Group Policy in production environments by your network administrator.
Windows Event Log: If all else fails, look in the Windows Application Event log for all messages with Event ID 41734.
InfoPath Offline mode: Make sure that InfoPath is not running in offline mode. Log in using the account the service is running under, open an InfoPath form and check the setting in the File menu.
Ink Controls: When using Ink Controls, for example to capture signatures on InfoPath forms, then please make sure the Ink controls are installed on the machine(s) that run the Muhimbi Conversion Service. For example, in Windows Server 2008 these controls are installed as part of the “Ink & Handwriting features”, part of the “Desktop Experience” Windows Feature.
IE ESC: Please make sure that Internet Explorer Enhanced Security Configuration is disabled(opens in a new tab) for the account used by the MDCS.
People pickers: When experiencing problems converting forms that contain people-pickers then Internet Explorer may be configured to block (or prompt for) all ActiveX controls for the Internet Zone. As a solution log in as the account the conversion service runs under (or use a group policy) and make sure the following settings are configured for the relevant zones:
* Run ActiveX controls and plug-ins: Enable
* Automatic prompting for ActiveX control: Disable
MDCS Trace Log: MDCS uses the industry standard log4net framework to write logging and trace data to a log file. Out-of-the-box information is logged to the DocumentConverter.log file stored in the directory MDCS has been installed in. A new file is created for each day and the default logging level is set to ‘INFO’. To increase the log detail, open the config file in the MDCS root directory, search for the <root> element, change the log level to DEBUG and restart MDCS using the following commands:
Net stop "Muhimbi Document Converter Service"
Net start "Muhimbi Document Converter Service"
Disable Delete Test: If none of the options mentioned above resolve the problem then please carry out the ‘DisableDelete’ Test, which will most likely highlight the source of the problem.
If none of the guidance provided in this posting or in the Administration Guide has resolved your particular problem then please contact us(opens in a new tab) directly.


