Effective customer management is essential for seamless business operations. Whether you’re onboarding a new customer or managing service adjustments, streamlined workflows play an important role in ensuring efficiency and accuracy.
This blog shows how to register a new customer or update an existing one in Microsoft Dynamics 365 Business Central, capture key customer details, and process inbound requests for service changes.
Use case
This post focuses on:
-
Adding/updating customer information — Capturing essential details when initiating a relationship with a new customer, or updating existing details.
-
Request management — Processing inbound requests using Nutrient Workflow Automation Platform, including changing engagement terms or canceling services.
To watch a video tutorial, see below.
Workflow overview for request management
The following image shows an example of how a workflow might look.

The following steps are necessary:
-
Capturing input — Gathering essential customer information using the For a selected record (V3) step in Power Automate.
-
Retrieving a record — Extracting existing customer details from the Dynamics 365 Business Central database.
-
Reviewing a workflow — Reviewing the data and approving or denying it.
Connecting Business Central with Nutrient using Power Automate
To learn how to connect Business Central with Nutrient’s Workflow Automation Platform using Power Automate, read on.
Prerequisites
-
A Power Automate subscription with access to a premium license.
-
Access to the Nutrient custom connector (request access here).
-
Basic knowledge of Power Automate and appropriate permissions to create workflows from Business Central.
Power Automate solution
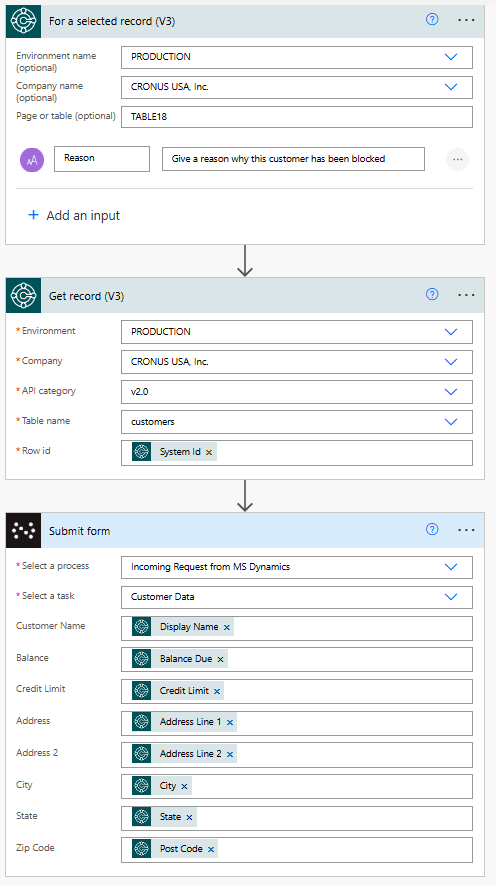
From a high level, our Power Automate solution is similar to what the screenshot below shows.

For a selected record (V3)
The first action begins in Microsoft Dynamics 365 Business Central, where users select a record to input reasons for the customer registration or change.
Get record (V3)
This connector retrieves the necessary fields, including the customer’s balance, credit limit, and address. These details populate a submission form for processing. You’ll need to select the following:
-
Environment — Production
-
Company — CRONUS USA, Inc.
-
Table name — customers
Submit form
This is where the real magic happens. Use the custom connector to submit the collected details to Nutrient for approval.
-
Select a process — The workflow selected is Incoming Request from MS Dynamics.
-
Select a task — The task type is Customer Data.
-
Customer Name — Maps to the Display Name field output of the Get record (V3) action.
-
Balance — Captures the customer’s Balance Due field output of the Get record (V3) action.
-
Credit Limit — Displays the customer’s Credit Limit output of the Get record (V3) action.
-
Address — Includes the Address Line 1 and Address Line 2 output of the Get record (V3) action.
-
City, State, and Zip Code — Collects the customer’s location details output of the Get record (V3) action.
Conclusion
After you’ve created a new customer or updated an existing one, trigger the Power Automate workflow. This will seamlessly initiate a workflow process in Nutrient, effectively automating the business process for improved efficiency and accuracy.

Clavin is a Microsoft Business Applications MVP who supports 1,000+ high-level enterprise customers with challenges related to PDF conversion in combination with SharePoint on-premises Office 365, Azure, Nintex, K2, and Power Platform mostly no-code solutions.

