Convert HTML to PDF in SharePoint

In this guide you’ll learn how to convert HTML / website content to PDF in SharePoint. This guide is commonly used to convert SharePoint pages such as Wikis, publishing pages, Nintex Forms, and the ‘properties page’ for Lists and Document Library items to PDF. This guide can be used in SharePoint Online or On-premises deployments.

Note: If you are using our Document Converter before release 8.3, you may find that particularly HTML5 pages (e.g. SP2013 and later) are rendered as bitmaps and ‘overflow CSS’ elements are cut-off. For optimum results please use release 8.3 or higher.

The key HTML to PDF converter features include:

  1. Brand new conversion engine with support for JavaScript, CSS and HTML5.

  2. Support for Print and Screen CSS media types to optimize output for Print / PDF Conversion.

  3. Available to all client technology including Nintex Workflow, Nintex Forms, SharePoint Designer, Flow, Logic Apps, REST & Web Services API as well as the SharePoint User interface.

  4. Enabled by default, with the option to switch back to the legacy HTML Converter using our API or config file.

  5. The MSG and EML Converter uses the new engine by default for HTML based emails.

  6. Support for converting SharePoint Online URLs.

  7. Improved error reporting, including authentication related issues.

  8. Control conversion delay between initially loading the page, including JavaScript rendering, and starting the actual PDF Conversion process.

  9. Modify the ‘View Port’ size to allow responsive web content to output the appropriate version (e.g. mobile or desktop version).

Some Caveats

Please keep in mind that HTML is not the best format for print or PDF Conversion purposes. Although our new HTML Converter is much improved, there can still be certain situations where the output is not very well optimized . Depending on your exact needs or system settings you may need to experiment with the various settings.

We recommend you to take into account the following:

  1. When converting MS SharePoint content, it is recommended to disabled the ‘Minimal Download Strategy’ SharePoint Feature as it interrupts the conversion process. Please refer to this article for details. If this is not an option, then set the conversion delay to 1000 (milliseconds).

  2. The Conversion Services will need to authenticate against the page you are looking to convert. The HTML Converter fits in with Windows’ standard security model, so you may need to tweak the server’s internet settings as per this Knowledge Base article. Naturally you have to make sure that the account the Conversion Service runs under has the appropriate privileges to read the page that is being converted.

  3. Modern web based content is very complex and it is no longer a couple of HTML elements that make up the design of a page. External JavaScript is loaded, as is third party content in iframes, part of the page is rendered by JavaScript, CSS modifies the look and feel of the page depending on the media type. So, this means that there is no clear point in time for our Converter to start the conversion process. Our software tries to make the most of it though, and in many cases succeeds using the default settings. For those situations where HTML content is converted too early (e.g. a ‘please wait, loading’ or similar message is displayed in the converted file) it is possible to tweak the Conversion Delay setting.

  4. The converter has no knowledge of the current user’s browser session. If the user has modified the page (e.g. collapsed / opened certain sections) or has made changes to the page without saving, then the converter will not reflect those changes. When converting HTML to PDF, the Converter requests the specified URL from scratch using the credentials of the account the Conversion Service runs under.

If you have any questions or comments, please feel free to contact our friendly support desk.

Setup Automatic PDF Conversion Using SharePoint Designer Workflow

In this example, you will generate a PDF file whenever the Tasks list is modified. The generated PDF file is stored in the Shared Documents library. You can create the workflow as follows:

  1. Make sure you have the appropriate privileges to create workflows on a site collection.

  2. Create a new workflow using SharePoint Designer.

  3. On the Workflow definition screen, associate the workflow with the Tasks list, tick the boxes next to both ‘Automatically start’ options, and proceed to the next screen.

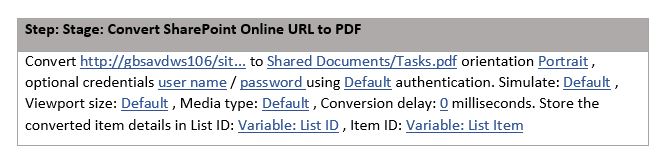
  4. Add ‘Convert HTML to PDF’ action and click ‘this url’ and enter the URL to the page that was created in the previous step.
    e.g. http://gbsavdws106/sites/Demo2019/SitePages/SalesTaskList.aspx

  5. Click ‘this file’ and enter the path and file name where the PDF file will be generated, e.g. Shared Documents/Tasks.pdf.

  6. Optionally, change the generated page’s orientation from Portrait to Landscape.

  7. The username and password are optional. By default, the credentials that the Muhimbi Conversion Service runs under will be used to open the web page. You can leave it empty.

  8. Click the Publish button to deploy and activate the workflow.

activate workflow

You can enter one or more tasks to test. You will observe that every time a task is added or updated a PDF file is written to the Shared Documents/Tasks.pdf location. You can open the PDF file to check the results.

shared documents

In summary, this HTML conversion capability (available in newer versions) opens up many possibilities. As always, upgrades are completely free, so please upgrade and use all the available features.

Convert List Item Including All Attachments to PDF

The Document Converter for MS SharePoint provides first-class support for converting (and/or merging) files stored in Document or Form Libraries. However, if you want to convert a list item, including all attachments, into a single PDF, then you have to do a little work.

The key to combining the list item and attachments in Document Converter is the Merge Workflow Activity, which accepts a mix of URLs (to convert the HTML of the List Item View to PDF) and paths to attachments. For example, the following two lines convert the list item and an attachment.

http://SomeWebApp/sites/SomeSiteCollection/Lists/SomeList/DispForm.aspx?ID=3

/sites/SomeSiteCollection/Lists/SomeList/Attachments/3/somefile.xxx

It is pretty simple to generate the fully qualified URL to the List Item, which is just a matter of requesting the current item’s ID and concatenating it to the URL of the list’s DispForm.aspx. However, retrieving the URLs to the attachments is a different matter as they all go into a generic ‘attachments bin’ for which file names cannot be queried from a SharePoint Designer workflow.

You have several options to overcome this challenge of querying the list attachments. Some of these are given below for your reference:

  1. Use JavaScript

  2. Use Nintex Workflow to extract the attachment paths. Our software ships with Nintex Workflow compatible workflow activities. For more information, refer to How can I use the Document Converter in combination with Nintex workflow?. For more information on how to retrieve list of attachments, refer to Practical Nintex Forms to PDF Conversion using the Document Converter for SharePoint (muhimbi.com)

    Note: You need version 7.2.1 of the Document Converter, or newer, to merge List Item attachments.

If none of the above options suit your particular scenario, you can always use our API from your own custom code. For details about merging files from your own code refer to How can I merge files from my own source code? – Muhimbi

Converting HTML pages in MS SharePoint to PDF

When the Muhimbi.PDFConverter.ConvertWebPage.Site feature is enabled on a site collection then an option to convert the current web page to PDF format is automatically added to the Personal Actions menu.

convert html to pdf

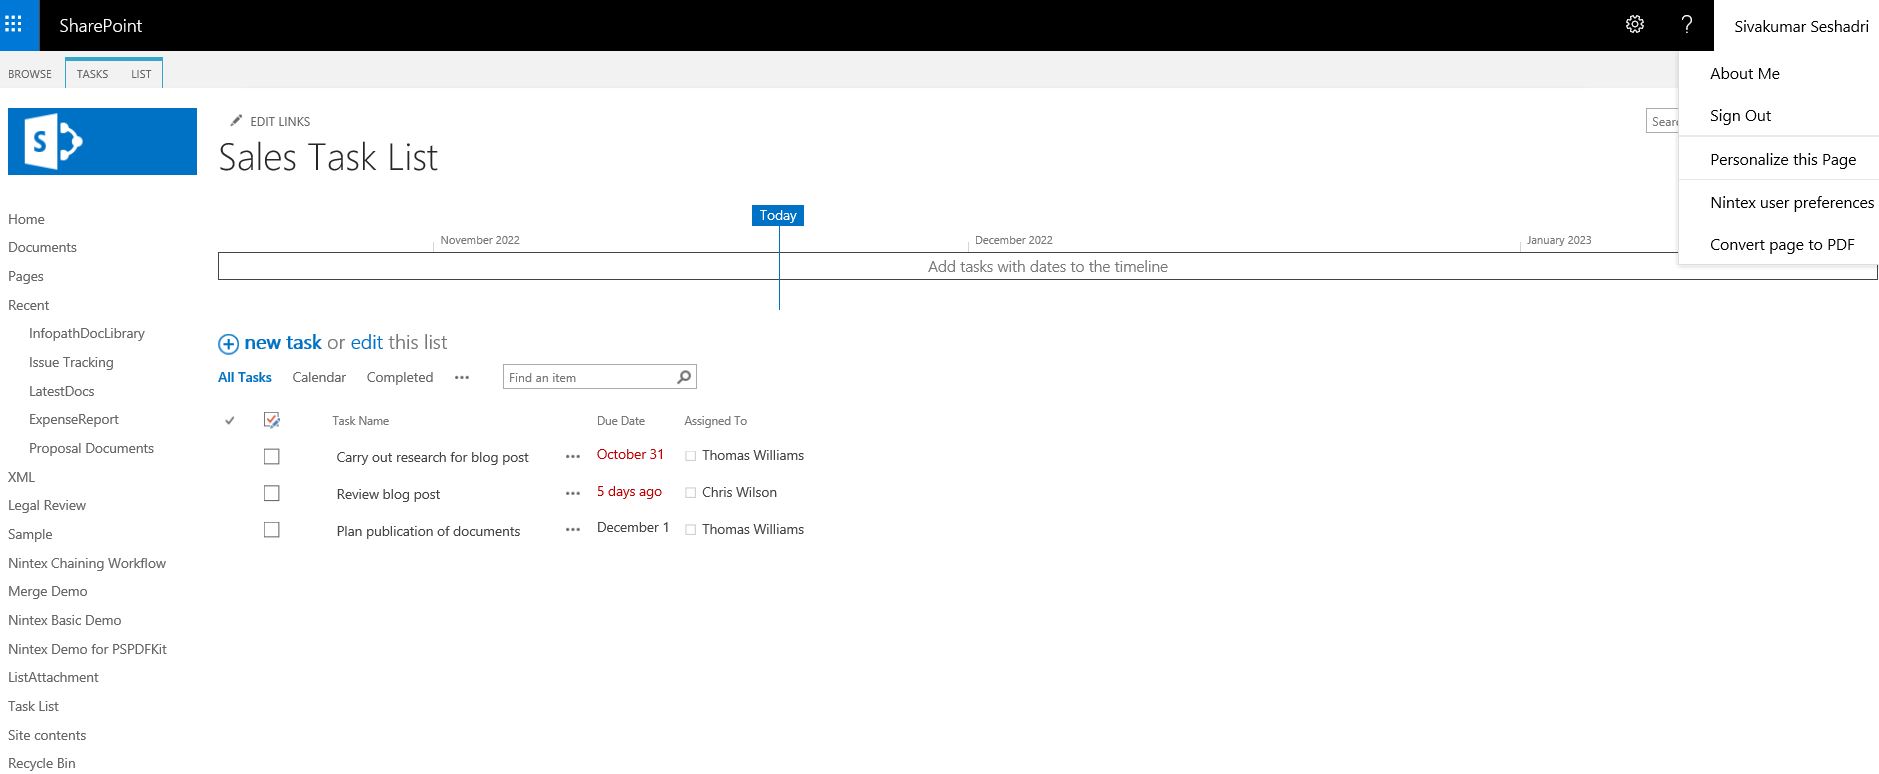
Select this option to convert the current page and download it as a PDF file. This is perfect for quickly saving a list or web page as a PDF file.

The default page size, orientation, margin, scale mode and many other settings can be tweaked in the service’s config file. For details see HTML Specific switches in the Administration Guide, subsection Tuning the Document Conversion Settings.

Additional Resources

Troubleshooting

Blog Articles

In this guide you’ll learn how to convert HTML fragments or web pages to PDF using a SharePoint Designer Workflow. In this specific example we show you how to convert a SharePoint list to a PDF format but this workflow can be used to convert any Web Page to a PDF File. This guide can be used in SharePoint Online or On-premises deployments.

One additional consideration when converting a list to PDF is whether to display the SharePoint UI in your document once it has been converted. If you prefer converting your list to a PDF without the quick launch menu start we’ve outlined steps to follow below.

Creating MS SharePoint Pages Without Quick Launch

To create a new page without the Quick Launch menu follow these steps:

  1. Navigate to the All Site Content screen and click gear icon and click Add a page.

  2. Enter the Title and add a List Web Part, and add a List - Expense Report

  3. On the newly created page click Add a Web Part and add the Expense Report List.

  4. Before adding the list in the page, please ensure you select the columns you want to be included in the PDF file by navigating to the List Settings in the List. For example Title, Expense Details, Attachments, Created and Created By..

  5. Under the Item Limit section set the limit to an appropriately large number. We don’t want to page through the data in batches as we want to include all items in the PDF file.

  6. Click Save button to save the changes and Publish button to publish your changes.

  7. Save the page’s URL as we need it later. E.g.
    http://gbsavdws106/sites/Demo2019/SitePages/Expense-Report.aspx

This new page will be used as the underlying layout of the PDF document. Feel free to modify it further in SharePoint designer / JQuery and remove more parts of the SharePoint user interface. You could also consider creating a minimalistic master page and applying that to the new PDFTasks page.

html to pdf designer workflow

Creating Automatic Conversion in MS SharePoint Designer

With the page in place the next thing we need to do is set up the automatic PDF Conversion using a SharePoint Designer workflow. In this example we generate a PDF file whenever the Expense Report List is modified. The generated PDF file is stored in the Shared Documents library. You can create the workflow as follows:

  1. Make sure you have the appropriate privileges to create workflows on a site collection.

  2. Create a new workflow using MS SharePoint Designer.

  3. On the Workflow definition screen, associate the workflow with the Expenses Report List, and tick the boxes next to both ‘Automatically start….’ options and proceed to the next screen.

  4. Add the Convert HTML to PDF action and click “this url” and enter the URL to the page that was created in a previous step, e.g.
    http://gbsavdws106/sites/Demo2019/SitePages/Expense-Report.aspx

  5. Click “this file” and enter the path and file name where the PDF file will be generated, e.g. Shared Documents/Expenses.pdf.

  6. Optionally, change the generated page’s orientation from “Portrait” to “Landscape”.

  7. The username and passwords are optional. By default, the credentials the Muhimbi Conversion Service runs under will be used to open the web page. For now, leave it empty.

  8. Click Publish button to activate the workflow.

    publish workflow

As a test, enter one or more items in the List. Every time an item is added or updated a PDF file is generated and written to Shared Documents/Expenses.pdf. You can access and open the PDF file to see the results.

In summary, the HTML conversion capability of the new version opens up a whole array of new possibilities. As always, upgrades are completely free, and please feel free to upgrade your converter to the latest version to enjoy all the conversion features.

Information

We recently released the Muhimbi Document Converter Xtension for Nintex Automation Cloud. You can download it here or learn more about available Muhimbi deployments for Nintex on our product page.

In this guide you’ll learn how to convert HTML / website content to PDF using a Nintex Workflow. This guide is commonly used to convert pages such as Wikis, publishing pages, Nintex Forms, and the ‘properties page’ for Lists and Document Library items to PDF.

Note: If you are using our Document Converter before release 8.3, you may find that particularly HTML5 pages (e.g. SP2013 and later) are rendered as bitmaps and ‘overflow CSS’ elements are cut-off. For optimum results please use release 8.3 or higher. I’ts also important to note using Nintex Workflows with SharePoint Online require a more complex process - see the Nintext for Office 365 blog post for addition details.

The key features of Document Converter 8.3 release are as follows:

  1. Brand new conversion engine with support for JavaScript, CSS and HTML5.

  2. Support for Print and Screen CSS media types to optimize output for Print / PDF Conversion.

  3. Available to all client technology including Nintex Workflow, Nintex Forms, SharePoint Designer, Flow, Logic Apps, REST & Web Services API as well as the SharePoint User interface.

  4. Enabled by default, with the option to switch back to the legacy HTML Converter using our API or config file.

  5. The MSG and EML Converter uses the new engine by default for HTML based emails.

  6. Support for converting SharePoint Online URLs.

  7. Improved error reporting, including authentication related issues.

  8. Control conversion delay between initially loading the page, including JavaScript rendering, and starting the actual PDF Conversion process.

  9. Modify the ‘View Port’ size to allow responsive web content to output the appropriate version (e.g. mobile or desktop version).

Some Caveats

Please keep in mind that HTML is not the best format for print or PDF Conversion purposes. Although our new HTML Converter is much improved, there can still be certain situations where the output is not very well optimized . Depending on your exact needs or system settings you may need to experiment with the various settings.

We recommend you to take into account the following:

  1. When converting MS SharePoint content, it is recommended to disabled the ‘Minimal Download Strategy’ SharePoint Feature as it interrupts the conversion process. Please refer to this article for details. If this is not an option, then set the conversion delay to 1000 (milliseconds).

  2. The Conversion Services will need to authenticate against the page you are looking to convert. The HTML Converter fits in with Windows’ standard security model, so you may need to tweak the server’s internet settings as per this Knowledge Base article. Naturally you have to make sure that the account the Conversion Service runs under has the appropriate privileges to read the page that is being converted.

  3. Modern web based content is very complex and it is no longer a couple of HTML elements that make up the design of a page. External JavaScript is loaded, as is third party content in iframes, part of the page is rendered by JavaScript, CSS modifies the look and feel of the page depending on the media type. So, this means that there is no clear point in time for our Converter to start the conversion process. Our software tries to make the most of it though, and in many cases succeeds using the default settings. For those situations where HTML content is converted too early (e.g. a ‘please wait, loading’ or similar message is displayed in the converted file) it is possible to tweak the Conversion Delay setting.

  4. The converter has no knowledge of the current user’s browser session. If the user has modified the page (e.g. collapsed / opened certain sections) or has made changes to the page without saving, then the converter will not reflect those changes. When converting HTML to PDF, the Converter requests the specified URL from scratch using the credentials of the account the Conversion Service runs under.

If you have any questions or comments, please feel free to contact our friendly support desk.

Convert URL or HTML to PDF Action in Nintex Workflow

Similar to all other Nintex Activities provided by Muhimbi, the HTML to PDF Conversion activity integrates with Nintex Workflow at a deep level. It supports SharePoint 2007-2019, allows errors to be handled and also supports integration with Nintex’ iterators to deal with multiple items and loops.

A screenshot of Convert URL or HTML to PDF action has been given below.

convert html to pdf action

The fields supported by this Workflow Activity are as follows:

  • Destination Path: Enter the path to write the converted file to, either:

    • A relative path to a subsite / document library / folder, e.g. Shared Documents/Some Folder/Some File.pdf.

    • An absolute path to a different site collection, e.g. /sites/Finance/ Shared Documents/Some Folder/Some File.pdf.
      Note: Always use forward slashes (‘/’) in path names.

  • Source URL / HTML: Either a fully qualified URL of the page to convert or an HTML fragment.

  • Page Orientation: Specify if you wish to use Portrait or Landscape for the generated PDF file.

  • Username: By default all pages are requested by the conversion service using the account the service is running under. If that account has no privileges on the requested URL then specify an alternative user name in this field.

  • Password: The password associated with the optional user name. Please note that any password entered here is displayed in clear text to allow field references to be added.

  • HTML Engine: Specify which HTML conversion engine to use. Chromium (the default on most modern systems) generally produces better results, especially with SharePoint 2013 and later, but for some rare scenarios the IE (Internet Explorer) or WebKit options may work better.

  • Authentication: By default the Muhimbi Document Converter attempts to authenticate using standard Web / HTTP / Windows authentication. However, in order to convert SharePoint Online pages, a different authentication type will need to be specified.

  • WebKit Viewport: Control the ‘virtual browser size’ to improve the rendering of responsive websites. (e.g. distinguish between mobile, tablet and desktop versions of a website)

  • Media Type: HTML is primarily aimed at displaying information on screen, not on paper. However, modern web pages - including SharePoint - use CSS to define a different look and feel for the screen and the printer. Providing the default ‘WebKit’ based HTML Converter is used, the converter can use Print optimized CSS (the default) or Screen optimized CSS. (The IE based converter always uses the ‘Screen’ option).

  • Conversion Delay: Modern web pages, including SharePoint 2013 and later, as well as SharePoint Online, use complex methods for rendering pages, often involving JavaScript. Under normal circumstances the Muhimbi Converter will convert HTML to PDF the moment the page has finished loading. However, you may want to add some milliseconds (a value of 1000 is 1 second) to allow all JavaScript to finish executing.

  • Output List ID: If you wish to carry out further actions on the generated PDF file, e.g. perform a check-in, then you can optionally write the ID of the List the PDF was written to in a workflow variable of type String.

  • Output List Item ID: Similarly to PDF List ID, the Item ID of the generated PDF file can optionally be written to a workflow variable of type Item ID (in SharePoint 2007) or Integer (in SharePoint 2010 and later versions).

  • Error Handling: Similar to the way some of Nintex’ own Workflow Activities allow errors to be captured and evaluated by subsequent actions, all of Muhimbi’s Workflow Activities allow the same. By default this facility is disabled meaning that any error terminates the workflow.

Setup Automatic PDF Conversion Using Nintex Workflow

In this simple example, a Nintex workflow retrieves the HTML file or a URL and converts it to PDF.

Note: You can customize this workflow to suit your organizational needs. The workflow example given below just has one step to demonstrate the HTML to PDF conversion. A more comprehensive example is beyond the scope of this article.

To create a new workflow, you can follow the instructions below.

create new workflow

The finished workflow

Prerequisites

Before we start building the workflow, ensure all prerequisites are in place. It is also assumed that the reader has some knowledge of building Workflows using Nintex Workflow.

  1. Make sure the Document Converter for SharePoint On-Premises version 4.1 (or newer) is installed in line with chapter two of the Administration Guide.

  2. Naturally, Nintex Workflow will need to be installed as well.

  3. Make sure the Muhimbi.PDFConverter.Nintex.WebApp SharePoint Feature is activated using SharePoint Central Administration on the relevant Web Application.

  4. You will need to have the appropriate privileges to create workflows.

Creating a new workflow

To get started, create a new workflow and choose the blank template. Ensure the workflow doesn’t start automatically.

Adding the workflow actions

You are now ready to add the action to the workflow.

You need to add the Convert URL or HTML to PDF action listed under the Muhimbi PDF section. You can fill this section as per the image below:

add workflow action

The Document Converter integrates with all Nintex Workflow versions.

If you leave the Destination Path empty, it will write the PDF File to the same location as the source file. For more information about the Destination Path or any of the other fields, hover the mouse over the small information icons.

The workflow is now done.

Running the workflow

You can finalize the workflow by saving and publishing it, after which the workflow is ready to be executed.

You can either run the workflow manually or schedule it to run at a specific time of your choice.
You can also use the output of one PDF Workflow Action as the input of the next Action.

Additional Resources