Convert to PDF using Nintex Workflow

In this guide, you’ll get step-by-step instructions for converting a wide variety of file types to PDF using the SharePoint user interface (UI). You’ll also learn how to convert an entire folder or document library to PDF in SharePoint. This guide can be used in SharePoint Online or on-premises deployments.

Converting a Single File

To convert a single file to PDF, follow these steps:

  1. Go to the document library and folder where the file is located.

  2. Select the file you want to convert.

  3. Open the context menu. Then click Convert to PDF.

    convert to pdf

  4. Review the Conversion Settings Page, and then click Convert.

    conversion settings

  5. Review the Conversion results page to check if the conversion was successful and without any errors.

    conversion results

  6. Click Destination Library to go to the converted PDF file’s directory.

    Note: When using the Document Converter with MS SharePoint 2010 or later, you can also convert the file by selecting it and choosing Convert to PDF in the ribbon.

Downloading a Single File

If Muhimbi.PDFConverter.ConvertAndDownload.Site Feature is enabled in a site collection, then the Download as PDF option is also added to both the MS SharePoint ribbon and the file context menu.

Download as PDF works very similar to the Convert to PDF option, except that it opens/downloads the PDF file on a local machine rather than saving it to MS SharePoint.

Converting an Entire Folder

To convert an entire folder to a PDF, follow these steps:

  1. Go to the document library that contains the folder to convert.

  2. Open the context menu. Then click Convert to PDF.

    convert to pdf

  3. The Conversion settings page will be displayed. You can review the settings and click Convert.

    conversion settings page

  4. The Conversion results page will be displayed. You can review the results on this page to check if the conversion was successful and without any errors.

    conversion results page

  5. Click Destination Library to navigate to the directory containing the converted PDF file(s).

    Note: When using the Document Converter with MS SharePoint 2010 or later, you can convert the file by selecting it and choosing Convert to PDF in the ribbon. The Download as PDF feature doesn’t work for folders.

Converting an Entire Document Library (MS SharePoint 2007)

This section is only valid for MS SharePoint 2007.

Although it’s possible to convert an entire document library (MS SharePoint 2007) in one go, it may take a long time to complete, or even time out, if the library contains many files. You’ll automatically receive a warning if many files are in the library.

You can convert an entire document library to PDF by performing the following steps:

  1. Navigate to the root folder of the document library to convert.

  2. Select Convert to PDF from the Actions menu.

    Note: This option is only available in MS SharePoint 2007.

    convert to pdf

  3. Specify if you want to convert subfolders as well.

  4. Review all the other settings and click Convert to start the conversion process.

  5. Verify the files have been converted without errors.

  6. Click Destination Library to navigate to the directory containing the converted PDF files.

    Note: If you’re using MS SharePoint 2010 or above, select all files and use the Convert to PDF option in the ribbon instead, as this option is only available in MS SharePoint 2007.

Saving the Converted File to a Different Location

By default, PDF files are saved to the same folder in which the source files are located. However, as discussed above, it’s possible to specify a different folder, document library, site, or even site collection to save the converted PDF files to.

To specify a different folder, open the PDF Conversion screen and select the destination folder. When the site is hosted on a SharePoint server rather than the free Foundation server, a user-friendly Browse button is available, allowing folders or sites to be selected within the current site collection.

destination folder
Browse for a destination folder (commercial versions of SharePoint only)

If the Browse button isn’t available or the destination folder is located in a different site collection, then you’ll need to enter the destination path manually. The format is as follows:

  1. A folder in the current site collection: Document Library Name/Folder path, e.g. Shared Documents/PDF Files

  2. A folder in the different site collection: Absolute path to Site Collection/Document Library Name/Folder path, e.g. /sites/Press Office/Shared Documents/PDF Files

Note: Don’t include http:// and the domain name in the absolute path. An absolute path always starts with /.

If the files are always written to the same directory, it may be a good idea to select Remember this path to automatically default to whatever custom path was last entered.

Note: These settings are remembered per user and stored at the site collection level.

Clearing the Remember this path checkbox will automatically forget the settings during future conversions.

Note: Document Sets can be used as a source as well as a destination for PDF conversion. They work exactly the same as folders.

Working with the Conversion Results Screen

The Conversion results screen contains functionality to simplify managing a large number of converted documents.

The following features are available:

  1. Filter by column — Click the column’s header to filter on and select the value to filter for. For example, select Error in the Status column to generate an overview of all files that caused an error during the conversion process.

  2. Sort by column — Click the header of a column to sort its contents either in ascending or descending order. For example, click the Source Path column to group all documents by folder.

    sort by column

  3. Jump to the destination folder — Click Destination Library to navigate to the folder to which the PDF file was written. This is particularly useful when a different destination folder has been specified during the conversion process.

  4. Page through results — A page is automatically displayed when you convert more than 100 files.

Next Steps

If you’d like to get started with Document Converter for SharePoint, we offer a free trial for both SharePoint Online and SharePoint on-premises deployments. We also provide free support to help you intergrate our solutions into your SharePoint environment. If you have any questions, please contact our Support team.

In this guide, you’ll learn how to convert different file types to PDF using SharePoint Designer workflows.

Muhimbi’s Document Converter for SharePoint comes with a number of workflow actions, including one you can use to convert documents as part of a workflow using MS SharePoint Designer. To get started, use the example below to create a simple workflow in MS SharePoint Designer, which converts a file to PDF format as soon as it has been approved.

The guide can be used for SharePoint Online, and the legacy MS SharePoint 2007/2010 workflow engine is fully supported, as is the optional Workflow Manager that comes with MS SharePoint 2013 and later versions. For more details, refer to this post.

Before you start, make sure that Document Converter for SharePoint has been installed and you have access to a site collection with the appropriate rights to create workflows.

To convert documents via a workflow using MS SharePoint Designer, you’’ll need to configure the document library and the workflow as outlined in the following sections.

Creating and Configuring the Document Library

You can create and configure the document library by performing the following steps:

  1. Create a document library named Proposal Documents. Alternatively, you can use any name of your choice.

  2. Once created, navigate to the library’s Settings > Document Library Settings > Versioning Settings screen and enable Requires content approval for submitted items.

  3. In the document library, create two folders: Confidential Proposals and Approved PDF Files. Alternatively, you can use any other names of your choice.

Creating and Configuring the MS SharePoint Designer Workflow

You can create and configure the MS SharePoint Designer workflow by performing the following steps:

  1. Start MS SharePoint Designer and open the site collection that contains the Proposal Documents document library.

  2. Click Add Item and select List Workflow. Specify the following settings:

    • Name for the workflow: Convert Approved documents to PDF Format.

    • Select the document library associated with the workflow: Proposal Documents list.

    • When creating a SharePoint Designer workflow in SharePoint 2013 or later, select the appropriate Platform Type.

      list workflow

  3. Click Create to proceed.

  4. From the Conditions menu, select the If value equals value condition.

  5. Click the first value, followed by the display data binding (fx) button.

  6. Select Current Item as the source and select Approval Status in the field. Then click OK to continue.

  7. Click the second value and select Approved from the list.

To avoid the same workflow being executed on the converted PDF file after the conversion has taken place, you need to specifically exclude PDF files as follows:

  1. Add another If value equals value condition.

  2. Click the first value, followed by the display data binding (fx) button.

  3. Select Current Item as the source and select File Type in the field. Then click OK to continue.

  4. Select equals and change it to not equals.

  5. Click the second value and enter PDF. (Don’t prefix the extension with a period.)

With the conditions in place, you can now add the actions.

  1. From the Actions menu, select Convert to PDF. It may be hidden behind the All Actions option.

  2. The following action is inserted: Convert ‘this document to ‘this url’ using ‘the same file name’ and ‘include / exclude meta data’. Store the converted item details in List ID: ‘Variable: List ID’, Item ID: ‘Variable: List Item ID’. Below is an overview of what the various options within the action mean:

    • this document — Specify which document to convert. Select the option and make sure Current Item is selected.

    • this url — Specify the location the converted file will be written to. The following options are available:

      1. Leave it empty — When no value is specified, then the converted document is written to the same folder as the source file.

      2. Site Relative URL — By specifying a URL relative to the current site, e.g. subsite/shared documents/PDF Files, any folder location in the current site collection can be targeted. This is the option you want to use, so enter Important Documents/Approved PDF Files.

      3. Web Application relative URL — By using a URL that’s relative to the entire web application — e.g. /sites/Press Office/Public Documents/To Distribute — any folder location in any site collection can be targeted.

    • the same file name — The name of the converted file can be specified here. Leave it empty to make sure you use the same name as the original document.

    • include / exclude meta data — In case of sensitive documents, you may want to strip any custom SharePoint columns from the file. Assuming that your document library contains a column Yearly sales forecast, you’ll want to select Exclude.

    • Variable: List ID — A new workflow variable named List ID is automatically created. After the file has been converted, this variable will contain the ID of the list the converted file was saved to. This can later be fed into another action to manipulate this file further.

    • Variable: List Item ID — A new workflow variable named List Item ID is automatically created. After the file has been converted, this variable will contain the ID of the item the converted file was saved to. This can later be fed into another action to manipulate this file further.

  3. Insert a new action named Log to History List and enter File converted.

  4. Insert a new action named Update List Item and select this list. You’ll now automatically mark the converted PDF file as approved.

    • From the List dropdown, select Confidential Proposals.

    • Click the Add button and set the field to Approval Status and the value to Approved. Click OK. Note: Starting with MS SharePoint 2010, it’s no longer possible to set the value of the Approved field.

    • In the Find the List Item area, set the field to ID.

    • Click the fx button next to Value, specify Workflow Variables and Parameters as the source, and set the field to Variable: List Item ID. Click OK.

    • Click OK again to return to the MS SharePoint Designer workflow. It will look like what’s shown in the image below.

      update list item

  5. Click Publish to deploy and activate the workflow.

Testing the Workflow

You can test the workflow created by performing the following steps:

  1. Create or upload a document in MS Word file format to the Confidential Proposals folder.

  2. From the context menu, select Approve / Reject and approve the file.

This will automatically start the workflow, and after a few seconds, the workflow status should change to Completed, as shown in the screenshot below.

approve or reject file

Once the workflow has completed, you’ll find the PDF version of the document in the Approved PDF Files folder.

approved pdf files

If an error occurs during the execution of the workflow, you can perform the following to troubleshoot:

  1. Check the messages on the workflow status screen.

  2. Check for errors in the Windows Event log.

  3. Check for errors in the SharePoint trace log.

Next Steps

If you’d like to get started with Document Converter for SharePoint, we offer a free trial for both SharePoint Online and SharePoint on-premises deployments. We also provide free support to help you intergrate our solutions into your SharePoint environment. If you have any questions, please contact our Support team.

Information

We recently released the Muhimbi Document Converter Xtension for Nintex Automation Cloud. You can download it here or learn more about available Muhimbi deployments for Nintex on our product page.

In this guide you’ll learn how to convert different file types to PDF using Nintex Workflows. The Muhimbi Document Converter for SharePoint On-Premises comes with comprehensive support for all Nintex Workflow versions (NW2007 – NW2019). Using Nintex Workflows with SharePoint Online require a more complex process - see the Nintext for Office 365 blog post for addition details.

In this example, a Nintex workflow retrieves all the files modified during the current day and converts them to PDF. In an ideal setup, you will schedule this workflow to run out of office hours to batch-process all new and modified files.

To create a new workflow, you can follow the instructions below or download the complete workflow in NWF format from the following link:

Nintex Workflow to retrieve and convert files to PDF

nintex workflow convert pdf

Prerequisites

Before we start building the workflow, ensure all prerequisites are in place. It is also assumed that the reader has some knowledge of building Workflows using Nintex Workflow.

  1. Make sure the Document Converter for SharePoint On-Premises version 4.1 (or newer) is installed in line with chapter two of the Administration Guide.

  2. Naturally, Nintex Workflow will need to be installed as well.

  3. Make sure the Muhimbi.PDFConverter.Nintex.WebApp SharePoint Feature is activated using SharePoint Central Administration on the relevant Web Application.

  4. You will need to have the appropriate privileges to create workflows.

Creating a new workflow

To get started, create a new workflow and choose the blank template. Ensure the workflow doesn’t start automatically, and add the workflow variables listed in the following screenshot.

add workflow variables

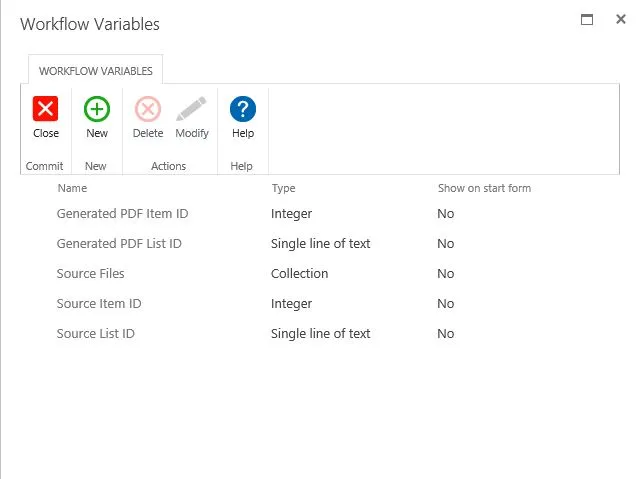
Ensure that the appropriate data types are assigned. They are listed under the ‘Type’ column beside each variable name. The names are largely self-explanatory, but some additional information is provided below:

  • Source Item ID: By default, the item that triggered the workflow is converted to PDF format. However, as we are iterating over multiple items, we need to specify the item’s ID to convert in this variable. In SharePoint 2010 and later, select Integer as the Type, not List Item ID.

  • Source List ID: The Document Converter assumes the item that is being converted is located in the same list the workflow is attached to. However, if this is not the case, then the list ID (a GUID) will need to be specified as well. In this example, everything is located in the same list, so this variable is not used.

  • Source Files: As we are potentially converting multiple files, we need to define a variable of type Collection to hold the list of files we will be iterating over.

  • Generated PDF Item ID: Once a file has been converted to PDF, you may want to carry out additional actions on this new file. For example, checking it in. Once converted, the ID of the PDF is automatically stored in this variable. In SharePoint 2010 and later select Integer as the Type, not List Item ID.

  • Generated PDF List ID: As the Document Converter allows files to be written to different document libraries, and even completely different Site Collections, you may want to know the ID of the destination list.

Adding the workflow actions

You are now ready to add the actions to the workflow. You can start by adding a Query List action, allowing you to retrieve all files modified today and store the results in the Source Files collection.

add query list

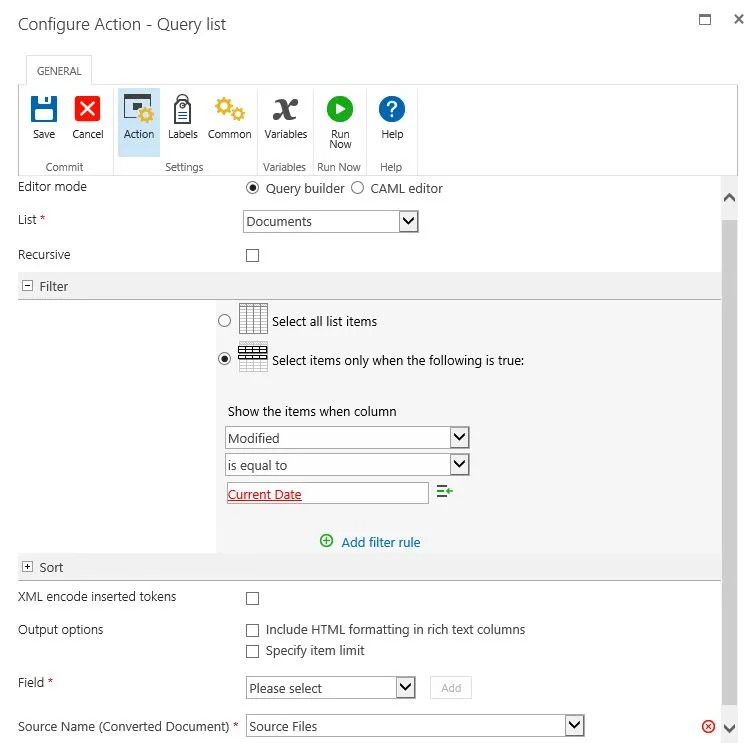
You can fill out the settings for this action as per the screenshot listed above. You may want to add an additional filter rule to check that Content Type is not equal to Folder or Document Set.

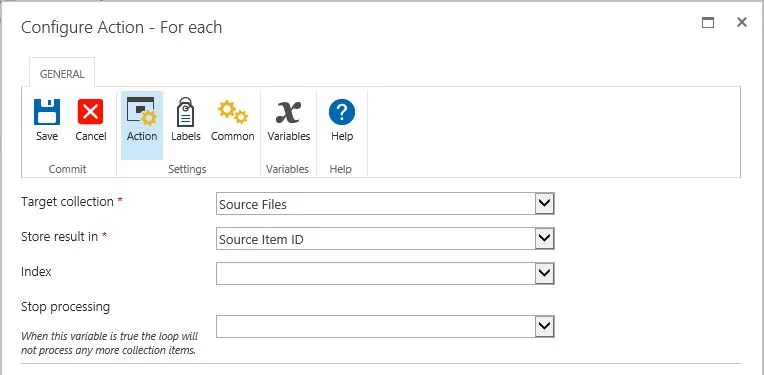
You can continue by adding the For Each action to the workflow. Specify the collection’s name to iterate over and the variable’s name to store the Item’s ID in.

configure action for each

The next set of actions you add will need to be added inside the For Each action to ensure they are executed separately for each file in the list.

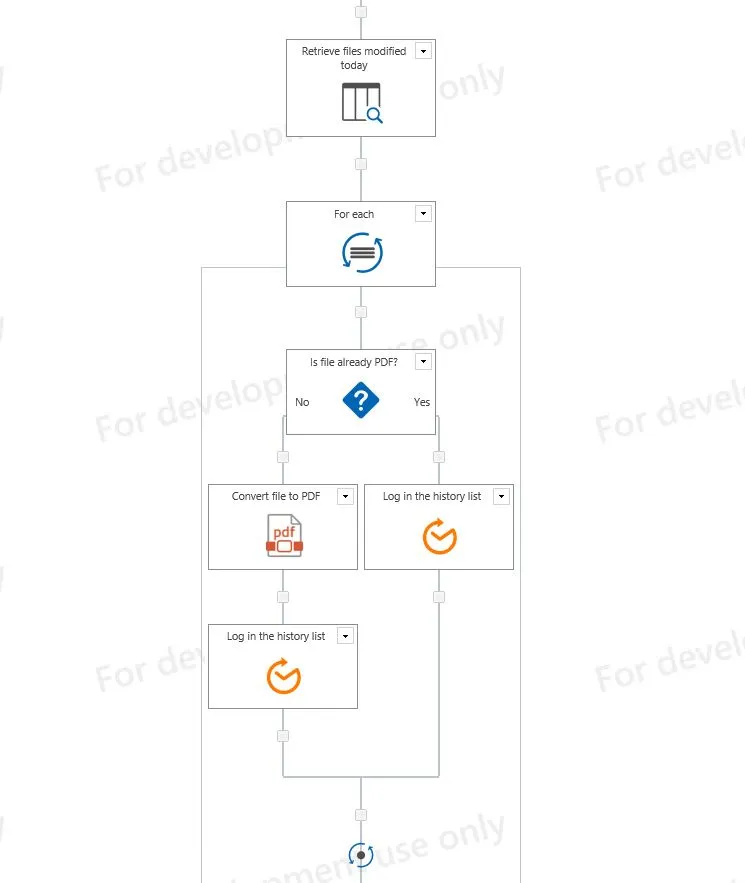
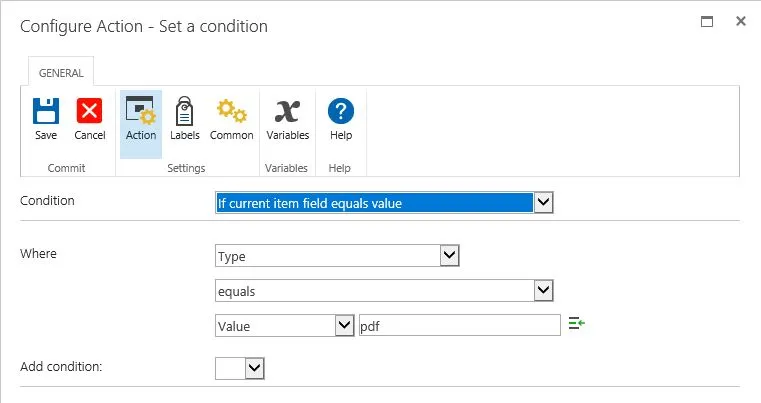
You need to ensure that the workflow only invokes the Document Converter for those files that are not already in PDF format. To achieve this, add a condition and check that the file type equals ‘pdf’ as per the following screenshot.
set condition in workflow

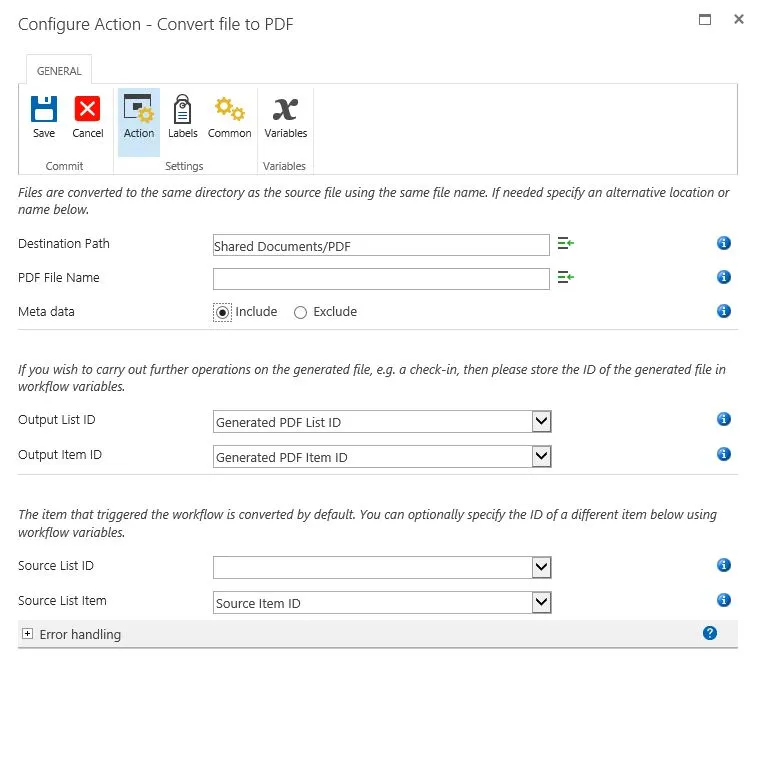
After this, you need to add the Convert file to PDF action listed under the Muhimbi PDF section to the No branch of the workflow condition (as we want this workflow to only convert those files that are not of type pdf). You can fill this section as per the image below:

convert file to pdf

The Document Converter integrates with all Nintex Workflow versions.

You may want to leave the Destination Path empty, which will write the PDF File to the same location as the source file. For more information about the Destination Path or any of the other fields, hover the mouse over the small information icons.

The workflow is now done. You may want to add some logging information using the Log In the History List action. In our example, we use the following two logging information:

  • Last action in the No branch:
    List ID: {WorkflowVariable:Generated PDF List ID} - List Item ID: {WorkflowVariable:Generated PDF Item ID}

  • Last action in the Yes branch:
    Already in PDF Format: {WorkflowVariable:Source Item ID}

Running the workflow

You can finalize the workflow by saving and publishing it, after which the workflow is ready to be executed.
You can either run the workflow manually or schedule it to run at a specific time of your choice.
For more information and an example on how to use the output of one PDF Workflow Action as the input of the next Action can be found in our blog Combining multiple Muhimbi PDF SharePoint Workflow Activities into a sequence.

Next steps

If you’d like to get started with Document Converter for SharePoint we offer a free trial for both SharePoint Online and SharePoint On-premise deployments. We also provide fre support to help you intergrate our solutions into your SharePoint environment. If you have any questions please contact our support team who will be happy to help.

Additional Resources