Merge Documents in SharePoint

In this guide you’ll learn how to combine and merge multiple files to PDF using the SharePoint UI. The guide covers two scenarios: merging an entire folder and merging a document library in SharePoint. It also provides instructions on how to save your merged files into a different location within SharePoint.

Merging an Entire Folder

You can merge files in an entire folder to PDF, by performing the following steps:

  1. Navigate to the Document Library that contains the files to merge..

  2. Open the context menu, and then click Convert to PDF.
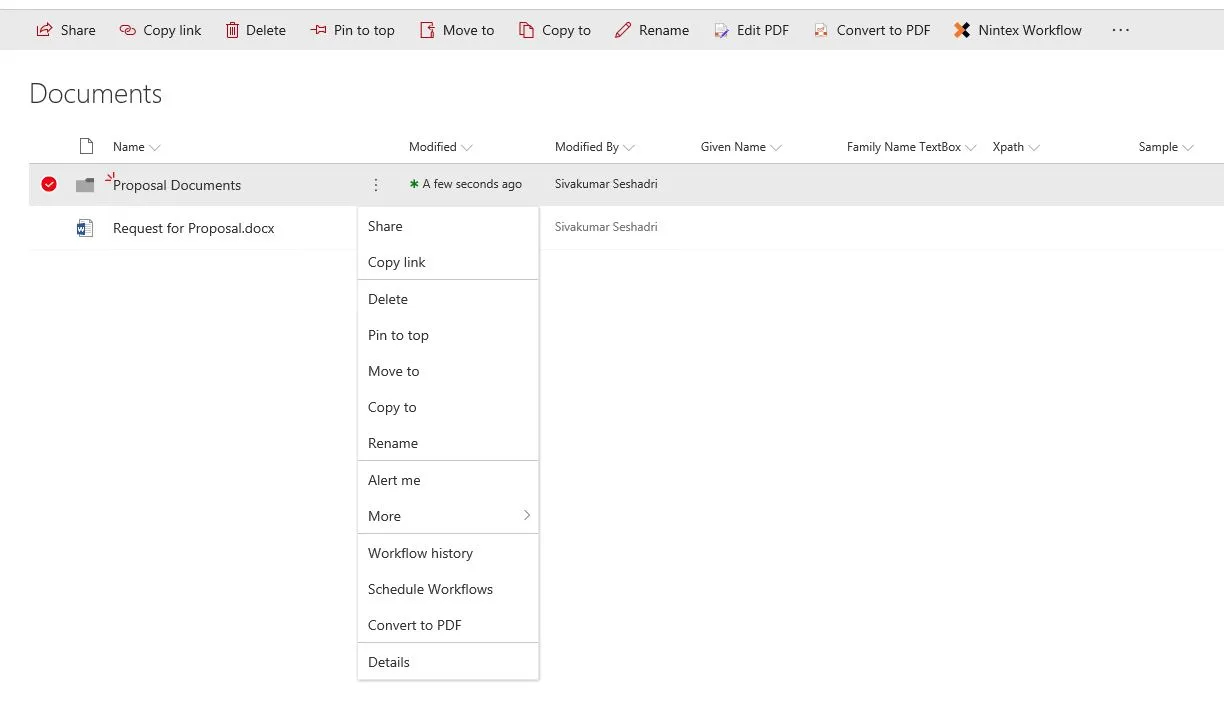
    convert to pdf

  3. Conversion Settings Page is displayed. You can review the merge order in this page and click Convert.

    conversion settings page

  4. Conversion results Page is displayed. You can review the results in this page to check if the merging has been successful and without any errors.
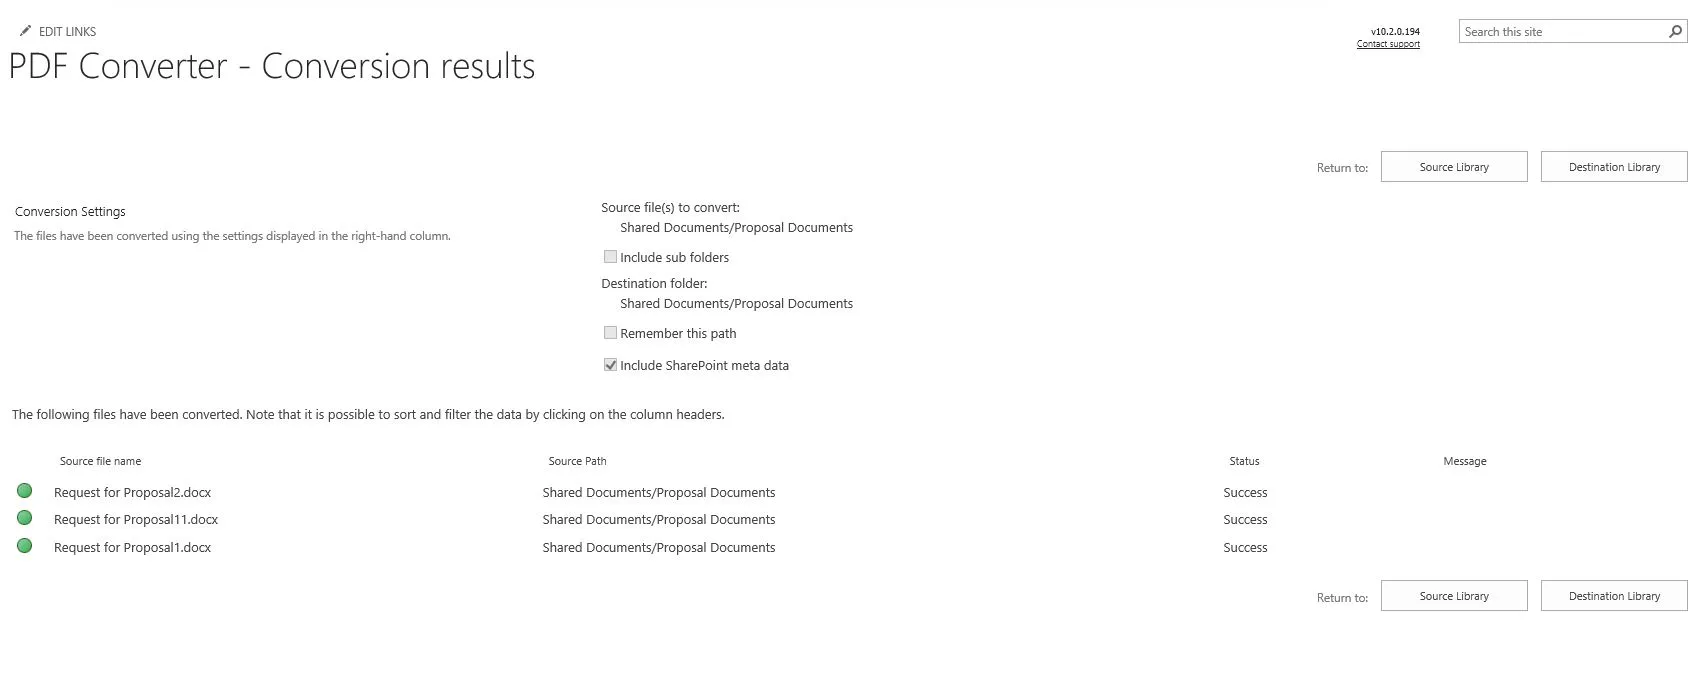
conversion results page

  1. Click Destination Library to navigate to the directory containing the merged PDF file(s).

    Note: When using the Document Converter with MS SharePoint 2010 (or later), you can merge the files by selecting it and selecting Convert to PDF in the Ribbon. The Download as PDF feature does not work for folders.

Merging an Entire Document Library (MS SharePoint 2007)

This section is only valid for MS SharePoint 2007.

Although it is possible to merge documents of an entire document library (MS SharePoint 2007) in one go, it may take a long time to complete, or even time out, if the library contains many files. You will automatically receive a warning if many files are in the library.

You can merge the files available in an entire Document Library to PDF by performing the following steps:

  1. Navigate to the root folder of the document library containing the file to merge.

  2. Select Convert to PDF from the Actions menu.

    Note: This option is only available in MS SharePoint 2007.

    convert to pdf

  3. Specify if you want to convert subfolders as well.

  4. Review all the other settings, especially the merge order and click Convert button to start the merging process.

  5. Verify the files have been merged without errors.

  6. Click Destination Library to navigate to the directory containing the merged PDF files.

    Note: If you are using MS SharePoint 2010 or above, select all files and use the Convert to PDF option in the Ribbon instead, as this option is only available in MS SharePoint 2007.

Saving the Merged File to a Different Location

By default, the merged PDF files are saved to the same folder in which the source files are located. However, as discussed above, it is possible to specify a different folder, document library, site, or even a different site collection to save the merged PDF files.

To specify a different folder, open the PDF Conversion screen and select the destination folder. When the site is hosted on a SharePoint server rather than the free Foundation server, a user-friendly Browse button is available, allowing folders or sites to be selected within the current site collection.
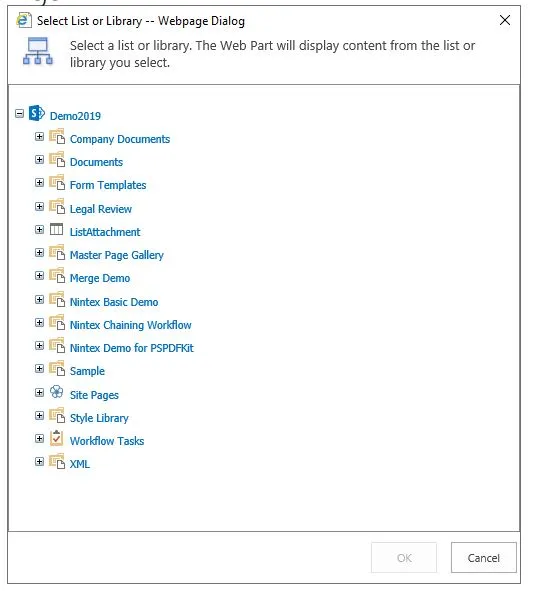
browse destination folder
Browse for a destination folder (Commercial versions of SharePoint only)

If the Browse button is not available or the destination folder is located in a different site collection, then you will need to enter the destination path manually. The format is as follows:

  1. A folder in the current site collection: Document Library Name/Folder path.
    E.g. – Shared Documents/PDF Files

  2. A folder in the different site collection: Absolute path to Site Collection/Document Library Name/Folder path.
    E.g. – /sites/Press Office/Shared Documents/PDF Files

Note: Do not include ‘http://’ and the domain name in the absolute path. An absolute path always starts with ‘/’.

If the files are always written to the same directory then it may be a good idea to select Remember this path to automatically default to whatever custom path was last entered.

Note: These settings are remembered per user and stored at the Site collection level.

Clearing the ‘Remember this path’ checkbox will automatically forget the settings during future conversions.

Note: Document Sets can be used as a source as well as a destination for PDF Conversion. They work exactly the same as folders.

Further operations such as applying watermarks andPDF security can be carried out as a post processing step using simple workflows.

Please note that the maximum number of files that can be merged is 200. You will automatically receive a warning message when this threshold is exceeded..

In this guide you’ll learn how to automatically combine and merge multiple files using SharePoint Designer Workflow. In this example, we use MS SharePoint Designer 2013, but it will not work in the legacy MS SharePoint Designer 2007 and 2010 versions.

Merge Document Workflow Activity

The following are the options provided by the Merge Document workflow activity:

merge document workflow activity

In typical Muhimbi fashion, the workflow sentence is consistent with our other Workflow Activities, and is largely self-describing.

  • these Documents: This field specifies the list of documents / URLs to merge (and convert if needed). Each file must be specified on a new line and each line may contains three ‘;’ separated values:

    • File Path: The path to the file to merge or URL of web page to convert. This may already be a PDF file. If this is not the case and the file format is supported by the converter, then it will be converted first. The path can be relative to the current site (e.g. Shared Documents/Some File.docx) or absolute (e.g. /sites/Finance/ Shared Documents/Some Folder/Some file.docx). SharePoint Designer Workflow Lookups are fully supported, which can be used to dynamically generate the path for the current file, e.g. [%Current Item:URL Path%].

    • Include Bookmarks: The source file may already include PDF Bookmarks, or may be able to generate such bookmarks as part of the conversion process. e.g. a MS Word document. Specify ‘true’ to copy these bookmarks to the merged PDF file, or ‘false’ to strip out any bookmarks. This value is optional.

    • Custom Bookmark value: The ‘this field’ parameter can be overridden using the third parameter. Specify the name of the ‘top level bookmark’ for the file, specify “” to remove the bookmark for this document or don’t specify anything at all to use the value stored in the column referenced by the ‘this field’ parameter.

  • this File: An optional filename (and path) to write the merged document to. When not specified, the same name as the document that triggered the workflow will be used with a ‘.pdf’ file extension.
    Note: Ensure the path does not include the host name, e.g. ‘http://your site/…’.

  • this Field: In a way similar to the User Interface for the merge facility, it is possible to specify a name of the column which contents will be used to populate the PDF Bookmark for the merged document. For example, specifying a name or title makes it very easy to jump between the various sections of the merged PDF file.

  • select start Page (Each Document): Control if empty pages are added between the documents to make sure each merged document always starts on the right-hand, or left-hand side when printing it double sided.

  • Variable: List ID: If you wish to carry out further actions on the generated PDF file, e.g. perform a check-in, then you can optionally write the ID of the List the PDF was written to in a workflow variable.

  • Variable: List Item ID: Similarly to List ID, the Item ID of the generated PDF file can optionally be written to a workflow variable.

Prerequisites

Before starting, please ensure the following prerequisites are met.

  1. Download and install the Muhimbi Document Converter for SharePoint.

  2. Make sure you have the appropriate privileges to create workflows on a site collection.

Building the Workflow

You can create the workflow as follows:

  1. Create a new workflow using MS SharePoint Designer.

  2. Associate the workflow with the library of your choice, and tick the boxes next to both ‘Automatically start….’ options and proceed to the next screen.

  3. Add the following local variables:

  • FileList (String): This variable stores the list of file Urls that are going to be merged into the pdf.

  • ResponseContent (Dictionary): This variable will store the response received from the web service.

  • responseCode (String): The response status (Ok/Failed) is returned from the web service call and stored in this variable.

  • RequestHeader (Dictionary): This will be used as a header for web service calls.

  • ListofServerRelativeUrls (String): This is used to temporarily store file urls and also used in the Loop.

  • CurrentServerRelativeUrls (String): This is used to store the current url and also used in the Loop.

  • Index (Integer): This is used to store the file count and used in the loop

  1. Add the ‘Set Workflow variable’ condition and set the Workflow variable ‘index’ value to ‘0’.

  2. Add the ‘Build Dictionary’ condition. Click ‘this’ and add the following Key/Value pairs:

    • Accept : application/json;odata=verbose

    • Content-Type : application/json;odata=verbose

Set ‘Output to’ variable to ‘RequestHeader’.

  1. Add the ‘Call HTTP Web Service’ action.Once this is inserted, select the line that contains the web service workflow action and click the ‘Properties’ button in the ribbon. Configure the Parameters with reference to details below:

e.g. https://tenantname.sharepoint.com/sites/sitecollectionname/_api/web/GetFolderByServerRelativeUrl(‘Libraryname&#8217/Files?$select=ServerRelativeUrl

Note:* The example above only fetches the ServerRelativeUrl property because we need file urls.

  • RequestHeaders: Set the “RequestHeader” workflow variable.

  • ResponseContent: Set the “ResponseContent” workflow variable.

  • ResponseStatusCode: Set the “responseCode” workflow variable.

  1. Add a ‘Log to History List’ action. Log ‘responseCode’ to the history list so that we know the status of the response.

  2. Add an ‘If any value equals value’ condition and set it to If ‘responseCode equals OK’. This checks for the web service response code and proceeds only when it is successful.

  3. When the ‘If condition’ evaluates to ‘True’:

  • Add ‘Get an Item from the Dictionary’ action. Click on the items by name or path link and type ‘d/results’, set the ‘from’ variable to the ‘ResponseContent’ workflow variable and Output it to the ‘FileList’ workflow variable.

  • Add ‘Count Items in Dictionary’ action. Click on the dictionary link and set the variable to the ‘FileList’ workflow variable and set the Output to variable ‘count’.

  • Add the ‘Log to History List’ action. Log ‘Count’ to the history list so that we know the total number of files we need to merge.

  1. Add the ‘Loop n times’ action.

  • Set ‘The Contents of this loop will run’ to ‘Variable: Count’.

  • Add the ‘Get an Item from the Dictionary’ action. Click on the ‘items by name or path’ link and type ‘d/results/([%Variable:index%])/ServerRelativeUrl‘, set the ‘from’ variable to the ‘ResponseContent’ workflow variable and Output it to the ‘Current ServerRelativeURL’ workflow variable.

  • Add the ‘Set Workflow Variable’ action and Set the workflow variable to ‘ListofServerRelativeUrls’ and use the String Builder to set it to: [%Variable:ListofServerRelativeUrls%] [%Variable:Current ServerRelativeURL%]

  • Add the ‘Do Calculation value’ action and set the value to the workflow variable ‘Index’ plus ‘1’ and set the Output to the ‘calc’ variable.

  • Add the ‘Set Workflow Variable’ action and Set the workflow variable to ‘index’ and the value of the workflow variable to ‘calc’.

  1. Outside the Loop, Add ‘Log to History List’ action.

  • Log the variable ‘ListofServerRelativeUrls’ to the history list.

  1. Add the Muhimbi ‘Merge Documents to PDF’ Action and set the ‘these documents’ field to the workflow variable ‘ListofServerRelativeUrls’ and ‘this field’ to ‘Merged.Pdf’.

Note: The Filename is being hardcoded in this example, however you can also dynamically create the file and also specify a different destination.

  1. Set the ‘Transition to Stage’, to go to ‘End of Workflow’. The workflow should look like this:

    end of workflow

  2. Publish the workflow and upload a few PDF files in the Document Library. Manually start the workflow. After a few seconds the workflow should have completed and the merged files should appear in the specified location..

Information

We recently released the Muhimbi Document Converter Xtension for Nintex Automation Cloud. You can download it here or learn more about available Muhimbi deployments for Nintex on our product page.

The Muhimbi Document Converter for SharePoint comes with comprehensive support for all Nintex Workflow versions, currently NW2007 to NW2019. It can easily merge documents in multiple formats and create a document in PDF format.

Similar to all other Nintex Activities provided by Muhimbi, the Merging files (and URLs) to PDF activity integrates with Nintex Workflow at a deep level. It supports SharePoint 2007-2019, allows errors to be handled and even supports integration with Nintex’ iterators to deal with multiple items and loops.

nintex workflow

merge document

The fields supported by this Workflow Activity are as follows:

  • Destination Path: Enter the path to write the merged file to, either:

    • Leave it empty to use the same filename (and path) as the file that triggered the workflow.

    • A relative path to a subsite / document library / folder, e.g. Shared Documents/Some Folder/Some File.pdf.

    • An absolute path to a different site collection, e.g. /sites/Finance/Shared Documents/Some Folder/Some File.pdf. Please make sure the path does not include the host name, e.g. ‘http://your site/…’. For details see Appendix - Specifying path and file names.

  • Source Files: This field specifies the list of documents to merge (and convert if needed). Each file must be specified on a new line and each line may contain three ‘;’ separated values:

    • File Path: The path to the file, or URL, to merge. This may already be a PDF file, but if not – and the file format is supported by the converter – then it will be converted first. The path can be relative to the current site (e.g. Shared Documents/Some File.docx) or absolute (e.g. /sites/Finance/Shared Documents/Some Folder/ Some file.docx). Nintex Workflow References are fully supported, which can be used to dynamically generate the path for the current file, e.g. {ItemProperty:FileLeafRef}. Some string manipulation to generate the exact path to the file may be needed.

Note: When specifying a file please make sure the path does not include the host name, e.g. ‘http://your site/…’.When converting a web page then the path MUST start with http:// or https://

  • **Include Bookmarks:**The source file may already include PDF Bookmarks, or may be able to generate such bookmarks as part of the conversion process, e.g. a MS Word file. Specify true to copy these bookmarks to the merged PDF file, or false to strip out any bookmarks. This value is optional

  • Custom Bookmark value: The Bookmark field (see below for details) can be overridden using the third parameter. Specify the content of the ‘top level bookmark’ for the file, specify “” to remove the bookmark for this document or don’t specify anything at all to use the value stored in the content specified in the Bookmark field.

  • Bookmark: In a way similar to the User Interface for the merge facility, it is possible to specify a name of the column, or any kind of Nintex Reference, which contents will be used to populate the PDF Bookmark for the merged document. For example, specifying Name or Title (using the appropriate Nintex Workflow Syntax) makes it very easy to jump between the various sections of the merged PDF file.

  • Start Page (Each Document): Control if empty pages are added between documents to make sure each merged document always starts on the right-hand, or left-hand side when printing it double sided.

  • Output List ID: If you wish to carry out further actions on the generated PDF file, e.g. merge additional documents or perform a check-in, then you can optionally write the ID of the List the PDF was written to in a workflow variable of type String.

  • Output List Item ID: Similarly to Output List ID, the Item ID of the generated PDF file can optionally be written to a workflow variable of type Item ID (in SharePoint 2007) or Integer (in SharePoint 2010 and later versions).

  • Source List ID & List Item: The item that triggered the workflow is merged by default. You can optionally specify the ID of a different List and List Item using workflow variables. Please use the same data types as used by PDF List ID and PDF List Item ID.

  • Error Handling: Similar to the way some of Nintex’ own Workflow Activities allow errors to be captured and evaluated by subsequent actions, all of Muhimbi’s Workflow Activities allow the same. By default this facility is disabled meaning that any error terminates the workflow.

In this example, we will merge all documents in a Document Library to PDF format. To create a new workflow, you can follow the instructions below.

document library

Prerequisites

Before we start building the workflow, ensure all prerequisites are in place. It is also assumed that the reader has some knowledge of building Workflows using Nintex Workflow.

  1. Make sure the Document Converter for SharePoint On-Premise version 4.1 (or newer) is installed.

  2. Naturally Nintex Workflow will need to be installed as well.

  3. Make sure the Muhimbi.PDFConverter.Nintex.WebApp SharePoint Feature is activated on the relevant Web Application using SharePoint Central Administration.

  4. You will need to have the appropriate privileges to create workflows.

Creating a New Workflow

You can create a new workflow by performing the following steps:

  1. To get started, create a new workflow and choose the blank template. Make sure the workflow doesn’t start automatically and add the workflow variables listed in the following screenshot.

create new workflow

Ensure that the appropriate data types are assigned. They are listed under the ‘Type’ column beside each variable name. The names are largely self-explanatory, but some additional information is provided below:

  • Document Collection: This is the collection where the documents to be merged are located.

  • Document URLs:Use this to add the URL location of the Library where the document(s) to be merged is located.

  • MergeList: The list of all the files that needs to be merged is stored in this variable.

  • Generated PDF Item ID: Once a file has been merged to PDF, you may want to carry out additional actions on this new file. For example, check it in. Once converted, the ID of the PDF is automatically stored in this variable.
    Note: For versions prior to MS SharePoint 2010 select List Item ID as the type.

  • Generated PDF List ID: As the Document Converter allows files to be written to different document libraries, and even completely different Site Collections, you may want to know the ID of the destination list.

  1. You are now ready to add the actions to the workflow. You can start with adding a Query List action. Select the Document Library in the ‘List Field’. In the Field select ‘Server Relative URL’ and click Add button and set it to ‘DocumentCollection Variable’. Save this action.

    add query list

  2. You can continue by adding the For Each action to the workflow. Specify the name of the collection to iterate over and the name of the variable to store the Item’s ID in. In our case, you can set the ‘Target collection’ field to ‘DocumentCollection’ variable and ‘Store result in’ to ‘DocumentURLs’ variable. Save.this action.

target collection

The next set of actions that you add, will need to be added inside the For Each action, to make sure they are executed separately for each file in the list.

  1. You can continue by adding the Build sting action to the workflow. You need to click the Insert Reference icon and add the Workflow Variables ‘DocumentURLS’ and ‘MergeList’ in the Text Field and set the ‘Store result in’ field to ‘Mergelist’. Save this action.

    insert reference

  2. After this, you need to add the Merge file to PDF action listed under the Muhimbi PDF section. You can fill this section as per the image below:

merge file to pdf

The Document Converter integrates and performs Merge with all Nintex Workflow versions

You may want to leave the Destination Path empty, which will write the PDF File to the same location as the source file. For more information about the Destination Path or any of the other fields, hover the mouse over the small information icons.

  1. Click Save and then Publish to ensure the workflow can be executed.

Running the Workflow

You can run the workflow manually and you will notice that the merged PDF file will be generated in the specified library.

Additional Resources