Manage your job settings in document automation
The Job Settings tab displays the settings for the selected job.
At the top, there are subtabs that enable you to view and edit the settings for the job.

The subtabs and their options are covered in detail below.
At the bottom of the Job Settings tab, there’s a toolbar with the following options.

| Screen field/button | Description |
|---|---|
| View Log File | Click this button to display the log file of the selected job. |
| Save Job | Click this button to save all the changes in the job. |
| Run | Click this button to execute the job. |
| Stop | Click this button to halt the processing of the current batch of files at the earliest convenience. |
| Delete Job | Click this button to delete the currently selected job. |
| Copy Job | Click this button to make a copy of the selected job. |
| Clear Error | Use this option to clear errors of jobs before running them. |
| Explore Destination | Click this button to open the target folder in File Explorer. If the folder doesn’t exist, it’ll display an error message. |
Job definition
Job Definition contains the common job properties that need to be set for the job to be executed.
The options displayed depends upon the Operation selected.
The following are common to all operations:
| Screen field/button | Description |
|---|---|
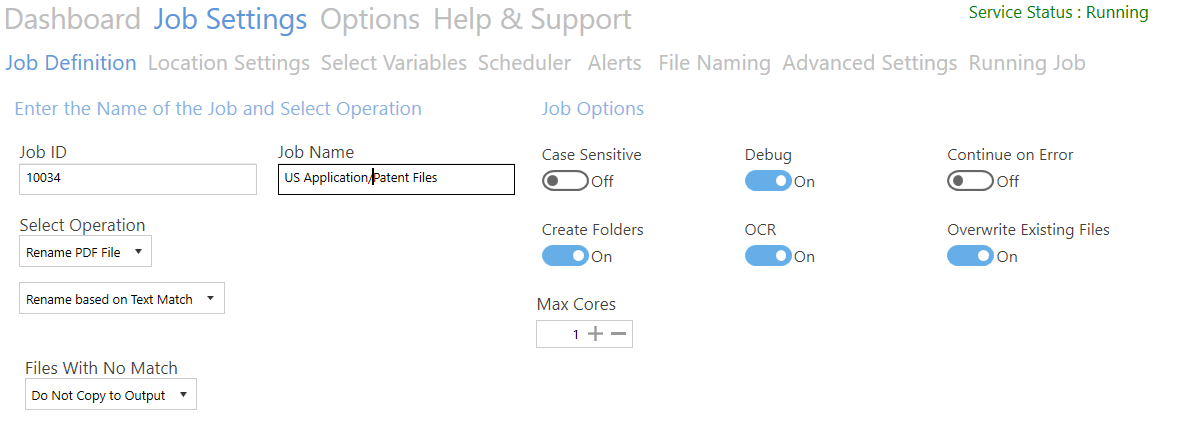
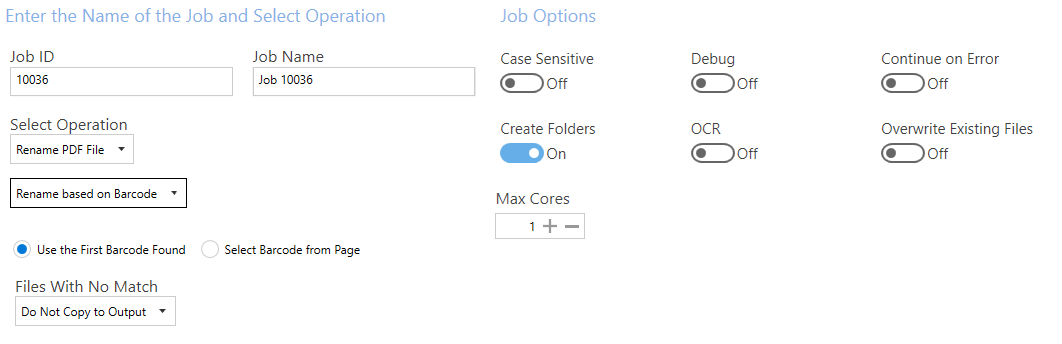
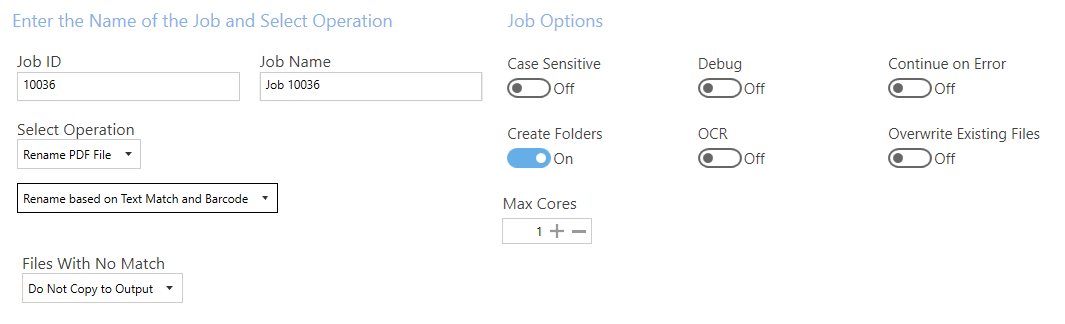
| Job ID | Automatically generated job ID. |
| Job Name | This name is displayed on the Dashboard, and it’s available as a variable within the job (file names and alerts). Though a default name will be generated when you create a new job, it’s always good practice to give the jobs sensible names when you create them. |
| Select Operation | Use this box to set the operation you want to carry out. There are four options to choose from. See DAS Content Extraction Operations for more details. - Rename PDF File - Split PDF Files - Extract Pages from PDF Files - Extract Content from PDF Files Each option has additional options. |
| Create Folders | If this is checked, DAS Content Extraction will create the target directories if they don’t exist. |
| Overwrite Existing Files | If checked, generated PDF files will overwrite existing files of the same name (but not source files). |
| Continue on Error | When checked, folder and tree processing jobs will continue when individual files fail. |
| Debug | If switched on, the job log will be more detailed. Additionally, temporary files aren’t deleted at the end of the run. These can build up if Debug is left on in production. |
| Max Cores | Sets the number of files that should be processed in parallel. Multicore jobs are only available with the Server license. |
| Case Sensitive | Setting this to true will make sure all the searches, text operations, and pattern matching will be performed in a case-sensitive fashion. |
| OCR | If switched, DAS Content Extraction will use OCR to locate the text on the PDF document. This is good for image PDFs and PDF files with encoding. |
Rename PDF files
Rename based on text match
| Screen field/button | Description |
|---|---|
| Sub options | - Rename based on Text Match - Rename based on Barcode - Rename based on Text and Barcode |
| Files With No Match | Options are: - Do not copy to output - Copy to output - Copy to output and rename (Additional filename template field added to settings) |
Copy to Output and Rename requires an additional file name template, which can use a number of variables.
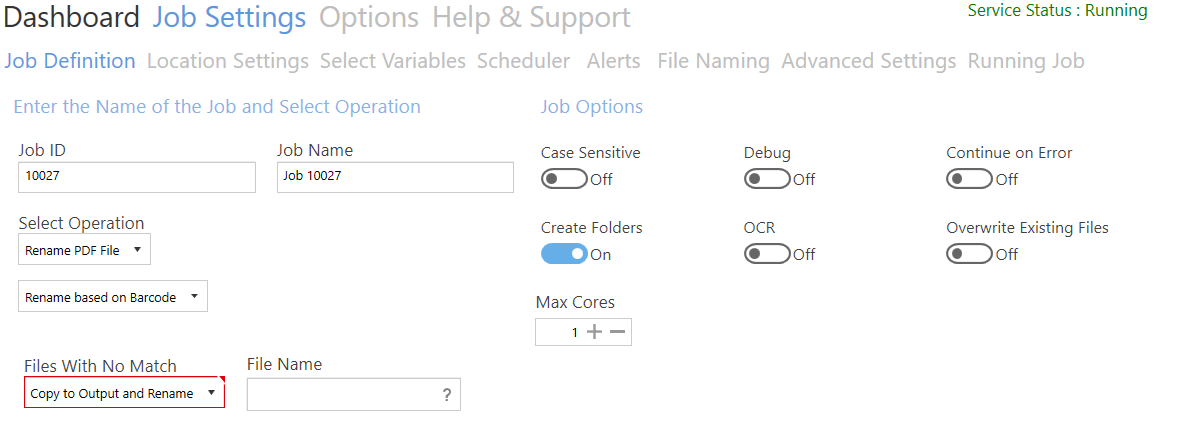
Click on the question mark (?) for details of the available variables.
Rename based on barcode
| Screen field/button | Description |
|---|---|
| Use the First Barcode Found | Use the first barcode located in the document. |
| Select Barcode from Page | Select the barcode in the Select Variables tab. |
| Files With No Match | Options are: - Do not copy to output - Copy to output - Copy to output and rename (Additional filename template field added to settings – refer to the Rename based on Text Match table above for more details.) |
Rename based on text match and barcode
| Screen field/button | Description |
|---|---|
| Files With No Match | Options are: - Do not copy to output - Copy to output - Copy to output and rename (Additional filename template field added to settings – refer to the Rename based on Text Match and Rename based on Barcode tables above for more details.) |
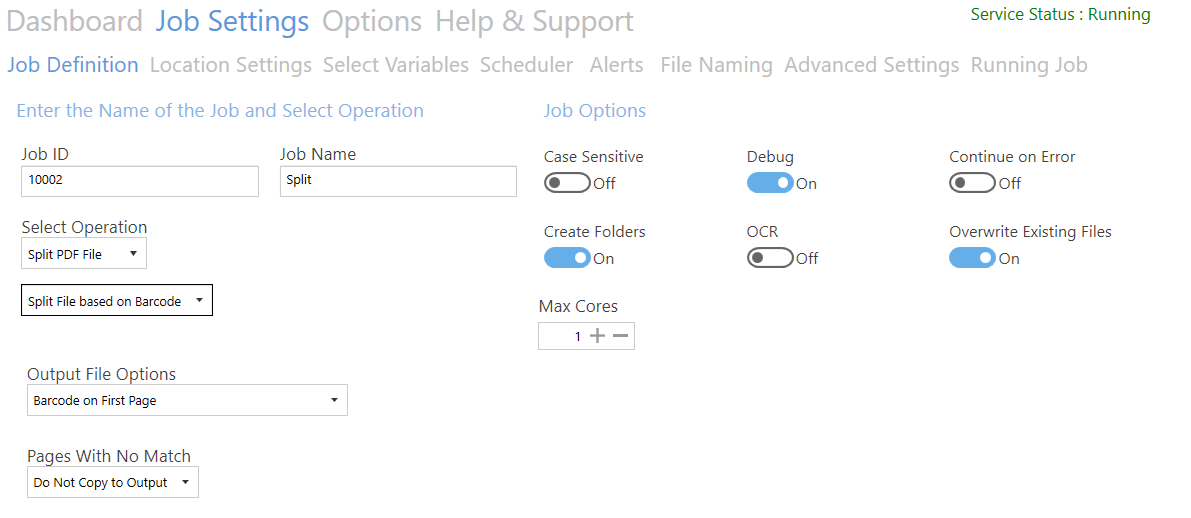
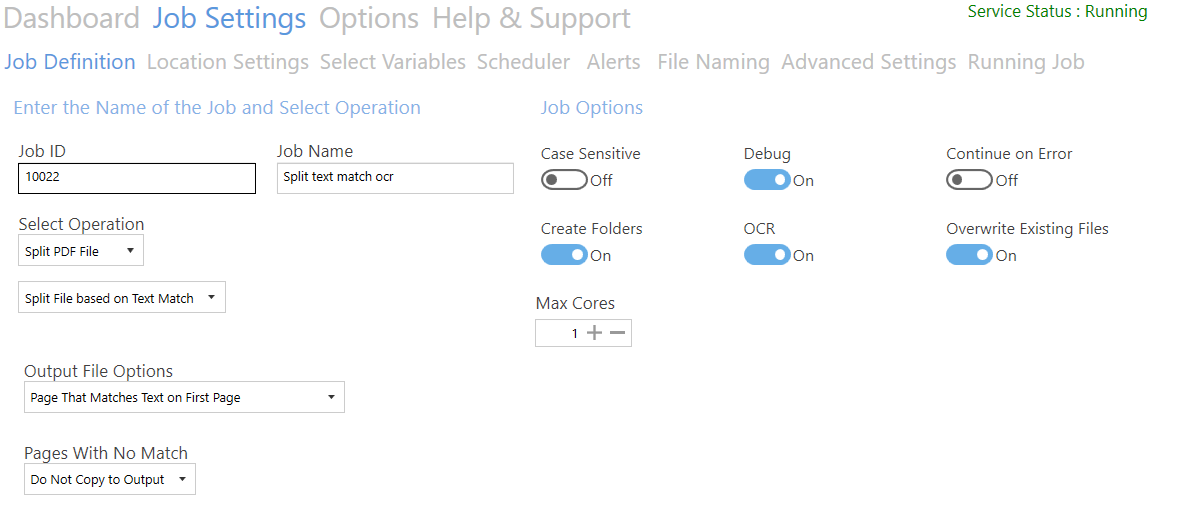
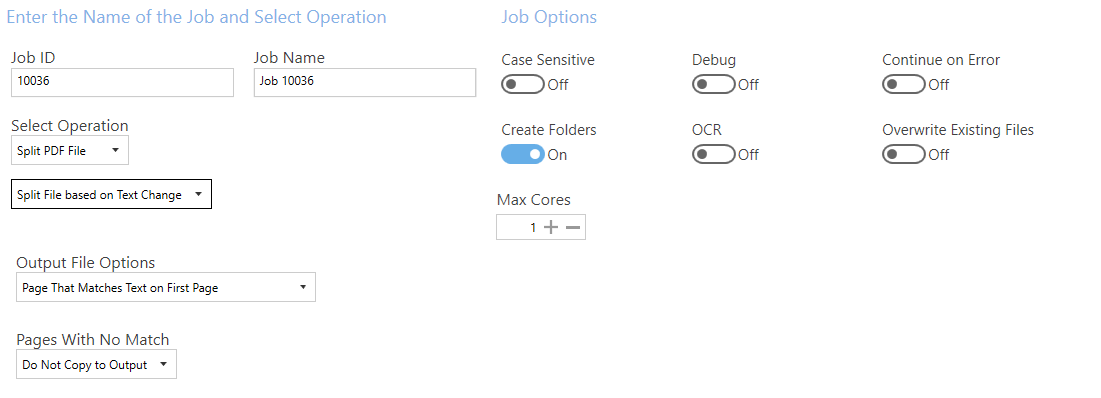
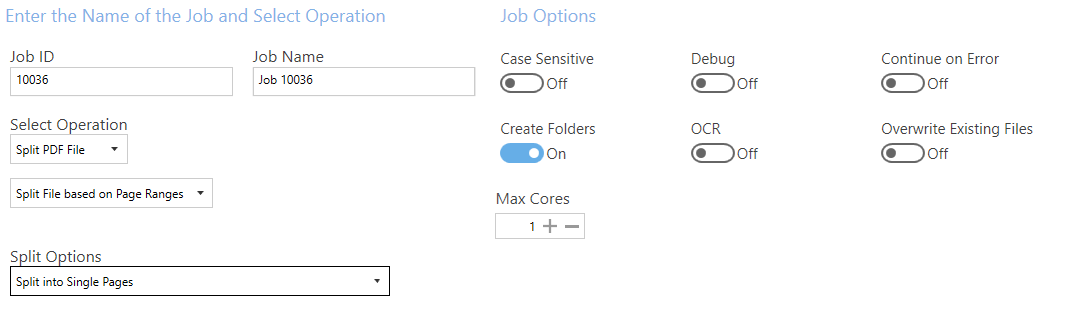
Split PDF files
Split file based on barcode
| Screen field/button | Description |
|---|---|
| Output File Options | - Barcode on first page - Barcode on last page - Remove Barcode Page |
| Pages With No Match | Options are: - Do not copy to output - Copy to output - Copy to output and rename (Additional filename template field added to settings – refer to the Rename based on Barcode table above for more details) |
Split file based on text match
| Screen field/button | Description |
|---|---|
| Output File Options | - Barcode on first page - Barcode on last page |
| Pages With No Match | Options are: - Do not copy to output - Copy to output - Copy to output and rename (Additional filename template field added to settings - refer to the Rename based on Text Match table above for more details.) |
Split file based on text change
| Screen field/button | Description |
|---|---|
| Output File Options | - Page That Matches Text on First Page - Page That Matches Text on Last Page - Remove Page that Matches Text |
| Pages With No Match | Options are: - Do not copy to output - Copy to output - Copy to output and rename (Additional filename template field added to settings) |
Split file based on page ranges
| Screen field/button | Description |
|---|---|
| Split Options | - Split into Single Pages - Split by Page Ranges - Split by Repeating Page Ranges |
Split by Page Ranges has one more additional field:

| Screen field/button | Description |
|---|---|
| Split Ranges | Enter a range |
Split by Repeating Page Ranges has two more additional fields.

| Screen field/button | Description |
|---|---|
| Split Ranges | Enter a range string. Refer to the Split File based on Page Ranges table above for more details. |
| Repeat Every | Repeat the range after the number of pages entered. |
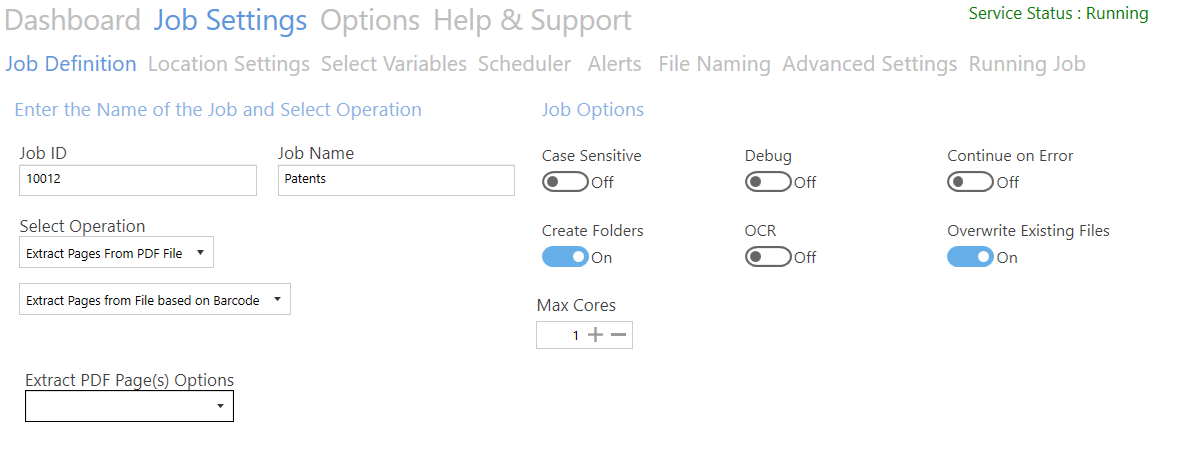
Extract pages from pdf files
Extract pages from file based on barcode
Extract pages from file based on text match
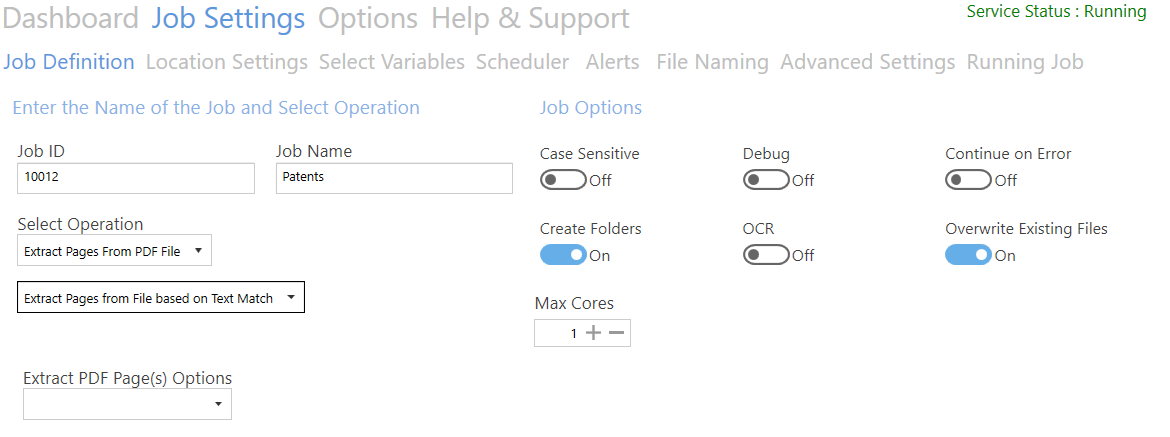
| Screen field/button | Description |
|---|---|
| Extract as Single Pages | Extract each page and save separately. Ensure that each page will be named differently, or add the %INDEX% variable. |
| Merge All extracted pages | Extract each page and merge into a single document |
| Merge All extracted pages on unique expressions that match | Last page to extract (blank is last page) |
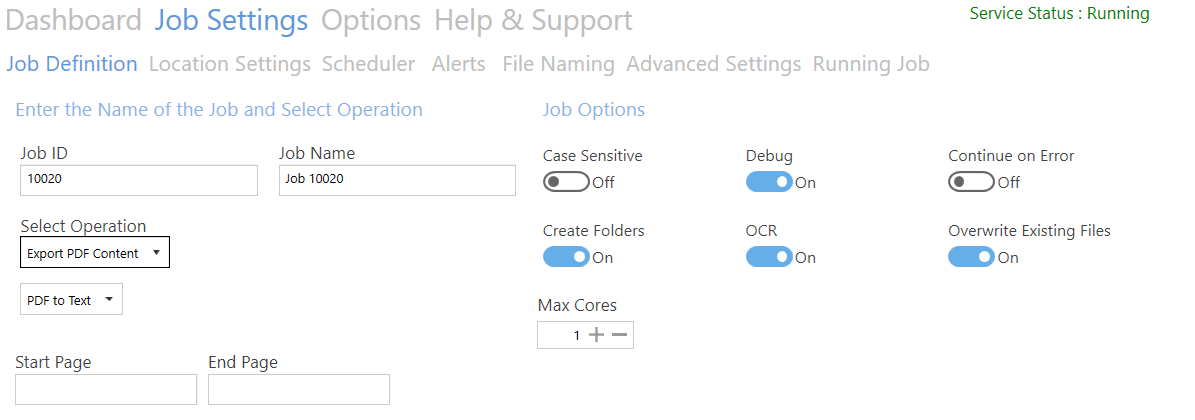
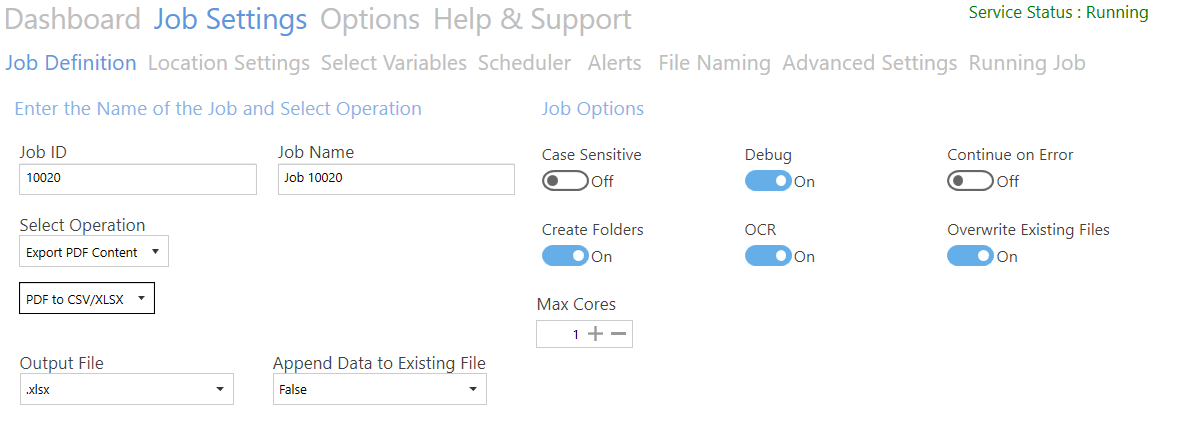
Export PDF content
PDF to text
| Screen field/button | Description |
|---|---|
| Start Page | First page to extract (leave this blank for the first page) |
| End Page | Last page to extract (leave this blank for the last page) |
PDF to CSV/XLSX
| Screen field/button | Description |
|---|---|
| Output File | - CSV – Comma Separated Values - XLSX – Excel sheet |
| Append Data to Existing File | Set to True to append to an existing file, or False to overwrite an existing file |
Advanced export to CSV/XLSX
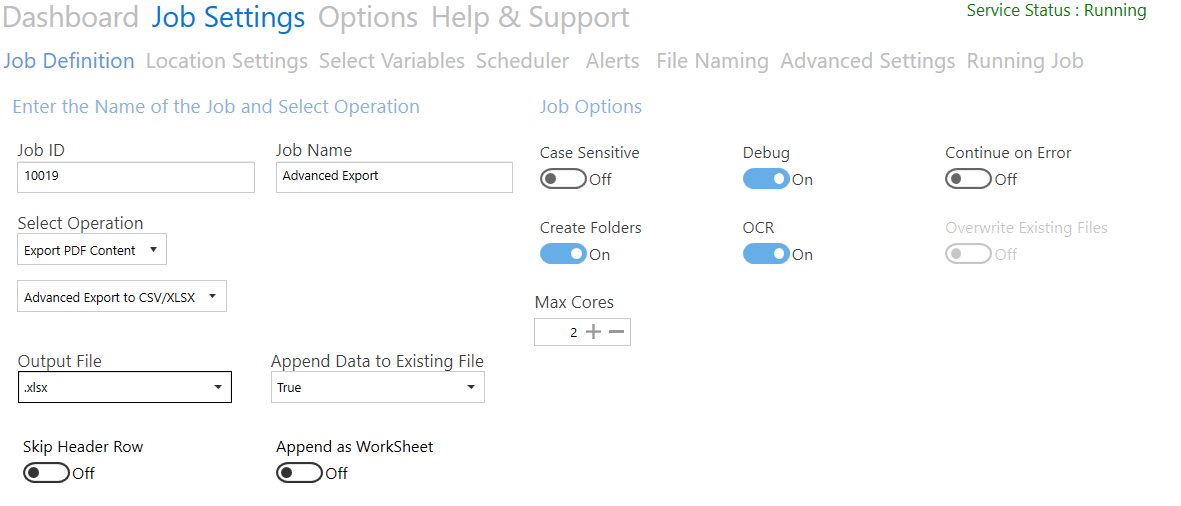
| Screen field/button | Description |
|---|---|
| Output File | - CSV - XLSX |
| Append Data to Existing File | - True – add lines to an existing file - False – Create a new file (refer to the Overwrite Existing Files option below) |
| Skip Header Row | Skip header row in sheet (Append Data to Existing File = True ) |
| Append as WorkSheet | Add new data as a new worksheet in the file (.xlsx output and Append Data to Existing File = True only) |
Location settings
DAS Content Extraction allows users to process files in SharePoint Online (Office 365) and SharePoint On-Premises and on the Windows file system. This section will cover the details of the Location Settings tab.
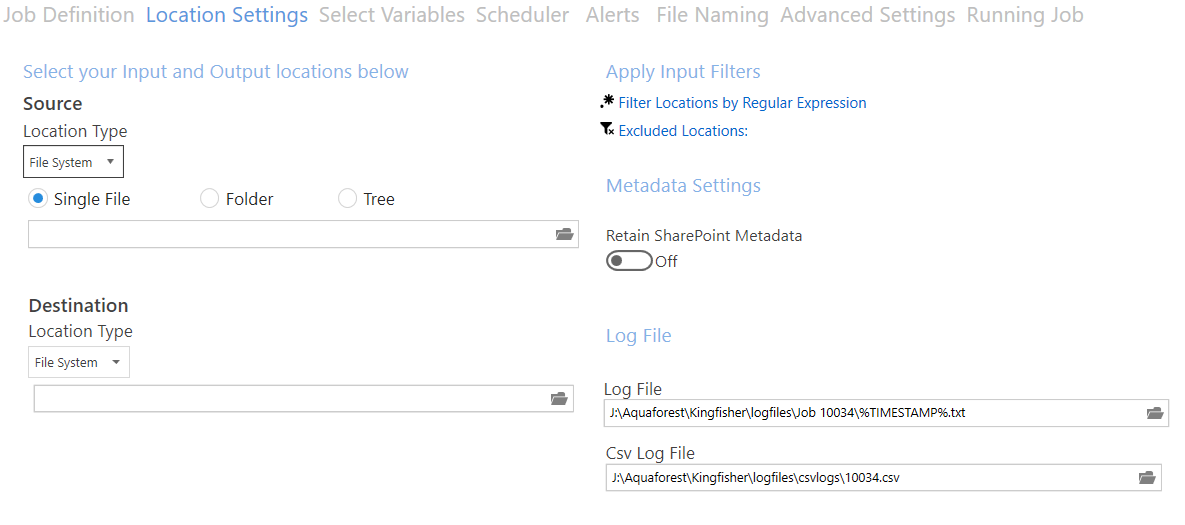
| Screen field/button | Description |
|---|---|
| Source | Use this combo box to select the source location type; the options are given below. - File System - SharePoint - Office365 |
| Destination | Use this combo box to select the source location type; the options are given below. - Same as Source: This option puts the file back in the source location - File System - SharePoint - Office365 |
| Filter Locations by Regular Expression | Regular expressions can be used to filter the input files processed by DAS Content Extraction. |
| Excluded Locations | Add paths you want DAS Content Extraction to skip. |
| Retain PDF Metadata | Switch this on to retain the PDF metadata of the source PDF file. |
| Retain SharePoint Metadata | Switch this on to retain the SharePoint metadata of the source PDF file. Note that the destination library must have the same column types and names as the source library for this to work. |
| Log File | This is the path to the log file for the current rule. You can use the %TIMESTAMP% and %DATESTAMP% variables to create log files based on dates or time. |
| Csv Log File | The CSV log files contain a summary of the new file names generated by DAS Content Extraction. You can use the %TIMESTAMP% and %DATESTAMP% variables to create log files based on dates or time. See CSV logs for more details. |
Location Types
DAS Content Extraction gives you an option of three different location types. The following section explains the different ways they’re added or edited in a job.
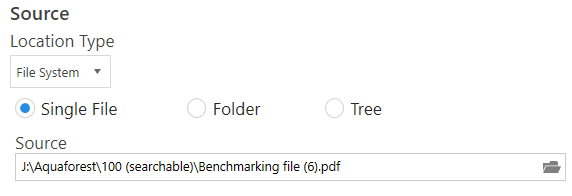
File System
Choose between processing a Single File, Folder, or Tree. After choosing the file system type, use the Browse button to select the location of the file or folder.
Local, mapped, and UNC paths
Local paths are those on drives local to the machine running DAS Content Extraction. These are — subject to suitable permissions for the DAS Content Extraction service user — usable as paths for locations for use by DAS Content Extraction.
Mapped drives (where a device has a network path mapped to a drive letter) must not be used in paths in DAS Content Extraction. This is due to how drive mapping is applied to service users. If you have a network path, use the uniform naming convention (UNC) path. If you select a path using the file or folder browser, it’ll convert it to the UNC path.
SharePoint on-premises
Adding a SharePoint location is a bit different. After selecting the SharePoint option, you’ll see the button shown below.
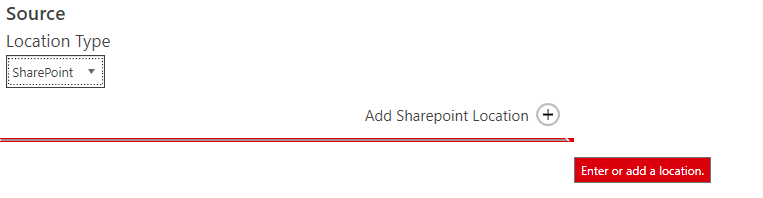
Click the Add Sharepoint Location button to open the SharePoint location dialog box shown below.
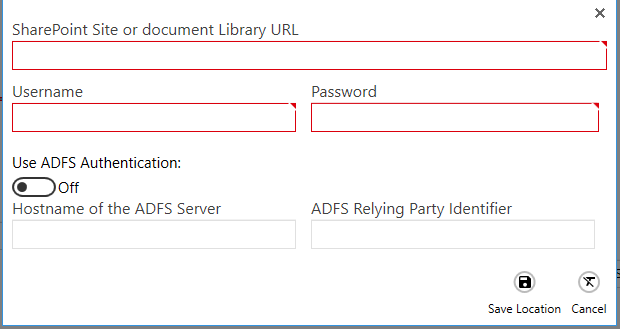
The SharePoint locations can be accessed using either Username and Password, or by providing the Active Directory Federation Services (ADFS) authentication.
| Screen field/button | Description |
|---|---|
| SharePoint URL | Provide the URL of the SharePoint site or document library you want DAS Content Extraction to process. |
| Username | Provide the username of a user that has access to the URL you provided above. |
| Password | Provide a password for the user above. |
| Use ADFS Authentication | Switch this on if you use Active Directory for your SharePoint User Management. |
| Hostname of the ADFS Server | Provide the name of the Active Directory server. |
| ADFS Relying Party Identifier | Provide the Relying Party Trust identifier for your SharePoint. |
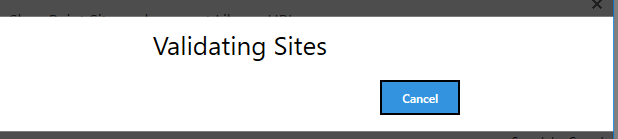
After you enter your SharePoint details, click the Save Location button and the locations will be validated as shown below.
After saving the location, you can always edit by clicking the Edit SharePoint Location option, shown below.

Note that DAS Content Extraction will traverse everything under the URL, so if the output location is in the same location, the files will be picked up on subsequent runs.
To specify what folders will and won’t be processed, use the input filters:
- Filter Locations by Regular Expression
- Excluded Locations
Additionally if the output location is supposed to be a sub folder, ensure that the URl has EXACTLY the same format (Shared%20Documents and Shared Documents are treated as different locations and generates a nested folder structure).
Office 365 (SharePoint Online)
Adding a new Office 365 location is similar to adding a new SharePoint location.
There are two options for authentication:
- Username and Password
- Modern Authentication/OAuth2
Username and password
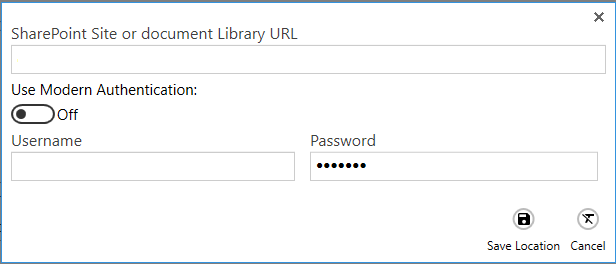
| Screen field/button | Description |
|---|---|
| SharePoint URL | Provide the URL of the SharePoint site or document library you want DAS Content Extraction to process. |
| Username | Provide the username of a user that has access to the URL you provided above. |
| Password | Provide a password for the user above. |
Note that DAS Content Extraction will traverse everything under the URL, so if the output location is in the same location, the files will be picked up on subsequent runs.
To specify what folders will and won’t be processed, use the Input Filters:
- Filter Locations by Regular Expression
- Excluded Locations
Additionally, if the output location is supposed to be a subfolder, ensure the URl has exactly the same format (Shared%20Documents and Shared Documents are treated as different locations and will generate a nested folder structure).
Modern authentication
For details on how to set up modern (OAuth2) authentication for SharePoint (and email) refer to the OAuth2 Configuration document.
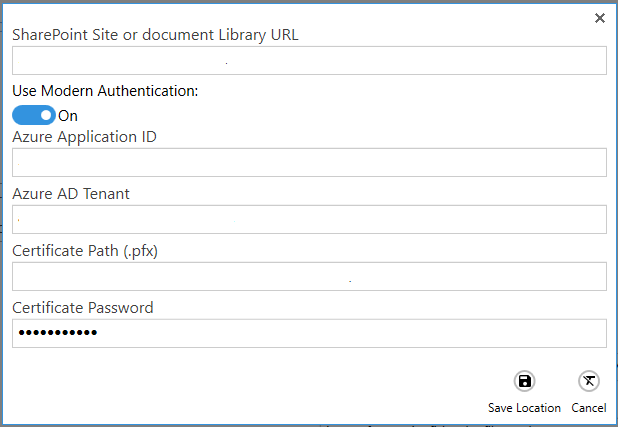
| Screen field/button | Description |
|---|---|
| SharePoint URL | Provide the URL of the SharePoint site or document library you want DAS Content Extraction to process. |
| Azure Application ID | Azure Application (client) ID. |
| Azure AD Tenant | Azure Active Directory Tenant ID. |
| Certificate Path | Path to the .pfx certificate associated with the client ID. |
| Certificate Password | Password for the .pfx certificate. |
Follow the same process as the previous section if you want to save or edit the location.
Apply input filters
DAS Content Extraction give you the ability to filter or exclude source files/paths based on difference criteria.
Filter locations by regular expression
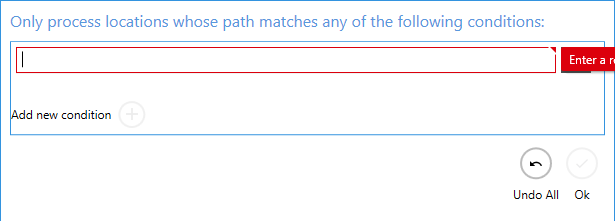
If you provide any values for this, DAS Content Extraction will only process files that match the regular expression provided. To add values, click the Filter Locations by Regular Expression link, which will show the dialog below. Then click the Add new Location button.
Example:
This example job will only process files in the RegexTest folder.
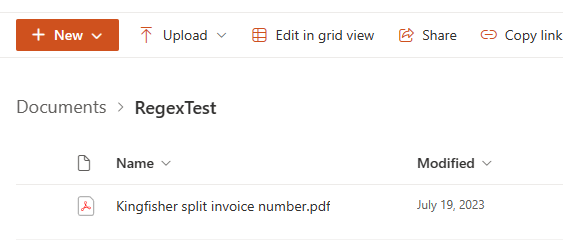
Open the Filter Locations by Regular Expressions dialogue and add the folder name RegexTest.
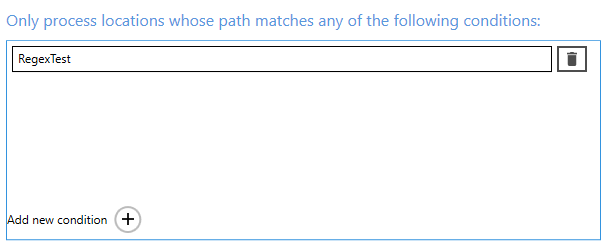
Be aware the regular expression only needs to match something in the path.
If the job is in Debug mode, the log will contain a record of those files that match and those that do not. This will help you with tailoring the regular expression to your environment.
Excluded locations
Any path you provide here will be skipped by DAS Content Extraction. To add values to this property, click the Exclude Location link. The dialog below will be shown.
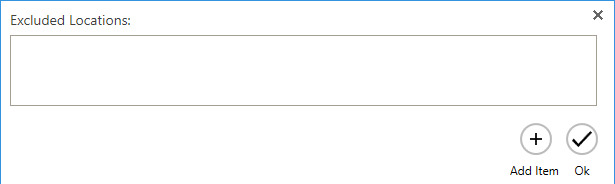
Click the Add Item button to add a new value, and after you’re done, click the Ok button.
If the job is in Debug mode, the log will contain a list of the exclusion locations and will show locations that are included and excluded. This will help you with tailoring the regular expression to your environment.
Select variables
One of the most attractive features of DAS Content Extraction is the ability to select text or barcodes at a position in a PDF page. The selected text or barcode can be used to:
- Decide whether to split the document at the page where the text of barcode was found.
- Decide whether to extract the page where the text of barcode was found.
- Use these extracted text or barcode values to rename the file.
Template file
The Select Variables tab uses a template file to allow the interactive definition of the various zones. By default, it picks up either the source file selected in the Location Settings tab or one of the files located in the folder file selected in the Location Settings tab.
It is possible that during the use of DAS Content Extraction, this file will be removed. If the job condition is opened again in the UI, a warning message will be displayed indicating that the template file is missing. It does not affect the operation of DAS Content Extraction.
It is a good idea to define a Template File folder and copy your chosen template file into it. Use the browse file option to select this as the new template file.
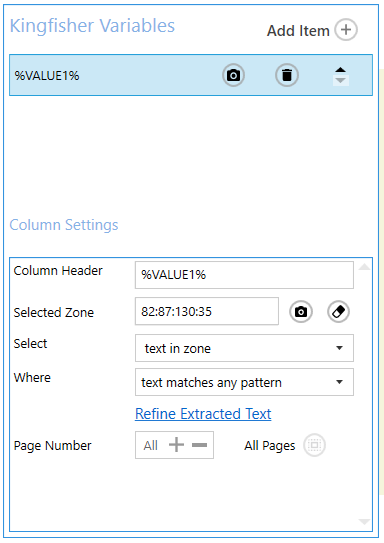
Variables
The “Select Variable” tab is used to select four variables named:
%VALUE1%: This is used to decide the split or extract page, it is also used to generate the output file name, note this must be selected for some jobs to run.%VALUE2%: This is used to generate the output file name.%VALUE3%: This is used to generate the output file name.%VALUE4%: This is used to generate the output file name.
Zones
To assign a zone to a variable, you should first choose the zone on the PDF page with your mouse, click the Camera icon associated to the variable you want to assign the zone to. If you do not assign a zone to the variable, DAS Content Extraction will assume you want to use the whole page as a zone. You will notice the “Selected Zone” Text Box change from “all” to the coordinates you selected.
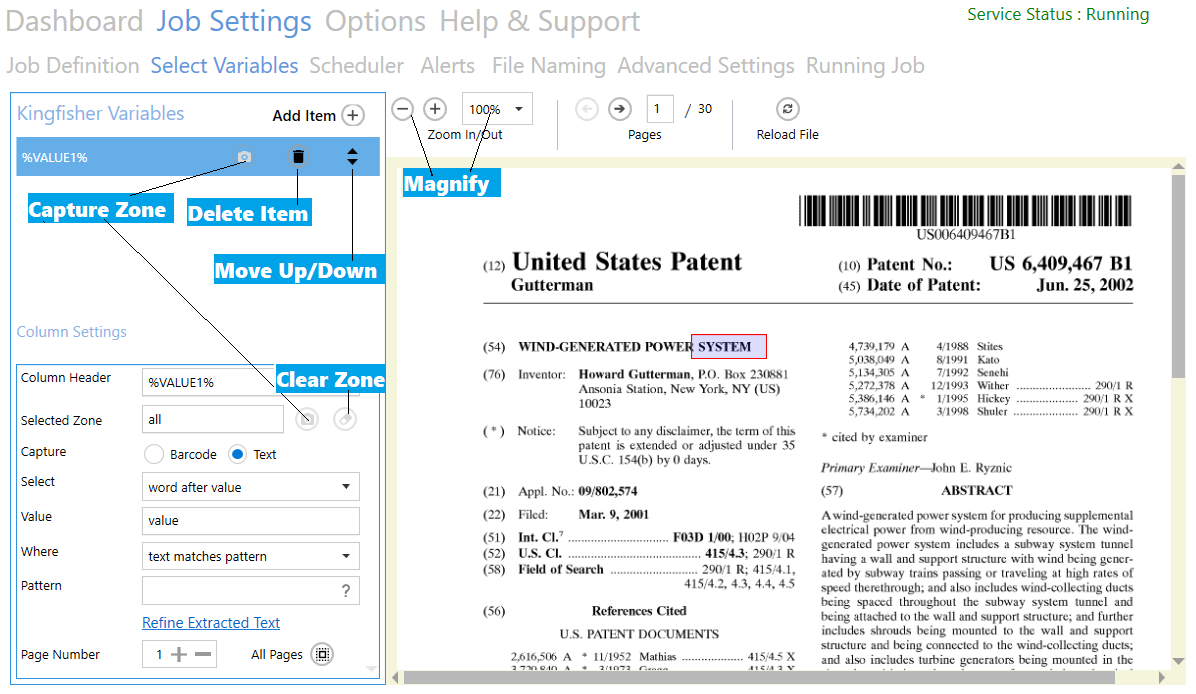
| Screen Field/Button | Description |
|---|---|
| Magnifier | Use the +/- buttons to zoom in or zoom out |
| Next | Click to go to the next page of the PDF file |
| Back | Click to go to the previous page of the PDF file |
| Delete Item | Click this button to delete the variable or item. |
| Move Up/Down | You can use this to rearrange the order of the variables. |
| Selected Zone | Click the Camera icon to assign a selected zone to a variable |
| Clear Zone | Click this button set the selected zone to the whole page |
| Text | Check this radio button to extract text values |
| Barcode | Check this radio button to extract barcode values |
| Select | Use this drop-down box to specify the text you want to extract relative to a word/value. |
| Where | Use this Drop-down box to specify if a regular expression should be used to match the selected text. |
| Refine Extracted Text | Click this link to refine the text extracted. |
| Page Number | You can specify specific pages to want DAS Content Extraction to check for certain values. |
| All Pages | Click this button to make DAS Content Extraction search for the values on all pages. |
Text match option
When extracting text, DAS Content Extraction gives you the ability to select text that is relative to a word/pattern. The table below shows the options available and what they mean.
| Screen Field/Button | Description |
|---|---|
| Select | - Text in zone: This option will select all the text that was extracted. - Word after value: If this option is selected, DAS Content Extraction will return the word that appears immediately after the word supplied in the text box. - Word before value: If this option is selected, DAS Content Extraction will return the word that appears immediately before the word supplied in the text box. - All text in Line after value: If this option is selected, DAS Content Extraction will return all the words that appear on the same line after the word supplied in the text box. - All text in line before value: If this option is selected, DAS Content Extraction will return all the words that appear on the same line before the word supplied in the text box. - All text in zone after value: If this option is selected, DAS Content Extraction will return all the words that appear in the selected zone after the word supplied in the text box. - All text in zone before value: If this option is selected, DAS Content Extraction will return all the words that appear in the selected zone before the word supplied in the text box. - All text in paragraph before value: If this option is selected, DAS Content Extraction will return all the words that appear in the paragraph before the word supplied in the text box. - All text in paragraph after value: If this option is selected, DAS Content Extraction will return all the words that appear in the paragraph after the word supplied in the text box. |
| Pattern | - Where text matches any pattern: This option will not match the text to any pattern - Where text matches pattern: Provide a regular expression here to match the extracted text to, this will be explained more below. |
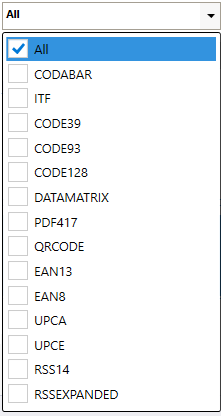
Barcode
When extracting Barcode, you can select specific barcode formats or select all of the supported barcodes (default).
| Screen Field/Button | Description |
|---|---|
| Barcode Type | This combo box allows the user to select the barcode type to extract, below is the list of barcode types that DAS Content Extraction can recognize. - CODABAR 1D format. - ITF (Interleaved Two of Five) 1D format (Code 25). - Code 39 1D format. - Code 93 1D format. - Code 128 1D format. - Data Matrix 2D barcode format. - PDF417 format. - QR Code 2D barcode format. - EAN-13 1D format. - EAN-8 1D format. - UPC-A 1D format. - UPC-E 1D format. - RSS 14 - RSS EXPANDED |
Text Pattern Option
DAS Content Extraction allows the user to define the text pattern of the text to be extracted from the PDF document. This helps the user make sure only text that match a certain pattern will be extracted. For example, a user might want a phone number, but a postcode gets extracted just because it was present in the same location as the postcode on a different page. DAS Content Extraction provide pattern matching so that a user can make sure the text that is extracted is properly validated before it is accepted.
Patterns are used to match parts of the document. Some useful examples are below. For a complete reference on patterns including advanced examples, see Regular Expression Language Quick Reference(opens in a new tab).
| Pattern | Matches | Examples |
|---|---|---|
invoice | The word “invoice” | |
*invoice no:* | The phrase “invoice no:” | |
*.* | Any 1 character | A 9 % |
*….* | Any 5 characters | 12abc $5.00 |
*Invoice….* | The word invoice followed by any 4 characters. A space is a character. | Invoice 123 Invoice No: Invoice A9- |
*^invoice* | The word invoice at the start of a line | |
*invoice$* | The word invoice at the end of a line | |
*\[0-9\] \[0-9\] \[0-9\]* | Any 3 digits | 123 900 |
*\[a-z\] \[a-z\] \[a-z\]* | Any 3 alphabetic characters | abc Inv |
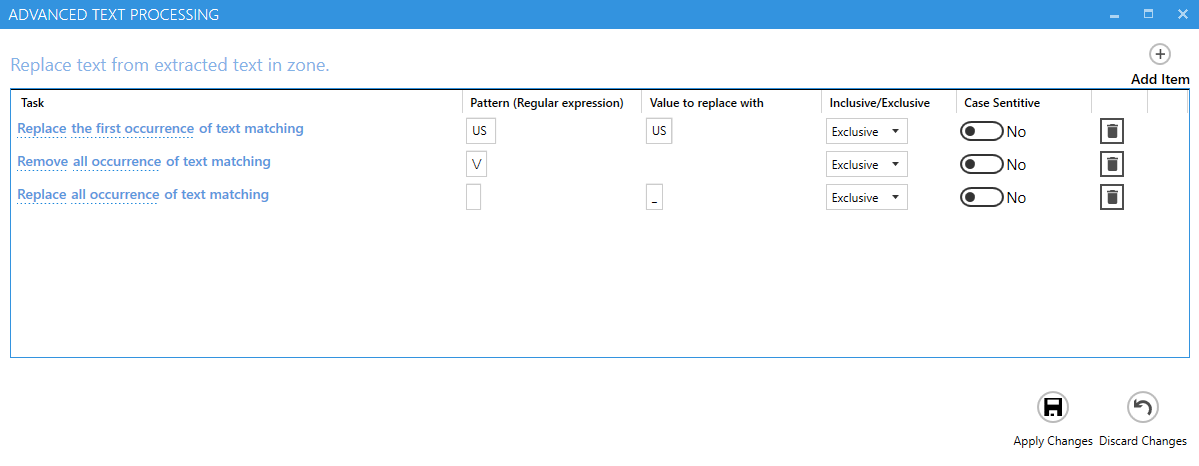
Refine Extracted Text
DAS Content Extraction has an advanced method to refine the extracted text.
This allows the removing/replacing of certain pieces of text based on patterns or values.
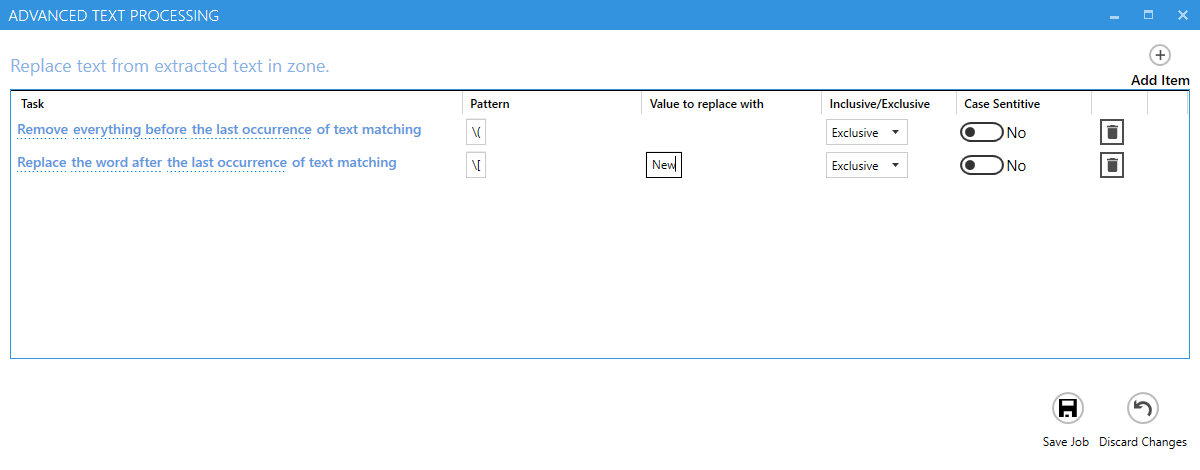
| Option | Explanation |
|---|---|
| Task | The first part of the task is whether to remove or replace the pattern provided, the next part deals with the position and the frequency of the removal or replacement. |
| Pattern | The pattern to search for, this can be a regular expression(opens in a new tab), Use the \\ literal to escape special characters. |
| Values to replace with | If you choose to replace a pattern, you will have to provide a substitute value in this text box. |
| Inclusive/Exclusive | When you chose Inclusive, DAS Content Extraction will remove all the text specified including the pattern being matched. When you choose Exclusive, DAS Content Extraction will remove all the text specified without the pattern being matched. |
| Case Sensitive | This option tells DAS Content Extraction whether to use a case sensitive approach or not. |
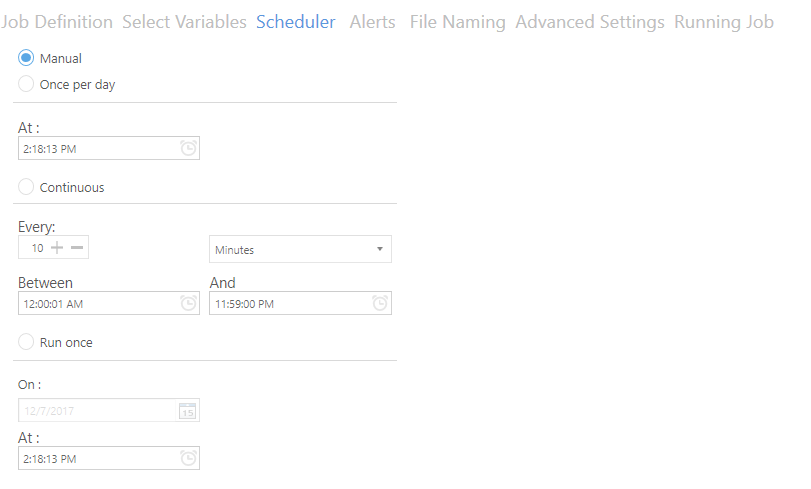
Scheduler
This tab allows the user to schedule when jobs are executed.
| Setting | Description |
|---|---|
| Manual | This means that the document library has to be run manually by clicking on the Run button on the dashboard. |
| Once per day | This allows the document library to be scheduled to run at a specified time each day. |
| Continuous | This allows the document library to be scheduled to run periodically between a start time and end time each day. The periods may be minutes, hours, days or months. For example, a document library may be specified to run every 1 hour between 9:00 and 17:00. |
| Run Once | This allows the document library to be scheduled to run only once at a specified time. |
DAS Content Extraction’s default behavior is that a Scheduled job that generates an error will not run again until either the error is cleared (right click on the job entry on the Dashboard and select clear error), or the job is successfully run manually.
This behavior can be changed by changing two entries in the Kingfisher.Config file.
For jobs scheduled to run once per day, change the value of the setting ScheduleOncePerDayContinueAfterError to true.
For jobs scheduled to run continuously, change the value of the setting ScheduleContinuousContinueAfterError to true.
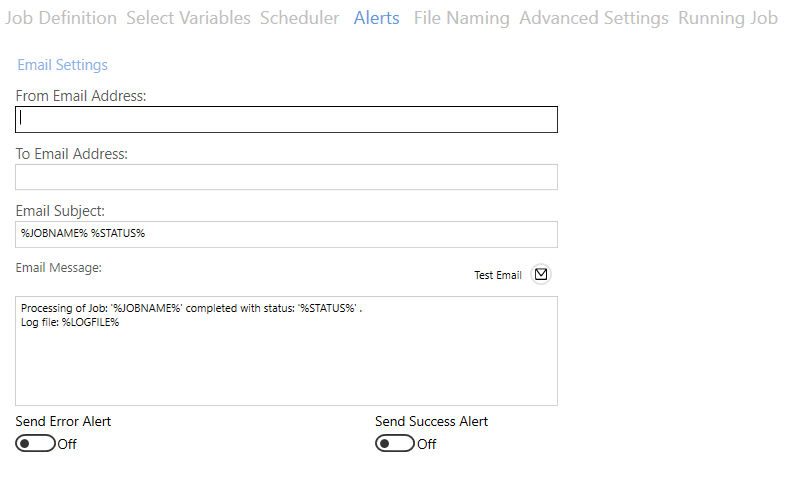
Alerts
Use this tab to set email alerts for jobs. Email settings (SMTP or OAuth2) are set in the Options/Email tabs (see email options for more details).
| Setting | Description |
|---|---|
| From Email Address | The email address to send the email from. This needs to be a valid email address for the email service employed (unless Anonymous is chosen as an SMTP option) |
| To Email Address | The email address to receive the email. |
| Email Subject | The email subject. You can use the following templates:%JOBNAME% - will be replaced by the name of the library%STATUS% - will be replaced by “success” or “error” depending on whether the job ran successfully or not |
| Email Message | The email message to send. You can use the following templates:%JOBNAME% - will be replaced by the name of the library%STATUS% - will be replaced by “success” or “error” depending on whether the job ran successfully or not%LOGFILE% - will be replaced by the path of the log file. |
| Send Error Alert | Switch this on to send an alert when a job ends in an error. |
| Send Success Alert | Switch this on to send alerts when the job successfully completes. |
File Naming
DAS Content Extraction offers various variables to customize the final output name. These variables include:
- Text/Barcode values extracted from the PDF document (including by OCR)
- Index value for split or extract operations (with zero padded options).
- Page numbers (original, first original page of block, last original page of block)
- Bookmarks (for split by bookmark)
- Time and Date values (including the date and time that a job started)
The index value is very useful where the values extracted on different pages during the split/extract are the same.
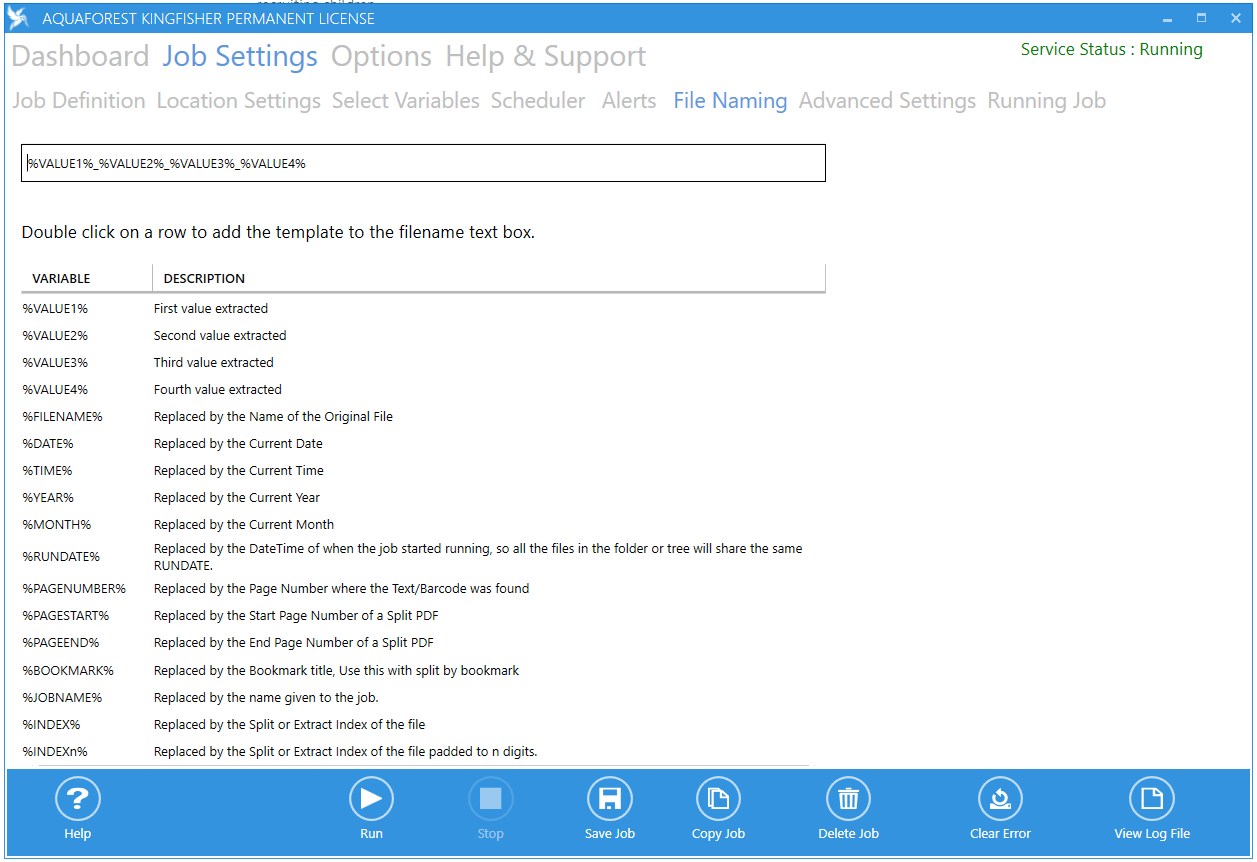
Name Template
You can enter a string in the name template text box, any occurrence of variables in the table below will be replaced by the appropriate value at runtime.
| Variable | Description |
|---|---|
%VALUE1% | The primary barcode/text value. |
%VALUE2% %VALUE3% %VALUE4% | The barcode/text value(s) found. |
%INDEX% | The index of the output file in a split or extract page operation. |
%INDEXn% | The index of the output file in a split or extract page operation padded with zeroes to length n. |
%PAGENUMBER% | The page number of the extracted page in the original PDF file. |
%PAGESTART% | Start page number. |
%PAGEEND% | End page number. |
%FILENAME% | The original file name without the .pdf extension. |
%BOOKMARK% | This represents the bookmark name and can be used with the “Split by Top Level Bookmarks” split option only. |
%TIME% | The current Time. |
%DATE% | The current Date. |
%RUNDATE% | The Time at which the job was executed, the difference between this and the %TIME% variable is that this value will be same for all files processed in a single job run. |
%YEAR% | The current Year in the form yyyy |
%MONTH% | Current Mo0nth in form MM. |
%JOBNAME% | The Name of the Job. |
For non-Tree file sources, there is an option to include folders in the file naming by using a double backslash (escaping a single backslash).
%DATE%\\%VALUE1%
Be aware it is possible to use this file name template with Tree file sources, but the folder structure will include the source folder structure before the file naming one.
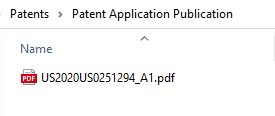
File naming example
Two areas are selected:
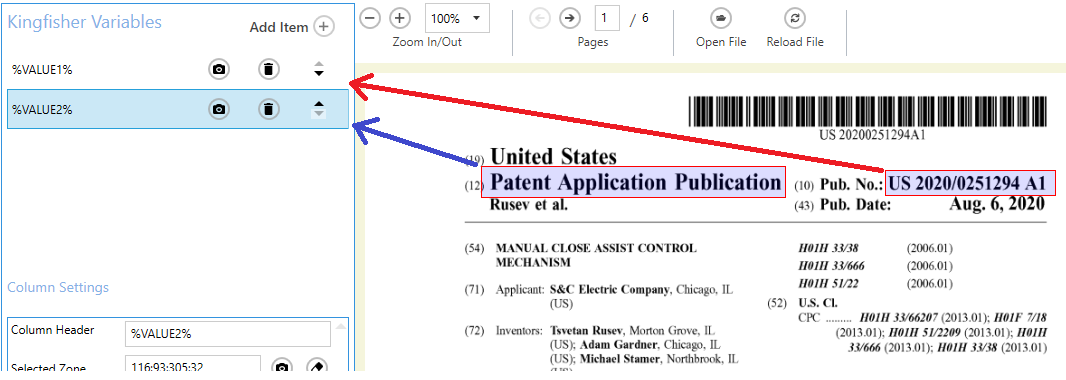
%VALUE1% has text refinement added:
The File Naming tab has the value %VALUE2\\%VALUE1. The double backslash (\\) is an escaped backslash that indicates the file should be written to a folder with the value of %VALUE2%.

The output file from the example above is created in a sub-folder called “Patent Application Publication”.
Advanced Settings
Security
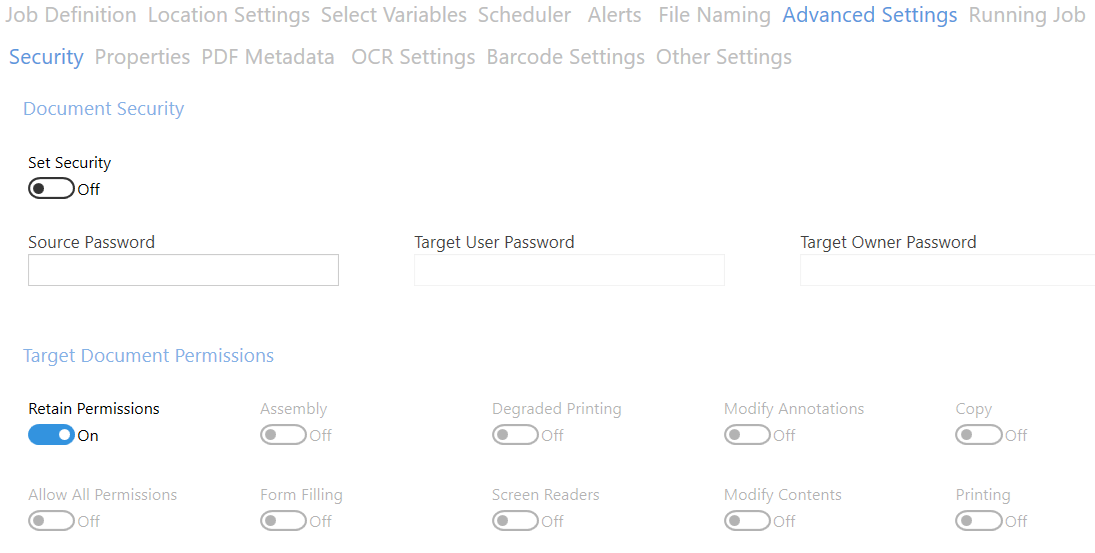
Source Document Security
| Screen Field/Button | Description |
|---|---|
| Source Password | If the source document requires a password it should be entered here. |
Target Document Security
| Screen Field/Button | Description |
|---|---|
| User Password | A password that will be required to open the document. |
| Owner Password | A password that will be required to change the document permissions. |
Target Document Permissions
| Permission | Description |
|---|---|
| Allow ALL Permissions | All the permissions below. |
| Printing | Allow high-quality printing. |
| Modify Contents | Allow assembly (see below) and other document medications. |
| Copy | Allow text and graphic copying and extraction. |
| Modify Annotations | Allow modification of annotations. |
| Form Filling | Allow filling of form fields. |
| Screen Readers | Allow extraction of text and graphics in support of accessibility. |
| Assembly | Allow rotation, insertion or deletion of pages. |
| Degraded Printing | Allow low-quality printing. |
Properties
The default display properties of a PDF can be set here.
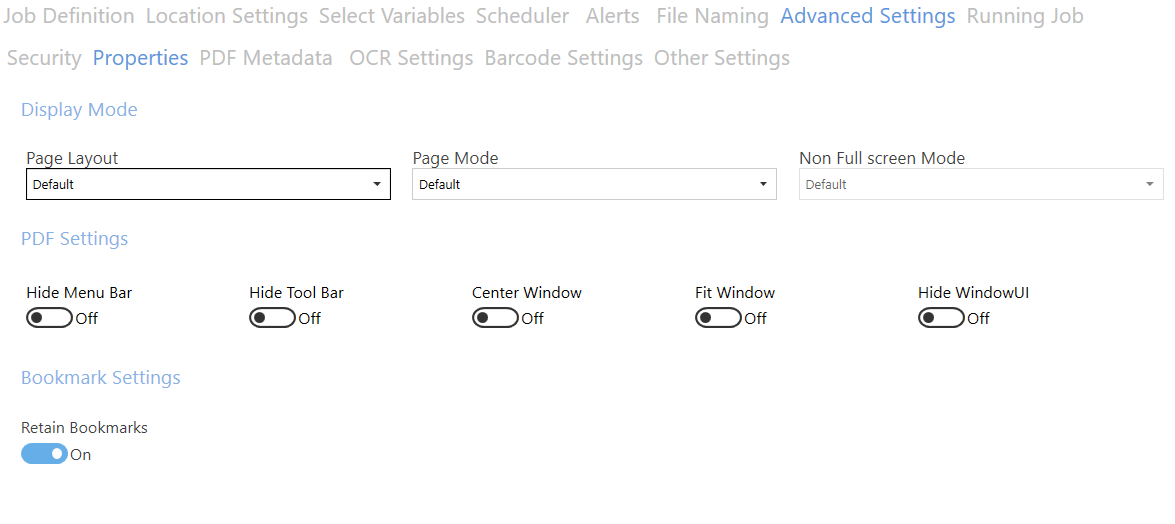
Display Modes
| Option | Description |
|---|---|
| Page Layout | The setting for initial document page display. Choose from: - Single Page - Continuous - Continuous Facing (odd pages left) - Continuous Facing (odd pages right) |
| Page Mode | The setting for initial viewer mode. Choose from: - Neither Bookmarks nor Thumbnails Open - Bookmarks Open - Thumbnails Open - Bookmarks & Thumbnails Open - Full Screen |
| Non-Full Screen Mode | Only applicable where Page Mode=Full Screen. The setting for document page display when exiting Full Screen mode. One of: - Neither Bookmarks nor Thumbnails Open - Bookmarks Open - Thumbnails Open |
Settings
| Option | Description |
|---|---|
| Hide Tool Bar | The viewer’s tool bar will be hidden. |
| Hide Menu Bar | The viewer’s menu bar will be hidden. |
| Hide Window UI | The viewer’s UI elements (scrollbars etc.) will be hidden. |
| Fit Window | The viewer will resize the document’s window to fit the size of the first displayed page. |
| Centre Window | The document window will be positioned in the center of the screen. |
Bookmark Settings
| Option | Description |
|---|---|
| Retain Bookmarks | Select this option to carry over the bookmarks in the original PDF to the split PDF. Default is set to true. |
PDF Metadata
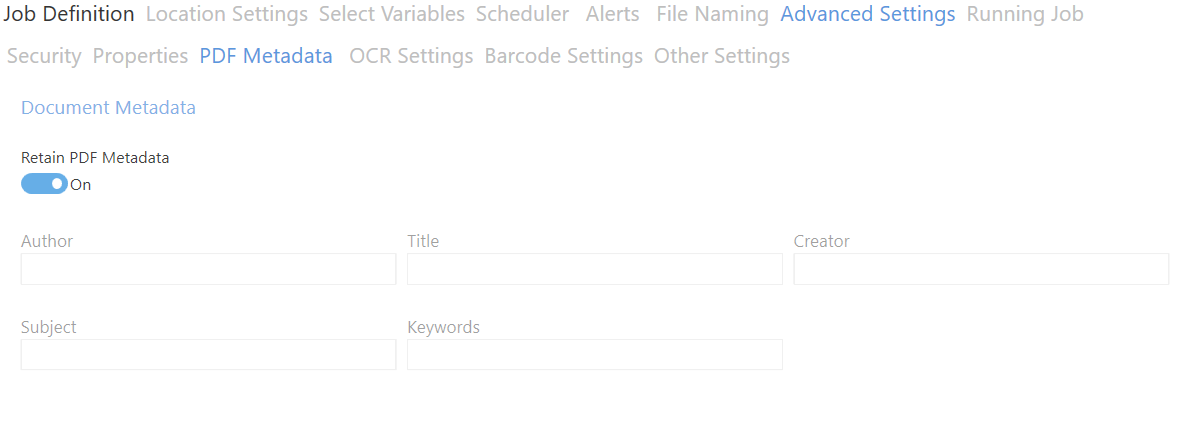
| Option | Description |
|---|---|
| Retain PDF Metadata | Set to yes if you want the output PDF file to retain the metadata of the input PDF, when you set this to true, DAS Content Extraction will disable all the metadata options below. |
| Author | Provide a new value for the Author |
| Title | Provide a new value for the Title |
| Creator | Provide a new value for the Creator |
| Subject | Provide a new value for the Subject |
| Keywords | Provide a new value for the Keywords |
OCR Settings
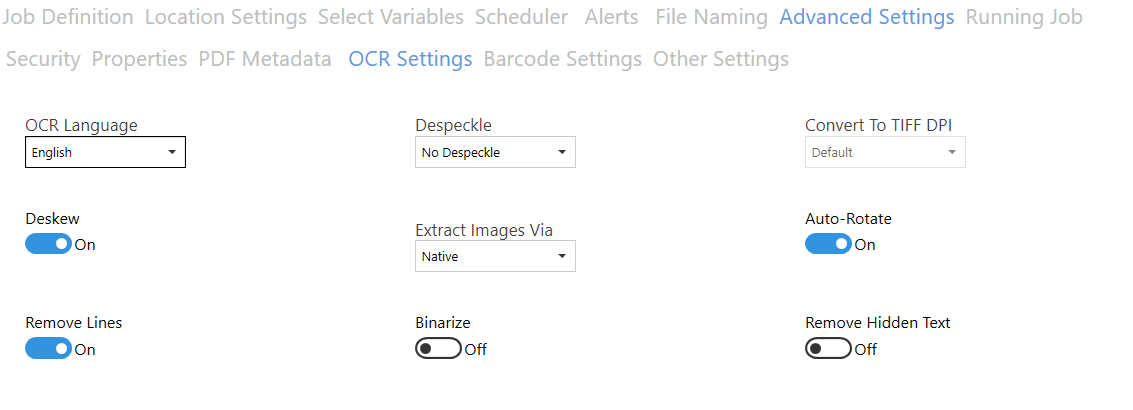
| Option | Description |
|---|---|
| OCR Language | Select expected language for OCR |
| Despeckle | Despeckle the image – The method removes all disconnected elements within the image that have height or width in pixels less than the specified figure. The maximum value is 9 and the default value is 0. |
| Convert To TIFF DPI | Select DPI for intermediate TIFF file for OCR when extracting images via the non-native mode. |
| Deskew | Deskew (straighten) the image. |
| Extract Images Via | Extract images for OCR as native or by converting the PDF to an intermediate TIFF file. The latter is useful if the file contains complex content (Forms, text and images etc.). Use in conjunction with the Convert To TIFF DPI to change the DPI of the image that is OCR’d. This can improve OCR accuracy depending on the file. |
| Auto Rotate | Auto rotates images to an orientation where more text can be recognized. |
| Remove Lines | Remove lines from images. |
| Binarize | This option is useful when processing colored images. It converts the page into an intermediate black and white image which can improve accuracy. |
| Remove Hidden Text | Remove existing hidden text. Some scanners produce PDFs with partially OCR’d text which can lead to incorrect results. |
Barcode Settings

| Option | Description |
|---|---|
| Barcode renderer DPI | Set the DPI used by the barcode engine to read the barcode. With certain images results can be improved by increasing the DPI above the nominal image DPI. |
| Barcode color depth | Set the color depth (bits per pixel) used by the barcode engine to read the barcode. Though barcodes are traditionally in black and white, color images may include barcodes where the lines or background are in shades or are crossed by colored lines. Changing the color depth can improve results. |
Other Settings
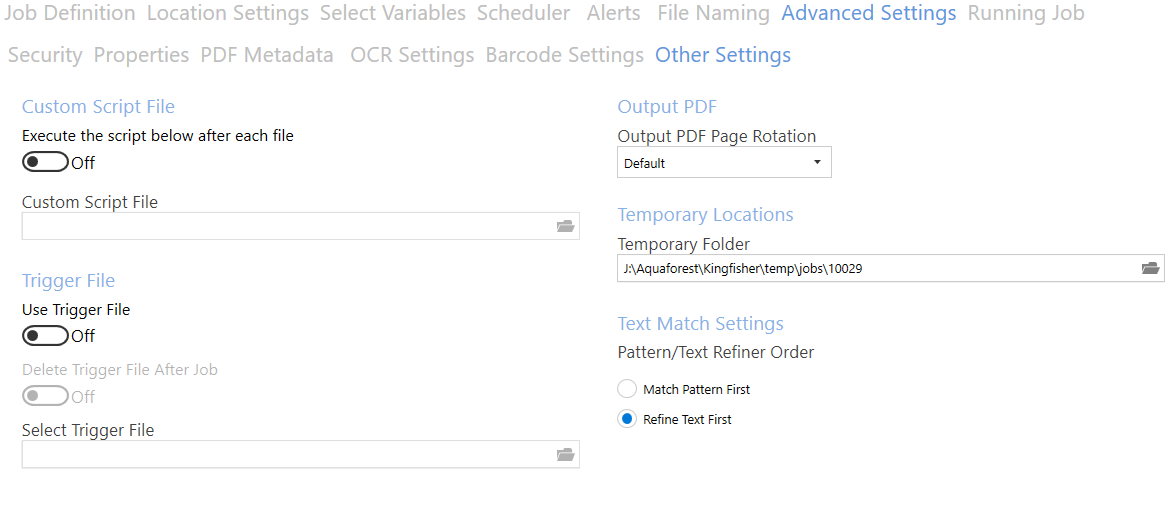
Custom Script File
| Option | Description |
|---|---|
| Execute the script below after each file | Switch this on if you want to execute a Windows Script File (.wsf) after each output file is produced. We send the following arguments: “newfilename” and “oldfilename”. |
| Custom Script File | The location of the script file. |
Trigger File
| Option | Description |
|---|---|
| Use Trigger File | When this option is switched on, a DAS Content Extraction job will not start if a trigger file specified is not available. |
| Delete Trigger File After Job | When the Use Trigger File option is on, DAS Content Extraction will delete the trigger file after the job completes. |
| Select Trigger File | Use this control to provide the trigger file name and location. |
Output PDF
| Option | Description |
|---|---|
| Output PDF Page Rotation | Choose the rotation of the output PDF pages. |
| Retain Bookmarks | Set to true to retain the bookmarks in the output PDF file. |
| Temporary Folder | You can change the temp folder using this directory browser control. |
Text Match Settings
| Option | Description |
|---|---|
| Match Pattern First | DAS Content Extraction will match the extracted text with the provided pattern before it applies the text refiner. |
| Refine Text First | DAS Content Extraction will apply the text refiner to the extracted text before matching it to the pattern. |
Running Job
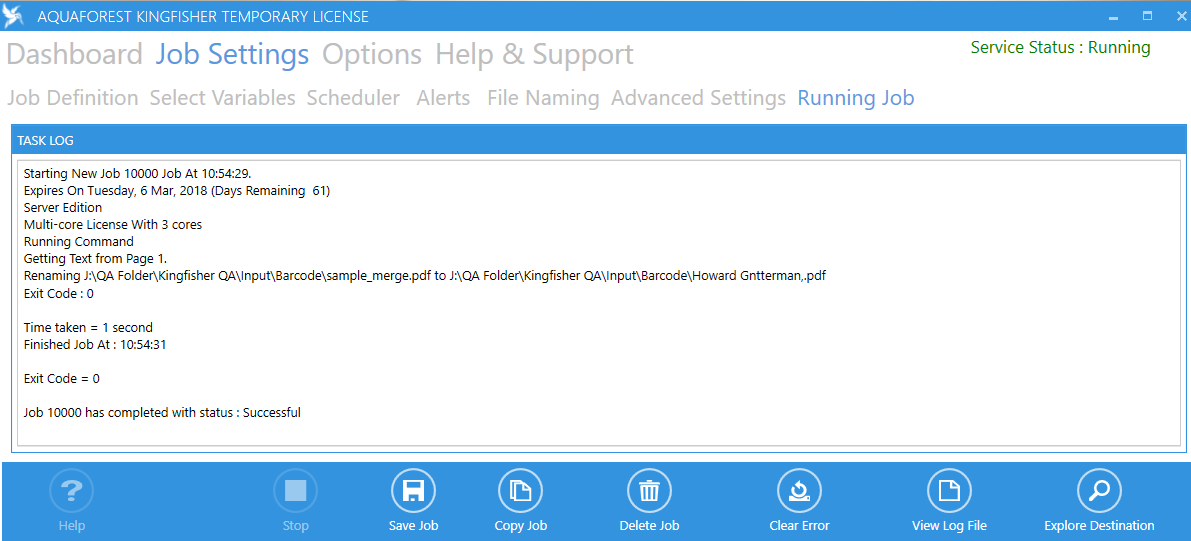
The Task Log displays the progress of the current or most recent run of the selected job.
The toolbar at the bottom has an additional Explore Destination button.
This opens the destination folder if it exists.