Fill PDF forms using Power Automate
In this guide, you’ll learn how to fill a PDF form using Power Automate.
Nutrient Document Automation Server (DAS) provides a powerful import PDF form data action, enabling seamless integration of XML, FDF, and XFDF data into PDF forms. This step-by-step guide demonstrates how to retrieve XML data from a Microsoft SharePoint list and use Power Automate to automatically populate a PDF form, streamlining document workflows.
Prerequisites
Before you start, make sure you have everything set up for a smooth workflow:
- A full or free trial subscription of Document Converter for Power Automate
- Appropriate privileges to create Power Automate flows
- Basic familiarity with Power Automate automation processes
- A Microsoft SharePoint list containing data ready for import into a PDF form
Fill a PDF form with Microsoft Power Automate
In this example, you’ll use Microsoft Power Automate to extract data from a SharePoint list, loop through all list items, and populate a PDF form template. Once imported, the form remains fully editable for additional modification.
To get started, download the sample fillable PDF form(opens in a new tab).
Create the form structure as XML
To structure your PDF form as XML, start by uploading your form to a SharePoint library and creating a new Power Automate flow. Choose the option to manually trigger the flow.
Steps to extract form data as XML
- Retrieve the file content
- Add the Get file content using path action.
- Select the appropriate Site Address and File Path.
- Export PDF form fields as XML
- Use Document Converter’s Export PDF Forms Data action to extract form fields.
- Exported data formats include XML, XFDF, and FDF.
- Log exported data
- Add the Compose action.
- Use the
Base64function to process the extracted data.

Document Converter’s Processed file content action returns a Base64 value. Use the base64ToString(outputs(‘Export_PDF_Forms_Data’)?\[‘body/processed_file_content’\ formula to convert it to a readable string.
Sample XML output
Once exported, the XML file will look as follows:
\<?xml version="1.0" encoding="utf-8"?\>
\<fields xmlns:xfdf="http://ns.adobe.com/xfdf-transition/"\>
\<GivenNameTextBox xfdf:original="Given Name Text Box"\>Clavin\</GivenNameTextBox\>
\<FamilyNameTextBox xfdf:original="Family Name Text Box"\>Fernandes\</FamilyNameTextBox\>
\<Address1TextBox xfdf:original="Address 1 Text Box"\>Sai Jewel\</Address1TextBox\>
\<HousenrTextBox xfdf:original="House nr Text Box"\>Central Park\</HousenrTextBox\>
\<Address2TextBox xfdf:original="Address 2 Text Box"\>Kharghar\</Address2TextBox\>
\<PostcodeTextBox xfdf:original="Postcode Text Box"\>410210\</PostcodeTextBox\>
\<CityTextBox xfdf:original="City Text Box"\>Navi Mumbai\</CityTextBox\>
\<CountryComboBox xfdf:original="Country Combo Box"\>India\</CountryComboBox\>
\<GenderListBox xfdf:original="Gender List Box"\>Man\</GenderListBox\>
\<HeightFormattedField xfdf:original="Height Formatted Field"\>180\</HeightFormattedField\>
\<DrivingLicenseCheckBox xfdf:original="Driving License Check Box"\>Yes\</DrivingLicenseCheckBox\>
\<FavouriteColourListBox xfdf:original="Favourite Colour List Box"\>Yellow\</FavouriteColourListBox\>
\</fields\>
With the PDF form data structured as XML, the next step is to create a Power Automate flow to import SharePoint list items into your PDF template.
Create the Power Automate flow
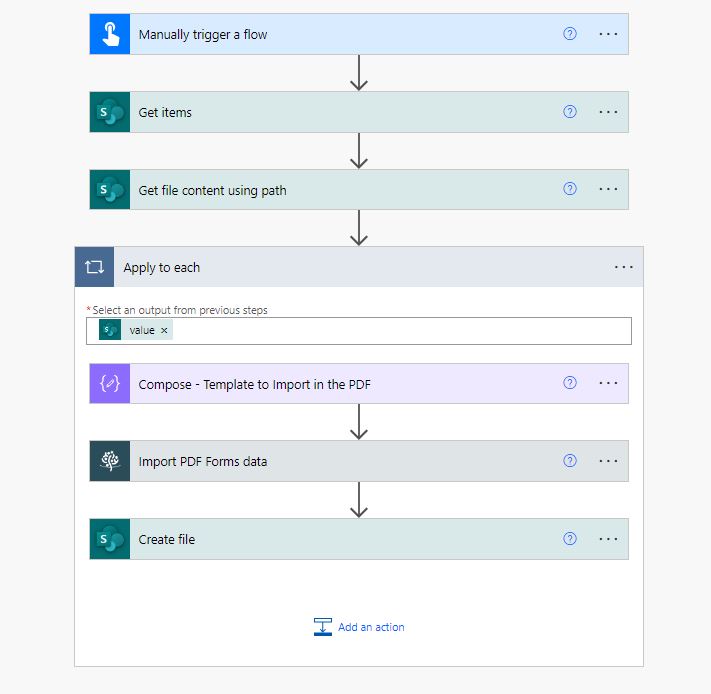
At a high level, your Power Automate flow will follow the structure shown below.
Create a new flow
- Navigate to Power Automate and create a new flow using the Instant cloud flow option.
- Choose Manually trigger a flow as the trigger.

Retrieve SharePoint list data
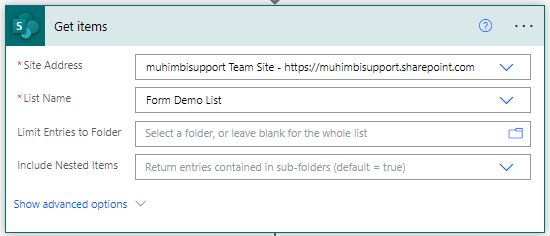
- Add the Get items action from SharePoint.
- Configure the settings:
- Site Address — Select the SharePoint Online site collection.
- List Name — Choose the SharePoint list containing the data.
If your list contains a large number of records, enable pagination in the action settings and increase the threshold as needed.
Retrieve the PDF form template
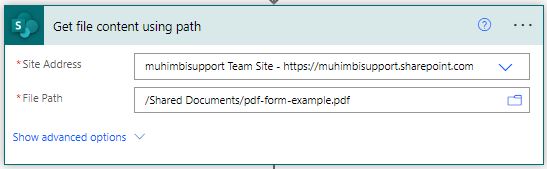
- Add the SharePoint Get file content using path action.
- Configure the settings:
- Site Address — Select the SharePoint site collection.
- File Path — Choose the PDF form template location.
Process each SharePoint list item
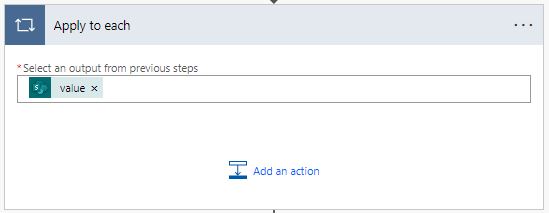
Insert an Apply to each condition.
In the Select an output from previous steps field, choose a value output from the Get items action.
Choose Add an action and paste the previously exported XML template.

Insert dynamic fields from the Get items action into the appropriate XML placeholders to populate the form with list data.
Import data into the PDF form
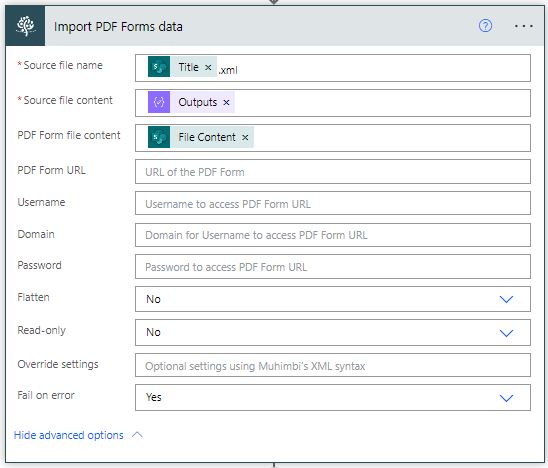
- Add Document Converter’s Import PDF Forms data action to the flow canvas.
- Configure the settings:
- Source file name — Set it to
Title.xml, which is the output of Get items. - Source file content — Use Outputs, which comes from the Compose action.
- PDF Form file content — Select File Content, which is the output of the Get file content using path action.
- Flatten — Select No to keep the form editable.
- Read-Only — Set to No to allow additional modification.
- Source file name — Set it to
Save the filled PDF to SharePoint
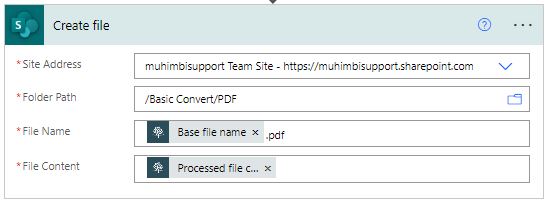
- Add the Create file SharePoint action to create the PDF document in the SharePoint document library.
- Configure the settings:
- Folder Path — Specify the destination library for the PDF output.
- File Name — Specify
Base File Name.pdf, which is the output variable of the Import PDF Forms data action. - File Content — Enter Processed file content, which is the output variable of the Import PDF Forms data action.
Run the flow
Manually start the flow. Within seconds, each SharePoint list item will be processed, and the corresponding PDF documents will be created in the SharePoint document library.