Convert CAD to PDF in SharePoint
In this guide, you’ll learn how to convert DWG and DXF files to PDF in SharePoint. Key features include:
- Full 2D and 3D support.
- Highly configurable (output paper size, margins, layouts/views to convert).
- Automatic and intelligent recoloring of drawings, e.g. switching the background to black, white, or any other color without losing visibility of elements that were already using that color. Full black and white support is available as well.
- Conversion of individual layouts or all layouts while skipping empty and invalid ones.
- Automatic detection of paper orientation.
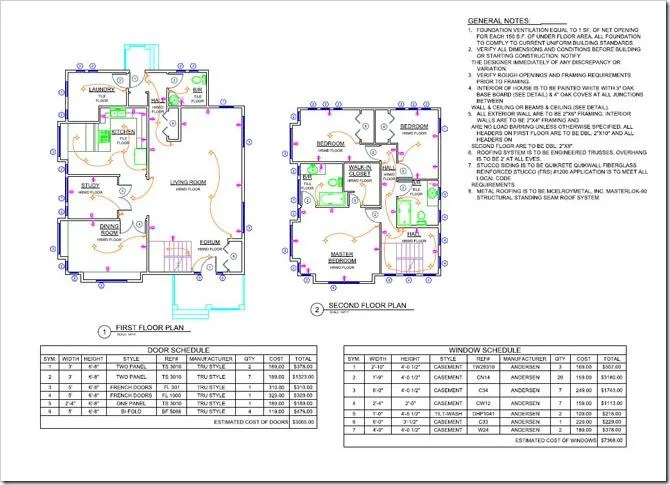
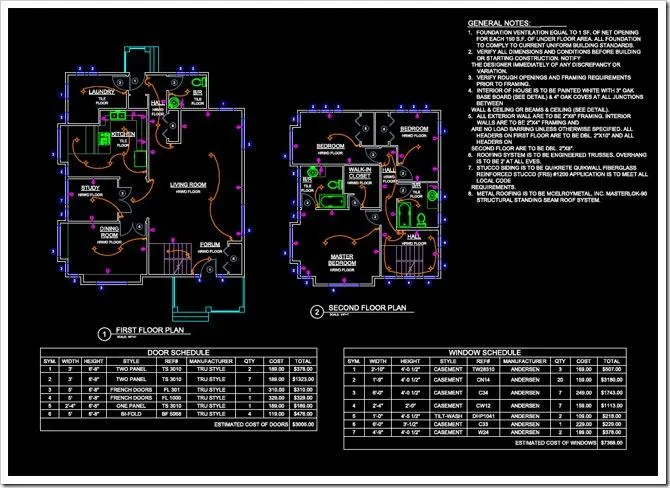
Below are three copies of the same drawing after conversion to PDF, but with different recoloring options.


If you prefer, you can also use third-party CAD converters in combination with Muhimbi Document Converter if you need support for a feature that isn’t currently supported by us.
Converting CAD Files Using the MS SharePoint UI
To convert CAD files using the MS SharePoint UI:
- Go to the document library and folder where the AutoCAD file is located.
- Select the file you want to convert.
- Open the context menu and click Convert to PDF.
- Review the Conversion settings page and click Convert.
- Review the Conversion results page to check if the conversion was successful and without any errors.
- Click Destination Library and to go to the converted PDF file’s directory.
Note: When using the Document Converter with MS SharePoint 2010 or later, you can also convert the file by selecting it and choosing Convert to PDF in the ribbon.
You can also select a different folder in which the converted PDF file(s) need to be saved by clicking Browse and selecting the appropriate folder.
If you select Remember this Path, it’ll become the default path for future conversions. This can also be changed if needed.
Converting CAD Files to PDF via MS SharePoint Workflow
You can use the example below to create a simple workflow in MS SharePoint Designer, which converts a DWG or DXF file to PDF format as soon as it has been approved.
The legacy MS SharePoint 2007 / 2010 workflow engine is fully supported, as is the optional Workflow Manager that comes with MS SharePoint 2013 and later versions. For more details, refer to How to Use SharePoint 2013 and 2016 to Convert to PDF(opens in a new tab).
Before you start, make sure Document Converter for SharePoint has been installed and you have access to a site collection with the appropriate rights to create workflows.
To convert documents via a workflow using MS SharePoint Designer, you’ll need to configure the document library and then configure the workflow according to the details below.
Creating and Configuring the Document Library
You can create and configure the document library by performing the following steps:
- Create a document library named Proposal Documents. If you prefer, you can choose another name.
- Once created, navigate to the library’s Settings > Document Library Settings > Versioning Settings screen and enable Requires content approval for submitted items.
- In the document library, create two folders: Confidential Proposals and Approved PDF Files. If you prefer, you can choose other names.
Creating and Configuring the MS SharePoint Designer Workflow
You can create and configure the MS SharePoint Designer workflow by performing the following steps:
- Start MS SharePoint Designer and open the site collection that contains the Proposal Documents document library.
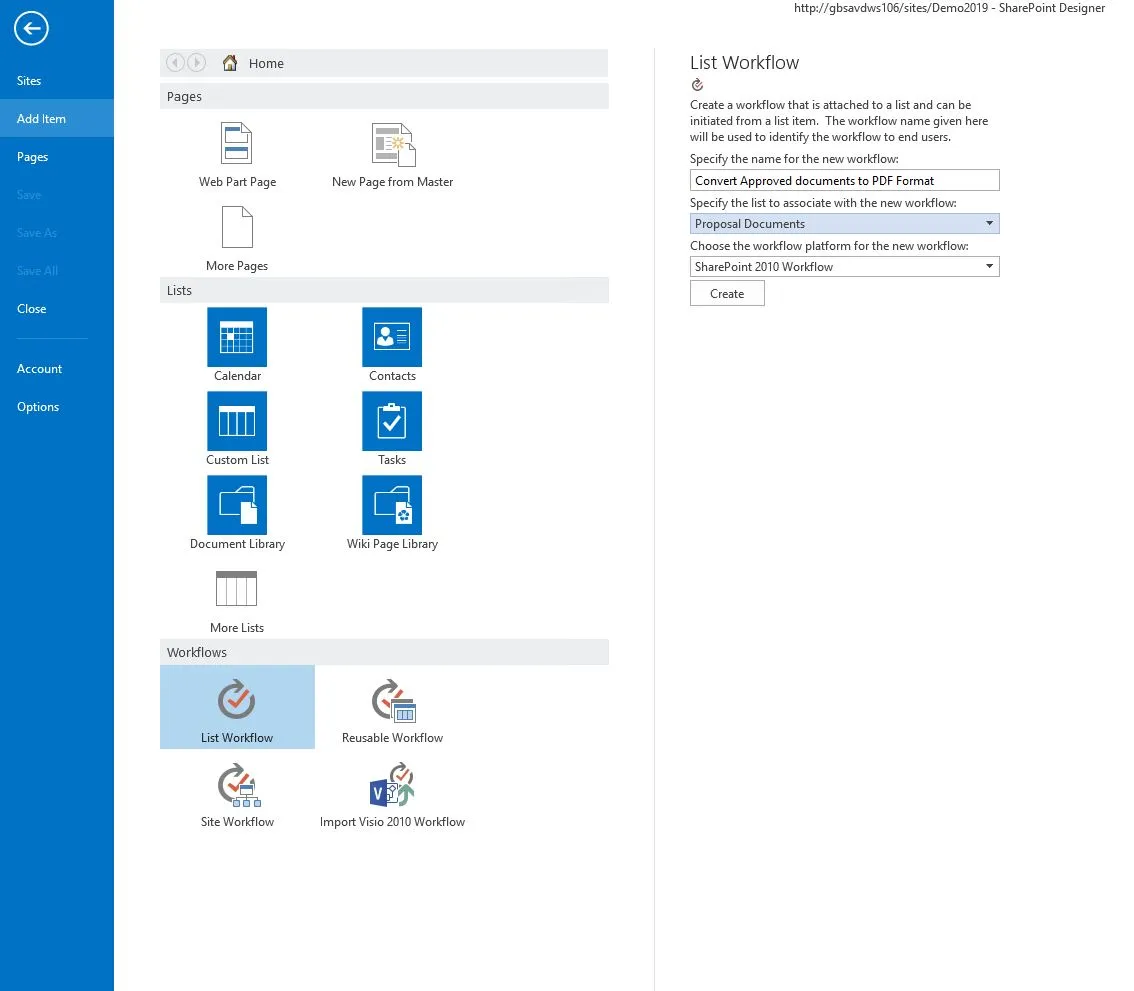
- Click Add Item and select List Workflow. Specify the following settings:
- The name for the new workflow: Convert Approved documents to PDF Format
- The list to associate with the new workflow: Proposal Documents
- When creating a SharePoint Designer workflow in SharePoint 2013 or later, select the appropriate platform type.

- Click Create to proceed.
- From the Conditions menu, select the If value equals value condition.
- Click the first value, followed by the display data binding fx button.
- Select Current Item as the Source, and select Approval Status in the field.
- Click OK to continue.
- Click the second value and select Approved from the list.
To avoid the same workflow being executed on the converted PDF file after the conversion has taken place, you need to specifically exclude PDF files as follows:
- Add another If value equals value condition.
- Click the first value, followed by the display data binding fx button.
- Select Current Item as the Source and select File Type in the Field
- Click OK to continue.
- Select equals and change it to not equals.
- Click the second value and enter PDF. (Do not prefix the extension with a period).
With these conditions in place, you can now add the Actions:
- From the Actions menu, select Convert to PDF. It may be hidden behind the All Actions option.
- The following action is inserted: Convert ‘this document to ‘this url’ using ‘the same file name’ and ‘include / exclude meta data’. Store the converted item details in List ID: ‘Variable: List ID’, Item ID: ‘Variable: List Item ID’.
There are various options within the action:
- this document — Specify which document to convert. Select the option and make sure Current Item is selected.
- this url — Specify the location the converted file will be written to. The following options are available:
- Leave it empty — When no value is specified, the converted document is written to the same folder as the source file.
- Site Relative URL — By specifying a URL relative to the current site, e.g.
subsite/shared documents/PDF Files, any folder location in the current site collection can be targeted. This is the option you want to use, so enter Important Documents/Approved PDF Files. - Web Application relative URL — Using a URL that’s relative to the entire web application, e.g.
/sites/Press Office/Public Documents/To Distribute, any folder location in any site collection can be targeted.
- the same file name — The name of the converted file can be specified here. In this case, leave it empty to make sure you use the same name as the original document.
- include / exclude meta data — In case of sensitive documents, you may want to strip any custom SharePoint columns from the file. For example, if your document library contains a column named Yearly sales forecast, you’ll want to select Exclude.
- Variable: List ID — A new workflow variable named List ID is automatically created. After the file has been converted, this variable will contain the ID of the list the converted file was saved to. This can later be fed into another action to manipulate this file further.
- Variable: List Item ID — A new workflow variable named List Item ID is automatically created. After the file has been converted, this variable will contain the ID of the item the converted file was saved to. This can later be fed into another action to manipulate this file further.
- Insert a new action named Log to History List and enter File converted.
- Insert a new action named Update List Item and select this list. You’ll now automatically mark the converted PDF file as approved.
- From the List dropdown, select Confidential Proposals.
- Click the Add button and set the field to Approval Status and the value to Approved. Click OK.
Note: Starting with MS SharePoint 2010, it’s no longer possible to set the value of the Approved field.
- In the Find the List Item area, set the field to ID.
- Click the fx button next to Value and specify Workflow Variables and Parameters as the Source. Set the field to Variable: List Item ID. Click OK.
- Click OK again to return to the MS SharePoint Designer workflow. It will look like the image below.

- Click Publish to deploy and activate the workflow.
Testing the Workflow
You can test the workflow created by performing the following steps:
- Create or upload a document in MS Word file format to the Confidential Proposals folder.
- From the context menu, select Approve / Reject and approve the file.
- This will automatically start the workflow, and after a few seconds, the workflow status should change to Completed, as shown in the screenshot below.

Once the workflow has completed, you’ll find the PDF version of the document in the Approved PDF Files folder.

If an error occurs during the execution of the workflow, you can perform the following to troubleshoot:
- Check the messages on the workflow status screen.
- Check for errors in the Windows event log.
- Check for errors in the SharePoint trace log.