Library
Library Status
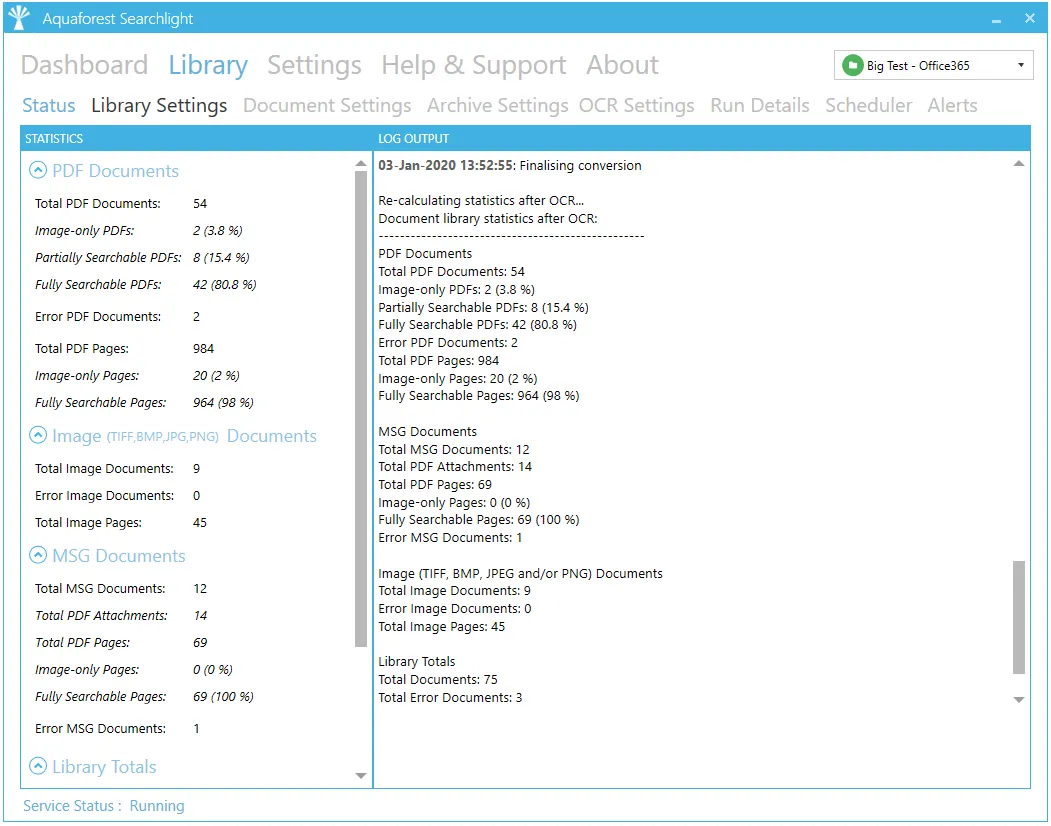
This screen provides a detailed breakdown of all the document libraries currently configured in Document Searchability. Each document library will have detailed information about each of the documents it contains and details about each document.
Library Settings
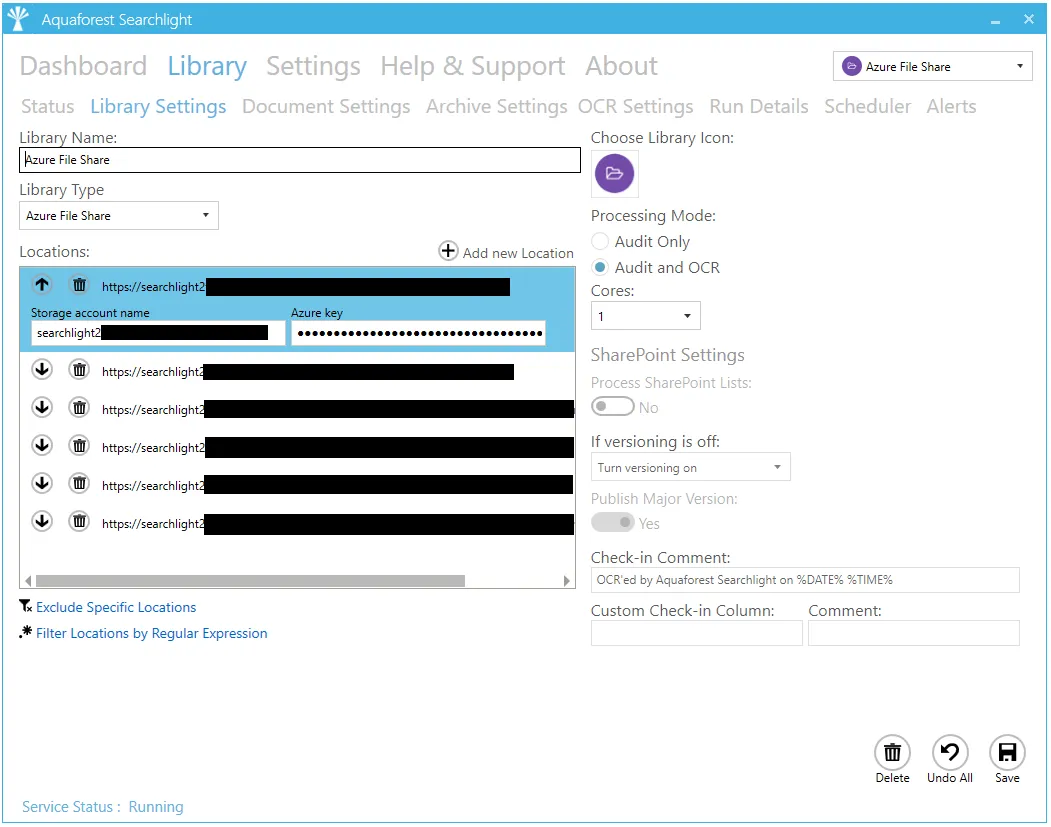
| Setting | Description |
|---|---|
| Document Library Name | Name/Title/Description of the document library |
| Document Library Type | The type of the document library: - File System - SharePoint - Office 365 - Azure Blob Storage - Azure File Storage |
| Locations | One or more locations (of the same type) to be processed. |
| Excluded Specific Locations | Select this if you want to exclude specific locations from being processed. Site collections, sites and libraries that match the specified URLs are excluded. |
| Filter Locations by Regular Expression | Select this to only include locations whose URLs match specific regular expressions. |
| Choose Library Icon | Choose an icon to associate to the library. |
| Processing Mode | - Audit Only: Analyse the document library to find out the documents that need to be converted without actually converting them. - Audit & OCR: Perform audit on the document library and OCR the documents that have been identified as candidates for processing |
| Cores | This determines the maximum number of CPU cores that will be used when running the job. |
| Process SharePoint Lists | Whether or not to process SharePoint lists. NOTE: Process SharePoint lists can be very time consuming if the lists being processed are very large |
| SharePoint Versioning | This setting can be used to automatically turn versioning on. |
| Publish Major Version | Publish major version after OCR |
| Check-in Comment | The check-in comment applied to the updated SharePoint file version. There is also the option of specifying the following templates in the check-in comment: %DATE% : will be replaced by the date the document OCRed %TIME% : will be replaced by the time the document OCRed |
| Custom Check-in Column | Optionally, specify a SharePoint column to add a custom comment to after OCR. NOTE: This is case sensitive. |
| Comment | The comment to add to the Custom Check-in Column. There is also the option of specifying the following templates in the comment: %DATE% : will be replaced by the date the document OCRed %TIME% : will be replaced by the time the document OCRed |
Document Settings

| Setting | Description |
|---|---|
| Process PDF | Whether or not to process PDF documents |
| Image Only | Whether or not to process Image-only PDFs. An Image-only PDF is a PDF that originated from a scanned document or other digital image. An Image-only PDF does not contain any text, just pictures. |
| Partially Searchable | Whether or not to process PDF documents that are partially searchable, i.e., some pages are searchable, and some are image-only. |
| Fully Searchable | Whether or not to process PDF documents that are fully searchable. |
| Hidden Text | Whether or not process PDF documents with hidden text in them. A Hidden Text PDF has pages that are Image-only with hidden (type 3) text. - Such files are typically the output of running an OCR PDF process on an Image Only PDF. - Note: If you set this setting to true, you might want to consider setting Remove Hidden Text to true in the “OCR Settings > PDF Source Settings”, otherwise you will have multiple OCR text layers per page. |
| Process TIFF Files | Whether or not to process TIFF files |
| Delete Original TIFF | Whether or not to delete the original TIFF files after they have been converted to searchable PDFs. |
| Process BMP Documents | Whether or not to process BMP files. |
| Delete Original BMP | Whether or not to delete the original BMP files after they have been converted to searchable PDFs. |
| Process JPEG Files | Whether or not to process JPEG files |
| Delete Original JPEG | Whether or not to delete the original JPEG files after they have been converted to searchable PDFs. |
| Process PNG Files | Whether or not to process PNG files. |
| Delete Original PNG | Whether or not to delete the original PNG files after they have been converted to searchable PDFs. |
| Process PDF Attachments | Whether or not to process PDF attachments inside MSG files. |
| Temp Folder Location | The folder used to save documents temporarily for Audit and OCR processing. |
| Date Filter | Filter out documents by modified or creation date. Documents that fall within the specified “From” and “To” date will be excluded. |
| Exclude Specific Documents | Select this if you want to exclude specific documents by their paths. Documents that match the specified paths are excluded. |
| Filter Documents by Regular Expression | Select this to only include documents whose properties match specific regular expressions. E.g., Only include documents whose name matches a specific regular expression. |
| Document Error Rule | The operation to perform if a document fails to process: - Copy to error folder - Move to error folder (for file system library type only) |
| Retain Folder Structure | Option to retain document’s folder structure when copied to error location |
| Document Error Location | The path of the error location |
| Document Error Location Type | File System - SharePoint - Office 365 - Azure Blob Storage - Azure File Storage |
| Retry | Whether or not to re-process documents that have previously failed to convert |
| OCR Document Limit | Limit the number of documents to OCR (not Audit) per run. Set to ‘0’ for no limits. |
| Retain Creation Date* | Retain the creation date of the source document (SharePoint creation date, FileSystem creation date and created date in PDF properties) |
| Retain Modified Date* | Retain the modified date of the source document (SharePoint modified date, FileSystem modified date and modified date in PDF properties) |
| Retain Created By* | Retain the created user of the source document (SharePoint created by FileSystem owner and author in PDF properties) |
| Retain Modified By* | Retain the created user of the source document (SharePoint modified by) |
* See the sections 6.3.3.1, 6.3.3.2 and 6.3.3.3 for more details about these settings.
Retain Creation/Modified Date/User
| Creation Date | Created User | Modified Date | Modified User | |
|---|---|---|---|---|
| SharePoint metadata** | ✔ | ✔ | ✔ | ✔ |
| PDF metadata** | ✔ | ✔ | ✔ | N/A |
| Windows File System | ✔ | ✔* | ✔ | N/A |
* “Create User” maps best to “Owner” in Windows File System metadata.
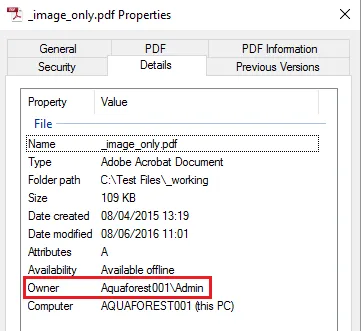
For this to be manipulated, the Document Searchability service must be running with sufficient administrative privileges.
** SharePoint metadata vs. PDF metadata
SharePoint metadata refers to the ‘columns’ available in SharePoint that stores information about each document.
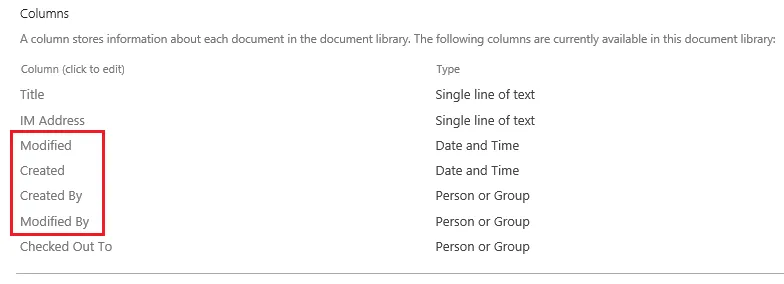
PDF metadata refers to the document properties (File > Properties) of a PDF document.

SharePoint Libraries
The behaviour of Retain Creation/Modified Date/User can vary depending on the settings used in SharePoint and Document Searchability. The table below summarises when these will and will not be retained in SharePoint.
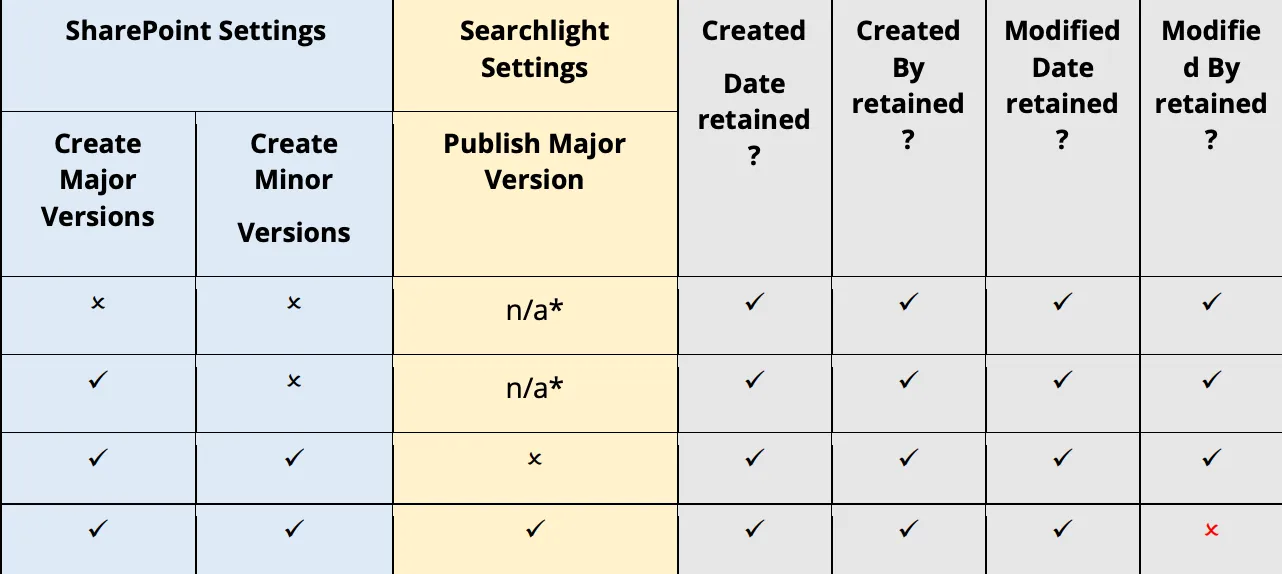
n/a* - To publish major version, both major and minor versioning must be on in SharePoint.
SharePoint Lists

Document Archive Settings

| Setting | Description |
|---|---|
| Archive Template | The template to use to rename the archived file name. The default is: %FILENAME%%TIMESTAMP%.%EXT% |
| Archive Location | The folder location where original documents will be archived |
| Archive source Images to Archive folder | If enabled, this will Archive your source Images (TIFF, BMP, JPEG, PNG) to the Archive folder specified above. |
| Archive source PDF & MSG files to Archive folder | If enabled, this will Archive the source PDFs and MSG files that have PDF attachments to the Archive folder (even when versioning is enabled within SharePoint). A file is only archived before it is OCRed. |
| Archive Location Type | File System - SharePoint - Office 365 - Azure Blob Storage - Azure File Storage |
| Retain Folder Structure | Option to retain document’s folder structure when file is archived |
OCR Settings
As described in section 5.1.4, Document Searchability has 2 OCR engines. When creating a new library, the default OCR settings are loaded from the Properties.xml file for each OCR engine.
- Nutrient engine: “[installation path]\ocr\Properties.xml”
- Extended (IRIS) engine: “[installation path]\extendedocr\Properties.xml”
This can be useful if you have a set of OCR settings that work best for the type of documents you have and want to use the same OCR settings for all newly created document libraries.
Note: Document Searchability does not modify the Properties.xml file. To set default values, you need to manually update the relevant Properties.xml file.
Standard OCR Settings
General Settings

| Setting | Description |
|---|---|
| General Settings | |
| Auto Rotate | Automatically rotate pages so that text flows left to right |
| Deskew | Straighten the image |
| Remove Lines | Remove lines and boxes during OCR processing to improve recognition – particularly in cases where characters touch lines |
| Despeckle | Remove specks below the specified pixel size from the image |
| Box/Graphics Processing | By default, if an area of the document is identified as a graphic area, then no OCR processing is run on that area. However, certain documents may include areas or boxes that are identified as “graphic” or “picture” areas but that actually do contain useful text. To ensure that the OCR engine can be forced to process such areas there are two options: - “Treat all Graphics Areas as Text”. This option will ensure the entire document is processed as text. - “Remove Box Lines in OCR Processing”. This option is ideal for forms where sometimes boxes around text can cause an area to be identified as graphics. This option removes boxes from the temporary copy of the imaged used by the OCR engine. It does not remove boxes from the final image. Technically, this option removes connected elements with a minimum area (by default 100 pixels). |
| Advanced Flags | Command line flags to be passed through to the underlying executable. Contact our support team for details on using this field. |
PDF Source Settings

| PDF Source Settings | |
|---|---|
| Re-Image PDF | Each page of the source PDF is rasterized to an image and appended to a new PDF document. |
| DPI | Sets the DPI of rasterized images. If 'Re-image PDF' is used, these images will be added to the output file. |
| Retain Bookmarks | Retains any bookmarks from the source file in the output PDF document when using 'Re-Image PDF'. |
| Retain Metadata | Retains any metadata from the source file in the output PDF document when using 'Re-Image PDF'. |
| Retain Viewer Prefs | Retains any PDF Viewer Preferences, Page Mode and Page Layout from source file in the output when using 'Re-Image PDF' |
| Compression | The image(s) in the output PDF file will be compressed using JBIG2 (for black and white image) or MRC (for color images) which can dramatically reduce the output size of PDFs. |
| Remove Hidden Text | Remove existing hidden text (text that was added as a result of a previous OCR) from the PDF file so that the resulting searchable PDF file does not have two layers of the same text. |
| Force Vector Check | This setting is useful when dealing with documents that contains vector objects (e.g., CAD drawings). By default, pages that contain only vector objects are rasterized. Pages that do not have any images but contains vector objects as well as electronic text are skipped from rasterization. However, sometimes there can be a page that contain vector objects (CAD drawings), but its title may be in electronic text. To force rasterizing pages like these, set this property to true. |
| PDF/A | Switch on to make sure the output PDF conforms to the PDF/A standards. |
| PDF/A Version | This determines the PDF/A version of the generated PDF. |
| Validate PDF/A | Validate the PDF as conforming to PDF/A. |
Image Source Settings
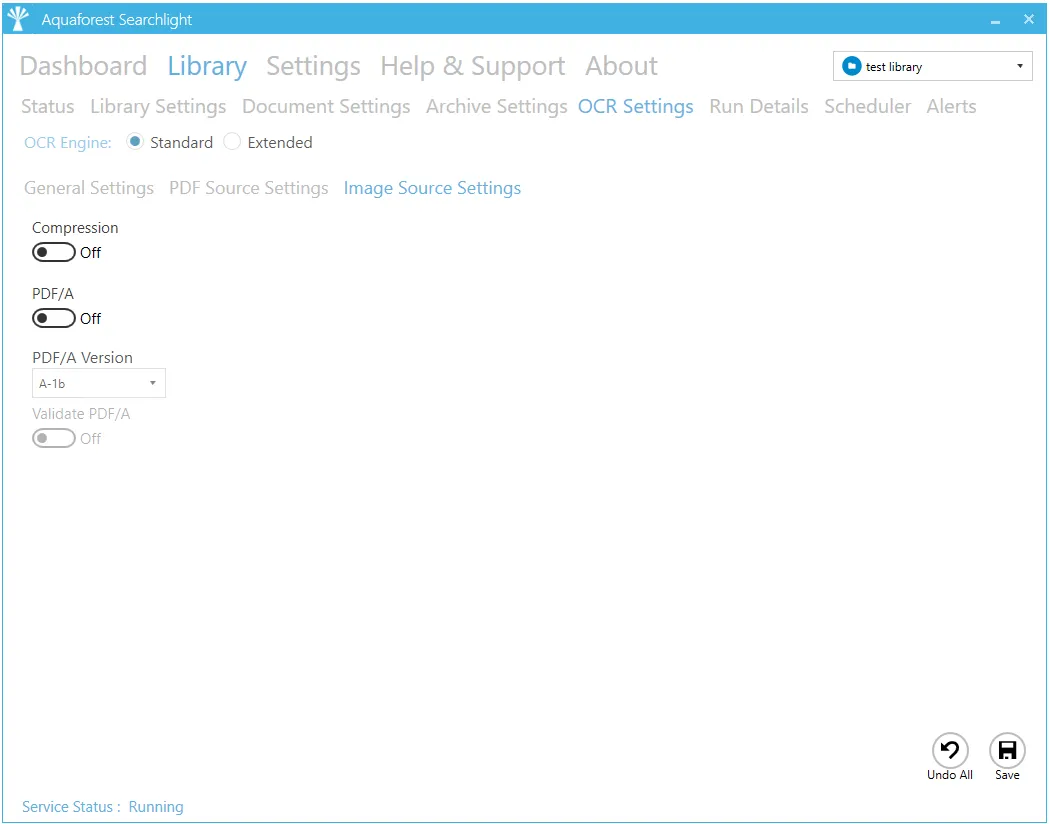
| Image Source Settings | |
|---|---|
| Compression | The image(s) in the output PDF file will be compressed using JBIG2 (for black and white image) or MRC (for color images) which can dramatically reduce the output size of PDFs. |
| PDF/A | Switch on to make sure the output PDF conforms to the PDF/A standards. |
| PDF/A Version | This determines the PDF/A version of the generated PDF. |
Extended OCR Settings
General Settings

| Setting | Description |
|---|---|
| Auto Rotate | Detect page orientation and correct if required |
| Deskew | Rotates the image to correct its skew angle. |
| Remove Dark Borders | Removes the dark surrounding from bitonal, grayscale or color images. The dark surrounding of the image is whitened. - Note: The dark border should be touching the edge of the image/page for this to work. |
| Keep Original Image | Yes, to keep the original image as it is. No to output the image generated after selected pre-processing has been applied. - Note: This only applies when the source document is an image (TIFF, BMP, JPEG, PNG) or 'Re-Image PDF' is used when the source is a PDF document. |
| Despeckle | Removes all the groups of connected pixels with a number of pixels below the parameter. |
| Advanced Despeckle | The size of the speckles to remove. |
| Remove White Pixels | By default, despeckle removes black pixels. If set to true, despeckle will remove white pixels rather than black pixels. |
| Work Depth | This parameter (0 – 255) defines how deeply the OCR engine will analyse a page with 255 being the deepest. For poorer quality documents, higher values can give better recognition results. |
| Remove Blank Pages | Set this to true to remove blank pages from output PDF documents. A value needs to be set for sensitivity (see below). |
| Sensitivity | The sensitivity, from 1 to 100. With a high sensitivity, fewer blank pages are detected. |
| Language | Set the language(s) to use for OCR. - Note: Only a maximum of 8 languages can be selected. - Only the English language can be used in conjunction with an Asian language |
PDF Source Settings
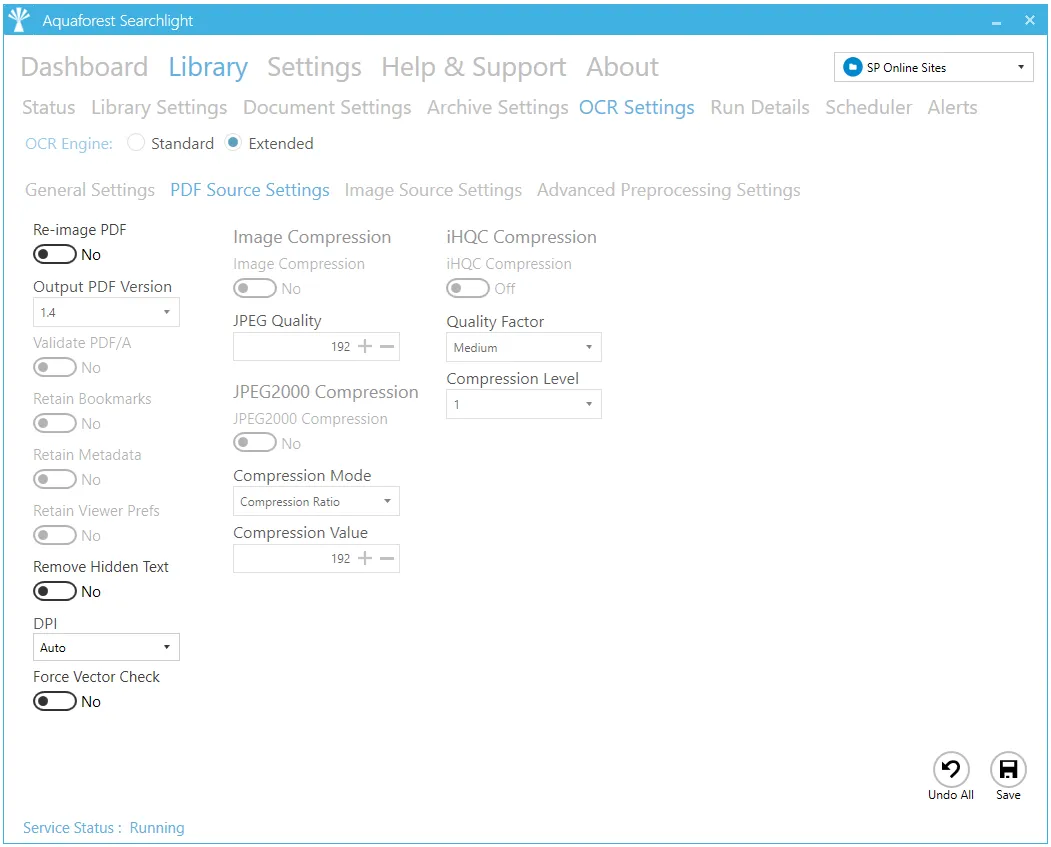
| PDF Source Settings | |
|---|---|
| Re-Image PDF | Each page of the source PDF is rasterized to an image and appended to a new PDF document. |
| Output PDF Version | This determines the PDF version of the generated PDF. |
| Retain Bookmarks | Retains any bookmarks from the source file in the output PDF document when using 'Re-Image PDF'. |
| Retain Metadata | Retains any metadata from the source file in the output PDF document when using 'Re-Image PDF'. |
| Remove Hidden Text | Remove existing hidden text (text that was added as a result of a previous OCR) from the PDF file so that the resulting searchable PDF file does not have two layers of the same text. |
| Remove Visible Text | Whether or not to re-OCR existing visible text. |
| DPI | Sets the DPI of rasterized images. If 'Re-image PDF' is used, these images will be added to the output file. However, applying 'Image Compression' or 'iHQC Compression' may reduce the DPI in the output PDF. |
| Force Vector Check | This setting is useful when dealing with documents that contains vector objects (e.g., CAD drawings). By default, pages that contain only vector objects are rasterized. Pages that do not have any images but contains vector objects as well as electronic text are skipped from rasterization. However, sometimes there can be a page that contain vector objects (CAD drawings), but its title may be in electronic text. To force rasterizing pages like these, set this property to true. |
| Image Compression | Compress color JPEG images in generated PDFs |
| JPEG Quality | This parameter (0 – 255) determines the compression/quality of color JPEG images in generated PDFs. 0 gives the smallest file size whilst 255 gives the best quality. |
| JPEG2000 Compression | Use JPEG 2000 compression |
| Compression Mode | The JPEG 2000 compression mode to use. |
| Compression Value | The value to use for the selected compression mode. |
| iHQC Compression | Apply intelligent High-Quality Compression |
| Quality Factor | The IHQC quality factor. |
| Compression Level | The iHQC compression level to be used. Level 1 is the basic compression level. Level 3 is the most advanced intelligent High-Quality Compression mode. |
Image Source Settings

| Image Source Settings | |
|---|---|
| Output PDF Version | This determines the PDF version of the generated PDF. |
| Image Compression | Compress color JPEG images in generated PDFs |
| JPEG Quality | This parameter (0 – 255) determines the compression/quality of color JPEG images in generated PDFs. 0 gives the smallest file size whilst 255 gives the best quality. |
| JPEG2000 Compression | Use JPEG 2000 compression |
| Compression Mode | The JPEG 2000 compression mode to use. |
| Compression Value | The value to use for the selected compression mode. |
| iHQC Compression | Apply intelligent High-Quality Compression |
| Quality Factor | The IHQC quality factor. |
| Compression Level | The iHQC compression level to be used. Level 1 is the basic compression level. Level 3 is the most advanced intelligent High-Quality Compression mode. |
Advanced Pre-processing Settings
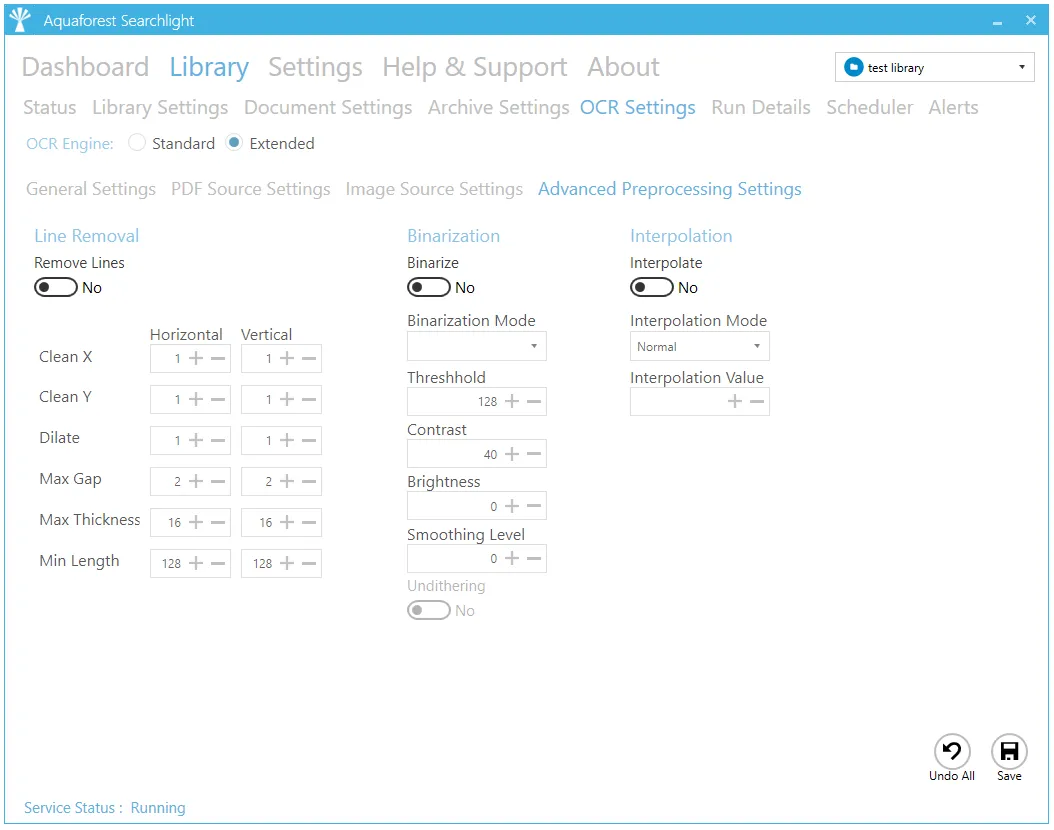
| Advanced Pre-processing Settings | |
|---|---|
| Remove Lines | Whether or not to remove lines from an image (The image must be black and white). |
| Horizontal Clean X | The parameter for cleaning noisy pixels attached to the horizontal lines. |
| Horizontal Clean Y | The parameter for cleaning noisy pixels attached to the horizontal lines. |
| Vertical Clean X | The parameter for cleaning noisy pixels attached to the vertical lines. |
| Vertical Clean Y | The parameter for cleaning noisy pixels attached to the vertical lines. |
| Horizontal Dilate | The dilate parameter that helps the detection of horizontal lines. |
| Vertical Dilate | The dilate parameter that helps the detection of vertical lines. |
| Horizontal Max Gap | The maximum horizontal line gap to close. It is useful to remove broken lines. |
| Vertical Max Gap | The maximum vertical line gap to close. It is useful to remove broken lines. |
| Horizontal Max Thickness | The maximum thickness of the horizontal lines to remove. It is useful to keep vertical lines larger than this parameter. Can be also useful to keep vertical letter strokes. |
| Vertical Max Thickness | The maximum thickness of the vertical lines to remove. It is useful to keep horizontal lines larger than this parameter. Can be also useful to keep horizontal letter strokes. |
| Horizontal Min Length | The minimum length of the horizontal lines to remove. |
| Vertical Min Length | The minimum length of the vertical lines to remove. |
| Binarize | Whether or not to perform binarization on the document. |
| Brightness | The brightness (higher values will darker the result). |
| Contrast | The contrast (lower values will darker the result). |
| Smoothing Level | Smoothing may be useful to binarize text with a colored background in order to avoid noisy pixels (0 disables smoothing, higher values smooth more). |
| Threshold | Sets the threshold for fixed threshold binarization (0 for automatic threshold computation). |
| Interpolate | Whether or not to interpolate. |
| Interpolation Mode | Sets the interpolation mode. |
| Interpolation Value | Interpolates the source image to the given resolution. This value (the target resolution) must be greater than the source image's resolution. |
Run Details
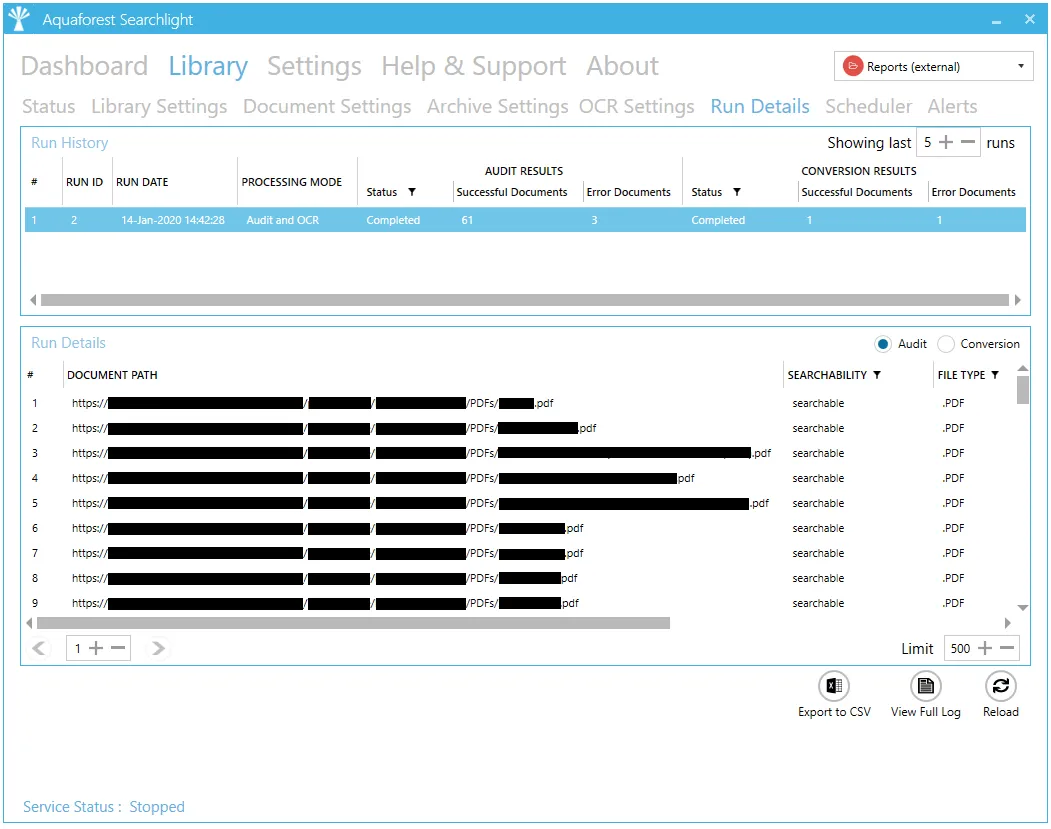
Previous runs carried out on a particular document library are listed under the Run History section. The Run Details list provide detailed information about each run. Both the Run History and Run Details have columns where filters can be applied to limit what is displayed.
Use Export to CSV to export the run details to CSV file.
The View Full Log button can be used to display the full log file of a specific run.
Run Details Context Menu
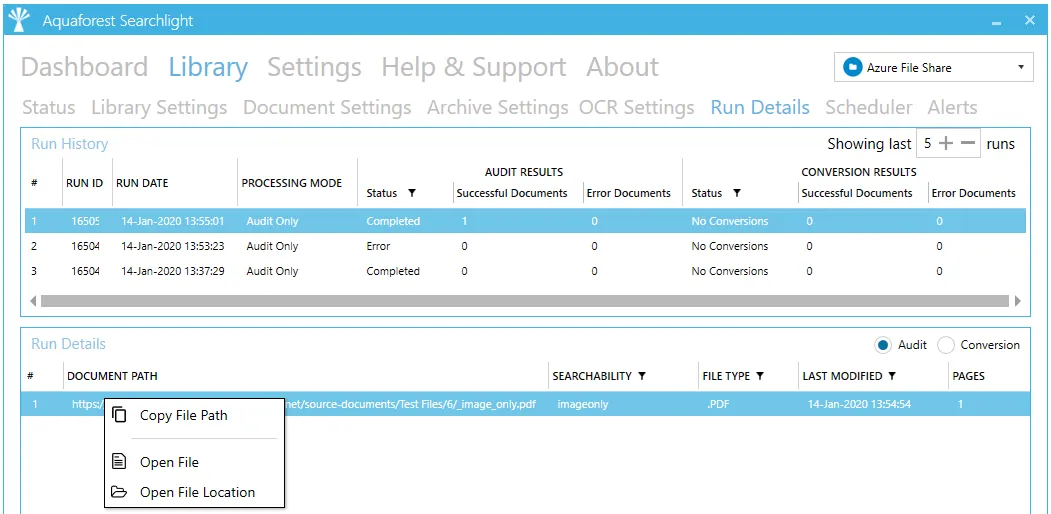
Use the right-click context menu to:
- Copy the file path of the selected document.
- Open the file (File System and SharePoint only)
- Open the location of the file (File System and SharePoint only)
Scheduler Settings
| Setting | Description |
|---|---|
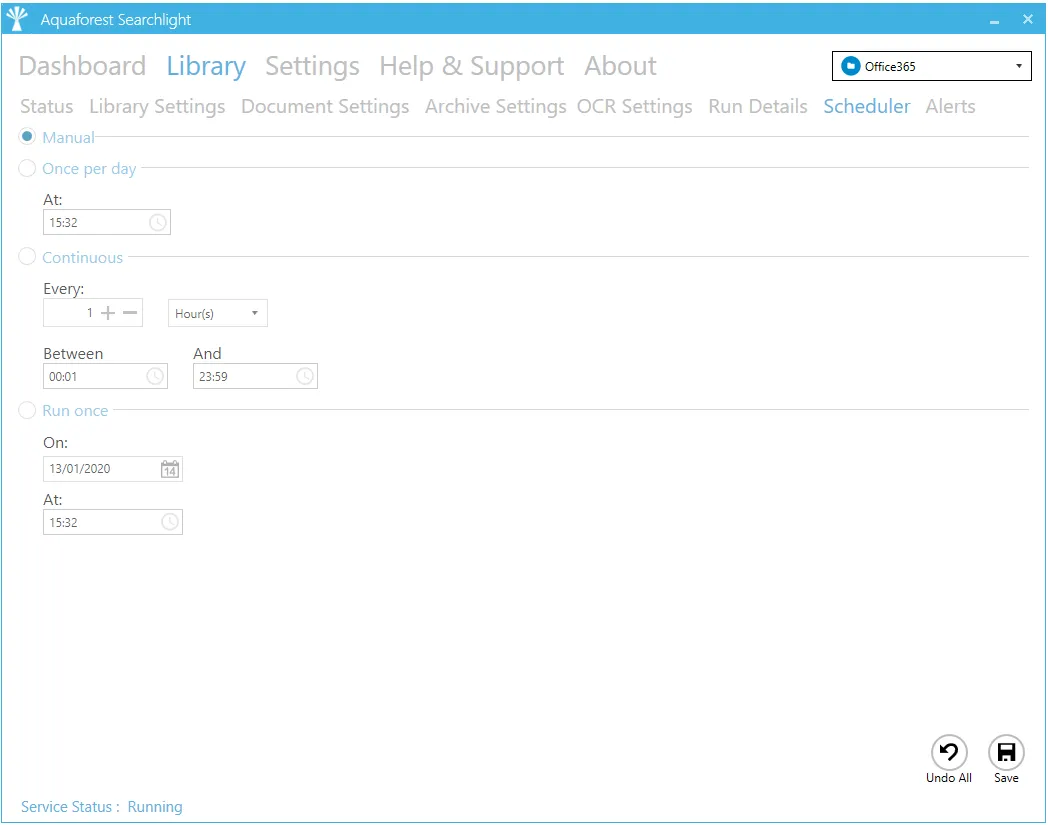
| Manual | This means that the document library must be run manually by clicking on the “Run” button on the dashboard. |
| Once per day | This allows the document library to be scheduled to run at a specified time each day. |
| Continuous | This allows the document library to be scheduled to run periodically between a start time and end time each day. The periods may be minutes, hours, days, or months. For example, a document library may be specified to run every 1 hour between 9:00 and 17:00. |
| Run Once | This allows the document library to be scheduled to run only once at a specified time. |
Alert Settings
Action

| Setting | Description |
|---|---|
| Action | |
| Send an email | Select this if you want to send an email |
| Generate a CSV report | Select this if you want to generate a report |
| Attach the CSV report to the email | Whether or not to attach the CSV report to the email |
| Save Report | Save the report locally |
| Location Type | The type of storage used to save the report: - File System - SharePoint - Office 365 - Azure Blob Storage - Azure File Storage |
| Location | The location to save the report |
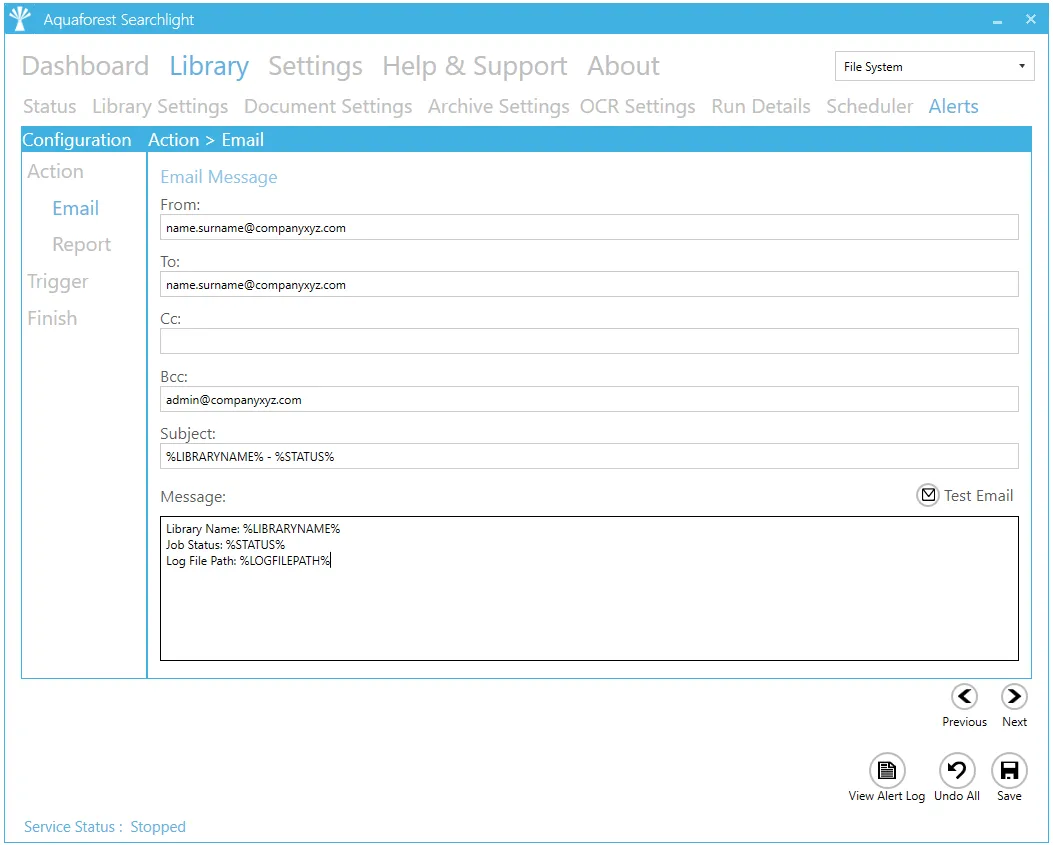
| From | The email address to send the email from. |
| To - Cc - Bcc | The email address(es) to send the email to. Multiple email addresses can be specified by separating each one with a semicolon in the “To”, “Cc” and “Bcc” fields. |
| Subject | The email subject. You can use the following templates: - %LIBRARYNAME% - will be replaced by the name of the library - %STATUS% - will be replaced by “success” or “error” depending on whether the job ran successfully or not |
| Message | The email message to send. You can use the following templates within the email message: - %LIBRARYNAME% - will be replaced by the name of the library - %STATUS% - will be replaced by “success” or “error” depending on whether the job ran successfully or not - %LOGFILEPATH% - will be replaced by the path of the log file for the library - %ERRORMESSAGE% - will be replaced by any error messages that occurred during the library run |
Report

| Report | |
|---|---|
| Show library audit summary in report | The library audit summary contains statistics about the current searchability status of the library as a whole, as well as individual statistics about each document type in the library. |
| Run Details Summary (OCR only) | |
| Show run details summary in report. | The run details summary lists all the documents that were processed in a particular run including: - Number of documents OCRed - Number of documents that failed to OCR |
| Show details of individual documents that were processed | Include in the report individual document details (for the columns to be included see below) |
| Limit | Set the maximum number of documents reported. This value needs to be set by the user. |
| Choose columns that will appear in the report: | The columns include: - Document Path - Searchability - Document Type - Number of pages - Number of searchable pages - Number of image pages - Conversion status |
Trigger
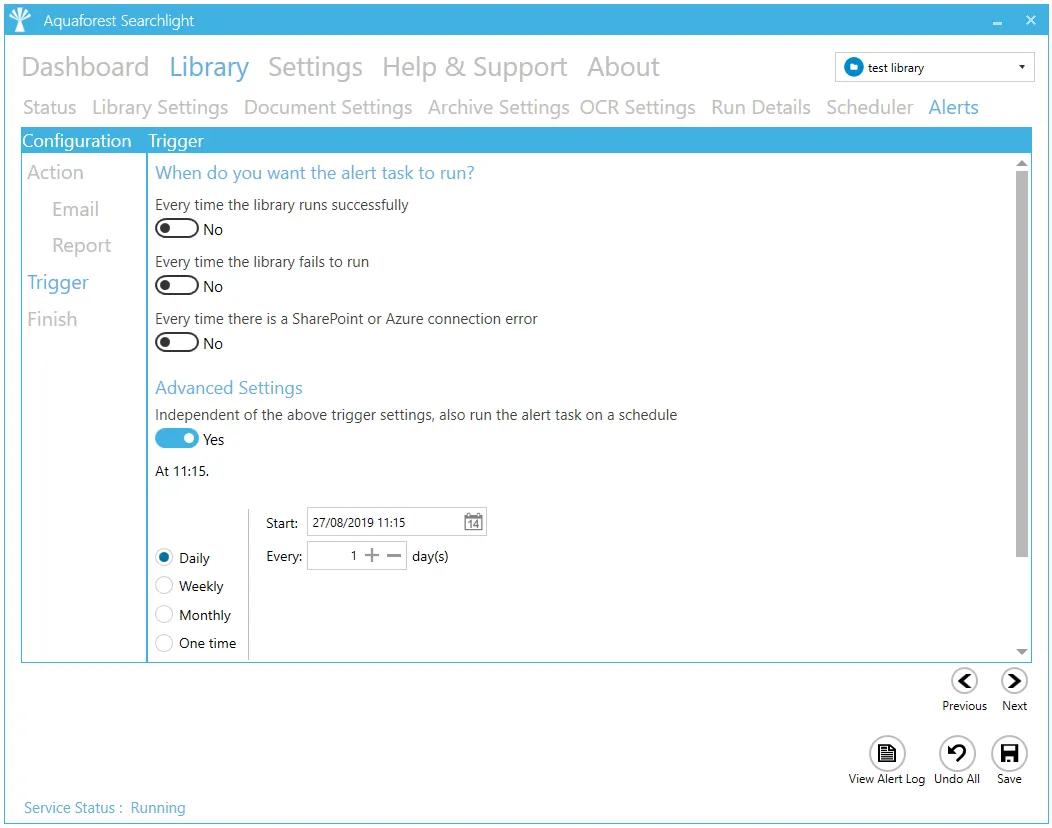
| Trigger | |
|---|---|
| Alert is triggered | Every time the library runs successfully. - Every time the library fails to run. - Every time there is a SharePoint or Azure connection error |
| Advanced Settings | Independent of the above trigger settings, the alert can be scheduled to run daily, weekly (on selected days), monthly or once. |
| Expires | Whether or not the trigger expires |
| Expiry | The expiry date of the trigger. The alert task will not run after this date. |