’Add watermarks to documents in SharePoint’

In this guide, you’ll learn how to add watermarks to documents in SharePoint using the standard SharePoint user interface. This feature supports applying watermarks to documents, list item attachments, and even custom user-specific watermarks when opening a document — achieving what other solutions cannot.

Information

By default, the SharePoint watermarking screens associated with this feature are disabled. Enable them by activating Nutrient Document Converter Automatic Document Processing User Interface feature at either the web application or site collection level (but not both).

Configuring predefined watermarks at the site collection level

To enable shared watermarks across multiple lists and libraries, default watermarks can be configured at the site collection level using the Site Actions\Watermarking Settings screen. This ensures consistent watermarking across your SharePoint environment.

Information

Configuring default watermarks at the site collection level doesn’t automatically activate watermarking for a specific library. Watermarking must be enabled individually for each library.

default watermarks

You can configure different default watermarks for insert, update, and open watermarking events. Additionally, you have the option to lock the appearance of watermarks, ensuring their design cannot be modified at the list or library level.

Configuring automatic watermarking at the list or library level

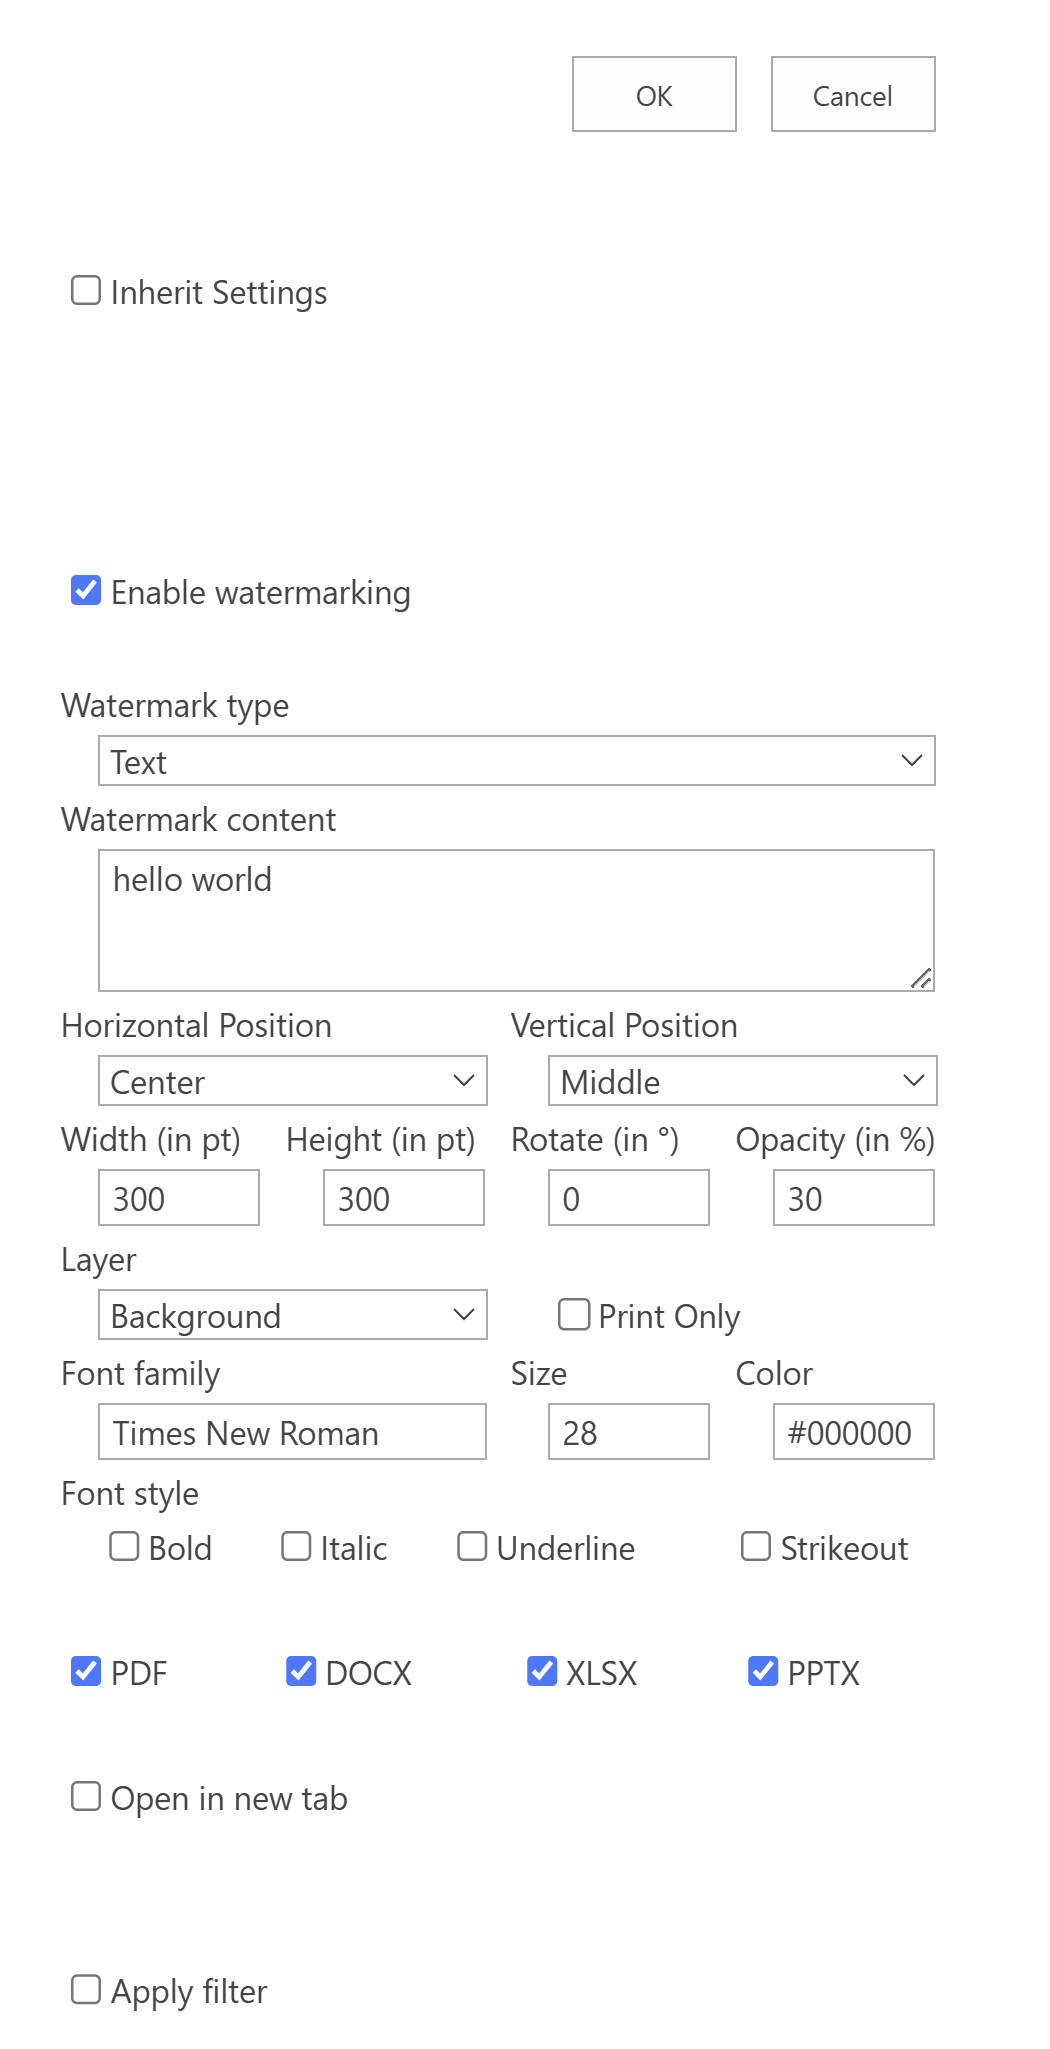
While default watermarks can be configured at the site collection level, automatic watermarking must be enabled individually for each list or library. You can access the Watermarking Settings screen from a list or library’s settings page.

watermark settings

The Settings screen allows enabling automatic watermarking for insert, update, and open events, with options for separate watermarks and selection filters per event. Supported watermark types include text, RTF, image, PDF, and composite.

settings screen
Information

In Microsoft SharePoint 2007, automatic watermarking for insert and update events isn’t supported in document libraries. However, it is supported for lists and in Microsoft SharePoint 2010. As an alternative, consider using workflows.

Merging dynamic data into watermarks

Nutrient Document Converter for SharePoint offers a robust watermarking framework with powerful merge codes that enable dynamic data integration at runtime. For example, you can create a dynamic watermark such as:

PDF Opened by '{REMOTE_USER}' on '{LONG_DATE}' from IP '{REMOTE_ADDR}'

This results in the following watermark.

merging dynamic data into watermarks

Merge codes aren’t limited to the watermark on open feature; they can also be used in workflows or via web services. However, some field codes may not be available in certain interfaces. For instance, web services lack visibility into Microsoft SharePoint-specific events, and workflows aren’t always tied to an HTTP context. For a comprehensive list of merge codes, contact our Support team.

Specifying filtering criteria when automatically applying watermarks

Similar to how Microsoft SharePoint views can filter specific list items, Nutrient Document Converter’s automatic watermarking feature enables custom filters to decide which documents should be watermarked automatically. This provides endless flexibility. Below are some practical examples:

  • Watermark draft documents while excluding approved ones.

  • Automatically watermark documents created by users from specific domains or authentication providers (e.g. FBA).

  • Apply watermarks to embargoed documents based on the current date.

  • Enable watermarks for documents containing Confidential in the title.

  • Restrict watermarking to minor versions (e.g. 1.3) while excluding major versions (e.g. 2.0).

  • Apply watermarks only to specific content types.

specifying filter criteria

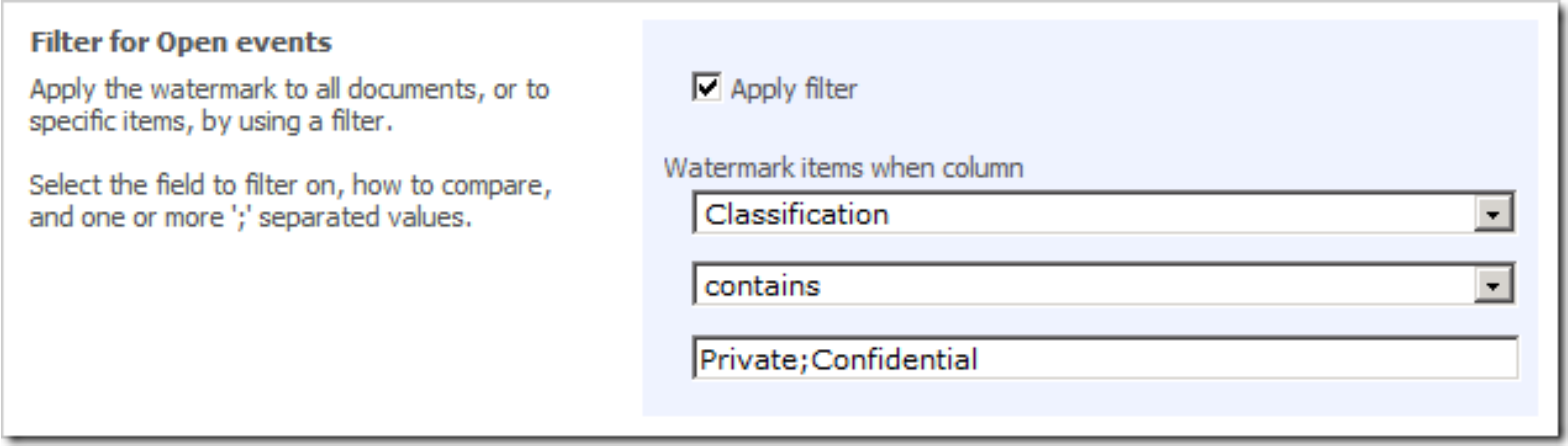
This powerful watermarking functionality is incredibly user-friendly. Each section includes a separate filter with the following features:

  • Apply Filter — Toggle filtering with a simple checkbox. When disabled, watermarks are applied to all documents.

  • Field List — Select fields like Title, Author, or Content Type. Non-essential fields are excluded for ease of use.

  • Comparison Type — Choose comparison methods, e.g. is equal to, contains, or begins with.

  • Comparison Value — Define values to compare the selected fields. All comparisons take the underlying type of the column into account. Supports common data types such as:

    • Boolean — Use True for True, Yes, -1, and 1, and False for False, No, 0.

    • Currency — Compare numeric currency values. Do not specify the currency symbol.
      currency comparisons

  • DateTime — Compare date and time fields. Enter [Today] (including the square brackets) to compare a date field to the current date, e.g. to apply watermarks to documents modified today. Similarly, [Now] can be used to compare a field with the current date and time.

  • Lookup — Compare lookup fields, including lookups that may contain multiple values.

  • User — Compares fields that contain a reference to a user account, e.g. the Modified By field. Filters of this type accept a value recognized by the underlying authentication provider. This will usually be in the ‘domain\user_name’ format, but could also be ‘fbaprovidername:username’.

Information

Enter [me] (including the square brackets) to evaluate the field against the current user, e.g. to allow watermarks to be added to all documents not created by the current user.

  • Single/Multiple Choice — Match single or multiple values, ideal for the contains comparison. Below are some practical examples:

    • Numerical Fields — Perform numerical comparisons.

    • URL — Compare fields of type URL.

    • Text — Compare text field or custom field type that uses a text-based representation.

With these features, filters allow for precise, dynamic watermarking tailored to your needs.

Additional notes on watermarking filters

  • All comparisons are case-insensitive.

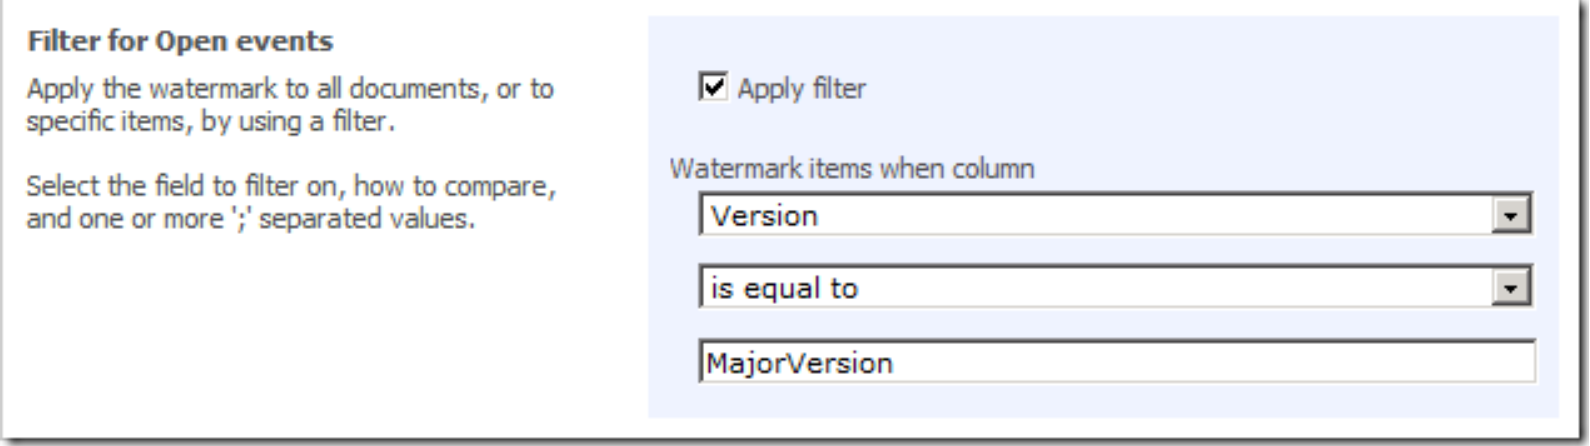
  • The filter for the Version field supports [MajorVersion] and [MinorVersion] values to distinguish between major (e.g. 1.0, 2.0) and minor (e.g. 1.1, 1.2) versions. Specific version numbers can also be specified.

  • When filtering multiple-choice/multi-select fields, you can specify multiple values. For example:

    • "Brett;Ben" Contains "Ben" = True

    • "Brett;Jeroen;Ben" Contains "Brett;Ben" = True

    • "Brett;Jeroen" Contains "Brett;Ben" = False

    • "Brett;Jeroen" is equal to "Jeroen;Brett" = True (sequence does not matter).

  • If a field is deleted from a list after being included in a filter, the filter will always evaluate to false, resulting in the watermark not being applied.

  • Filters for Insert events on a document library aren’t supported, as fields lack values at the time of insertion. However, this limitation doesn’t apply to documents attached to a list.

  • When comparing Date and Time fields (e.g. Modified Date) against values like [Today], consider the following:

    • [Today] represents only the date and doesn’t include a time element.

    • Created Date = [Today] will never evaluate to True unless it’s midnight. Use Created Date >= [Today] instead.

    • For date fields without a time element (e.g. birthdays), this issue doesn’t occur.

By understanding these notes, you can ensure accurate and effective use of watermarking filters.

Filtering out system users

When using the Watermark On Open feature on a SharePoint list or library, watermarks are applied every time a file is opened — this is the expected behavior. However, watermarks are also applied when the SharePoint Search Indexer opens these files. This can cause excessive system load during bulk indexing, as it triggers bulk watermarking.

To address this, it’s recommended to exclude specific accounts from automatic watermarking. Starting with version 8.4 of Nutrient Document Converter, a PDF real-time settings screen is accessible via the Site Actions menu, allowing administrators to specify accounts to exclude. The System account is excluded by default.

filtering out system users

Dealing with watermark errors

Automatically watermarking documents works seamlessly in most cases, but errors can occur. Sometimes, watermarks cannot be applied due to issues such as encrypted or corrupt documents, or unexpected errors such as temporary network failures.

To handle such exceptional situations, it’s important to define the system’s behavior. For example, should users still have access to the document even if watermarks can’t be applied, or should their access be blocked?

Starting from version 10.0 of Nutrient Document Converter, a Real-time settings screen is available via the Site Actions menu. This screen allows you to specify whether access to the document should be blocked in case of an error, or if the unprocessed (pre-watermarked) document should be provided to the user.

watermark errors

Additional resources

Knowledge base articles

Frequently asked questions

Videos

Blog articles

In this guide, you’ll learn how to add watermarks to documents using SharePoint Designer workflows. These powerful workflow actions enable you to apply various elements such as text, rectangles, images, PDF files, QR codes, barcodes, and other shapes to a wide range of documents, either as overlays, or behind the document’s content.

Each watermark workflow action is applied to the document individually. For applying multiple watermarks simultaneously, the Composite Watermark feature offers an efficient solution.

You can seamlessly add barcodes to Microsoft Word, Excel, PowerPoint, and PDF files using SharePoint Designer workflows. Our solution supports a wide range of popular barcode types, including:

  • Codabar

  • Code11

  • Code32

  • Code39

  • Code39Extended

  • Code128 (A, B, C)

  • GS1Code128

  • Code93

  • Code93Extended

Adding barcodes to documents has many practical applications, particularly in document management. When documents leave the systems they’re created and stored in, barcodes help track, audit, and manage them effectively, ensuring document integrity and providing valuable auditing information through watermarks.

The individual workflow actions are self-explanatory, but the following elements warrant special attention:

  1. this document — Specifies the document to apply the watermark to. In most workflows, selecting Current Item is sufficient, but certain scenarios may require referencing a different item. Ensure the document’s file type, such as PDF, DOCX, XLSX, or PPTX, is supported.

  2. this file — Defines the name and location of the watermarked file. Leave this field blank to overwrite the original file with the watermarked version. Alternatively, specify a path (including the Document Library and folder name) to save the watermarked file in a separate location, e.g. shared documents/watermarked files/confidential.pdf.

  3. List ID — The ID of the list where the watermarked file is saved. This can be used later in the workflow to perform additional operations on the file, such as check in or checkout.

  4. Item ID — The ID of the watermarked file, which can be used in conjunction with the List ID for additional workflow tasks.

Text watermark

The text watermark workflow action enables you to add text to the foreground or background of one or more pages in a document, offering complete control over font, style, size, and color.

In SharePoint Designer, this workflow action is called Add Text watermark to Document, and it includes the following parameters.

The text stored in the content field can include embedded field codes, such as the date or current page number. Additionally, Microsoft SharePoint Designer lookup variables are supported, allowing dynamic information stored in workflow variables or item columns to be seamlessly embedded in the watermark.

RTF watermark

The Rich Text Format (RTF) watermark feature enables adding simple RTF-encoded text as a watermark, offering enhanced control over the appearance of individual words in the watermark. While this provides greater customization, it comes with added complexity.

An example of valid RTF is as follows:

{\rtf1\ansi{\fonttbl\f0\fswiss Helvetica;}\f0\pard

This is some {\b bold} text.\par

}

In SharePoint Designer, this workflow action is called Add RTF watermark to Document, and it includes the following parameters.

Information

Unlike the text watermark, the RTF watermark doesn’t support embedded field codes. However, Microsoft SharePoint Designer lookup variables are fully supported, allowing dynamic information stored in workflow variables or the item columns to be embedded in the watermark. When applied to Microsoft PowerPoint files, RTF watermarks are displayed as plain text.

Image watermark

Use the image watermark to add common image types (BMP, JPG, GIF, PNG, TIFF, WMF, EMF/EMF+) as a watermark to a document.

In SharePoint Designer, this workflow action is called Add Image watermark to Document and the parameters are as follows.

The image at this path parameter requires the full path of the image relative to the current site — for example, shared documents/images/company_logo.gif.

PDF watermark

You can use existing PDF files as watermarks in your documents. These files can be either dynamically generated (e.g. a Microsoft Word document converted to PDF using Nutrient Document Converter) or static PDF files created manually.

The Microsoft SharePoint Designer workflow action for this is named Add PDF Watermark to Document, and its parameters are as follows.

The PDF file path parameter requires the full path of the PDF relative to the current site — for instance, shared documents/static watermarks/company_logo.pdf.

Information

PDF-based watermarks can only be applied to other PDF documents. It isn’t possible to use a PDF watermark on Office file formats like Word, Excel, or PowerPoint.

Rectangle watermark

Add a simple rectangle as a watermark to your document using the Add Rectangle to Document workflow action. This option allows you to define the size, position, and appearance of the rectangle. The parameters are as follows.

Line watermark

Use the Add Line to Document workflow action to add a line as a watermark. This is ideal for creating dividing elements or emphasizing specific sections within a document. The parameters are as follows.

Ellipse watermark

Easily add a circle or ellipse as a watermark using the Add Ellipse to Document workflow action. Customize the dimensions, position, and style of the ellipse to match your needs. The parameters are as follows.

QR code watermark

Easily add QR codes as watermarks to your documents using the Add QR Code Watermark to Document workflow action. This feature lets you encode information, such as URLs or text, into scannable QR codes, providing an interactive element in your documents.

The parameters are as follows:

  • Content — Enter the content to embed in the QR code. Ensure it aligns with the chosen input mode for accurate encoding.

  • Version — Choose the appropriate QR code version, ranging from Auto to Version01 – Version40, based on the complexity and size of your QR code.

  • Input mode — Specify the encoding mode:

    • Binary — Supports any value, including text and URLs.

    • AlphaNumeric — Allows numbers, uppercase letters, spaces, and characters such as $, %, *, +, -, ., /, :

    • Numeric — Accepts numbers only.

  • Error correction level — Select the error correction level suitable for your QR code’s reliability: Low, Medium, Quartile, or High.

Barcode watermark

Easily add barcodes as watermarks to your documents using the Add Linear Barcode workflow action. This feature supports a wide range of barcode types, making it versatile for document tracking, auditing, or inventory management.

The parameters are as follows:

  • Type — Select from a variety of barcode types, including:

  • Content — Enter the data to encode in the barcode. Ensure the content is compatible with the selected barcode type for proper generation.

  • Check digit — If applicable to your barcode type, calculate and encode the check digit to ensure accuracy and reliability.

Applying composite watermarks using Microsoft SharePoint Designer workflows

The individual watermarking workflow actions, detailed in the previous sections, are user-friendly and effective. However, when combining multiple shapes — such as a circle, an image, and dynamic text — each watermark requires a separate internal cycle. While this approach works well for most scenarios, it may not be the most efficient for complex workflows.

To address this, the Add Composite Watermark to Document workflow action enables the application of multiple watermarks simultaneously, with each watermark consisting of one or more individual shapes.

The parameters are as follows.

The true power lies in the watermark.xml field, which contains the XML structure defining multiple watermarks and their elements.

Example of composite watermark XML

The following example demonstrates three watermarks:

  • Company logo — Adds an image of the company logo in the foreground, positioned at the top-right corner of every page.

  • User login ID — Places the login ID of the user who created or modified the document in a semi-transparent style at a random background location.

  • Page number — Automatically generates and applies page numbers at the bottom-right corner of each page.

<watermarks>

      <!-- ** First watermark contains a single image element with the logo -->
      <watermark
            hPosition="right"
            vPosition="top"
            width="200"
            height="73"
            zOrder="1"
            opacity="100"
            pageOrientation="both">
            <image
                  width="200"
                  height="73"
                  scaleMode="maintainaspectratio"
                  imageFilePath="watermarking/muhimbi-logo.gif" />

      </watermark>

      <!-- ** Second watermark places the user's name in the background -->
      <watermark
            hPosition="random"
            vPosition="random"
            width="300"
            height="200"
            zOrder="-1"
            rotation="-30"
            opacity="15"
            pageOrientation="both">
            <text
                  width="200"
                  height="200"
                  fillColor="#000000"
                  content="Insert 'modified by' field using SharePoint Designer"
                  fontFamilyName="Times New Roman"
                  fontSize="24"
                  fontStyle="bold|italic"
                  wordWrap="word"
            />

      </watermark>

      <!-- ** Third watermark adds page numbering -->
      <watermark
            hPosition="right"
            vPosition="bottom"
            width="100"
            height="40"
            zOrder="1"
            pageOrientation="both">
            <text
                  hPosition="left"
                  vPosition="top"
                  width="100"
                  height="40"
                  content="Page {PAGE} of {NUMPAGES}"
                  fontFamilyName="Arial"
                  fontSize="11"
                  hAlign="left"
                  vAlign="top"
            />

      </watermark>
</watermarks>
Information

Understanding watermark components: A watermark represents a complete watermarking action. It’s a container that defines the overall placement, size, and properties of the watermark on the document page. This container can hold one or more elements, which are the individual components that make up the visual appearance of the watermark. These elements can include text, lines, shapes (like ellipses), images, rich text (RTF), PDF content, and even other nested watermarks. The following sections describe the various watermark elements that can be used to build a watermark. Each element can be used independently within a watermark container.

Text element

The text watermark element allows you to add custom text to the foreground or background of one or more pages in the target document. It provides full control over attributes such as font, style, size, and color.

Below is the XML structure for configuring a text watermark. Any attributes marked as “optional” can be excluded if not needed. However, retaining optional attributes with placeholder values like “optional” will result in an error:

<text
      hPosition="optional (absolute, random, left, center, right)" vPosition="optional (absolute, random, top, middle, bottom)" x="optional"
      y="optional"
      width="required"
      height="required"
      zOrder="optional"
      scaleMode="optional (absolute, exactFit, maintainaspectratio)" scaleX="optional"
      scaleY="optional"
      rotation="optional"
      opacity="optional"
      lineColor="optional"
      lineWidth="optional"
      fillColor="optional"
      content="required"
      fontFamilyName="optional"
      fontSize="optional"
      fontStyle="optional (regular, bold, italic, strikeout, underline)" wordWrap="optional (none, character, word, wordonly)" hAlign="optional (left, center, right, justify)"
      vAlign="optional (top, middle, bottom)" />

The content attribute can include embedded field codes, such as the date or current page number, for dynamic watermarking.

If you expect a significant amount of content, consider removing the content attribute and placing the text directly inside the text element. For example:

<text
      hPosition="optional (absolute, random, left, center, right)"
      ... rest omitted
>
      Your content goes here, use a CDATA section if needed.
</text>

SharePoint Designer lookup variables are fully supported, enabling dynamic information from workflow variables or the item columns to be embedded directly into the watermark.

RTF element

The RTF watermark element enables the addition of simple RTF-encoded text as a watermark, providing greater control over the appearance of individual words. While it offers more design flexibility, it also introduces added complexity.

An example of valid RTF encoding is as follows:

{\rtf1\ansi{\fonttbl\f0\fswiss Helvetica;}\f0\pard

This is some {\b bold} text.\par

}

The XML structure is as follows. You can exclude any attributes labeled as “optional” from your code when not required. Keeping them with the “optional” label will result in an error:

<rtf
      hPosition="optional (absolute, random, left, center, right)"
      vPosition="optional (absolute, random, top, middle, bottom)"
      x="optional"
      y="optional"
      width="required"
      height="required"
      zOrder="optional"
      scaleMode="optional (absolute, exactFit, maintainaspectratio)"
      scaleX="optional"
      scaleY="optional"
      rotation="optional"
      opacity="optional"
      lineColor="optional"
      lineWidth="optional"
      fillColor="optional"
      rtfData="required"/>

When a lot of content is anticipated, then you can remove the rtfData attribute and place it inside the <rtf> element — for example:

<rtf
      hPosition="optional (absolute, random, left, center, right)"
      ... rest omitted
      >
       Your content goes here, use a CDATA section if needed.
</rtf>
Information

Unlike the text element, the RTF element doesn’t support embedded field codes. However, Microsoft SharePoint Designer lookup variables are fully supported, allowing dynamic information stored in workflow variables or the item columns to be embedded in the element. When applied to Microsoft PowerPoint files, RTF elements are displayed as plain text.

Image element

The Image watermark element enables you to add common image types such as BMP, JPG, GIF, PNG, TIFF, WMF, and EMF/EMF+ as watermarks to documents.

The XML structure is as follows. You can exclude any attributes labeled as “optional” from your code when not required. Keeping them with the “optional” label will result in an error:

<image
      hPosition="optional (absolute, random, left, center, right)"
      vPosition="optional (absolute, random, top, middle, bottom)"
      x="optional"
      y="optional"
      width="optional"
      height="optional"
      zOrder="optional"
      scaleMode="optional (absolute, exactFit, maintainaspectratio)"
      scaleX="optional"
      scaleY="optional"
      rotation="optional"
      opacity="optional"
      lineColor="optional"
      lineWidth="optional"
      fillColor="optional"
      imageFilePath="required"/>

The image at this path parameter expects the complete path of the image relative to the current site, e.g. shared documents/images/company_logo.gif.

QR code element

Add various QR codes to documents using the QR code watermark element, which is perfect for embedding document IDs or any other SharePoint metadata.

The XML structure is as follows. You can exclude any attributes labeled as “optional” from your code when not required. Keeping them with the “optional” label will result in an error:

<qrcode
      hPosition="optional (absolute, random, left, center, right)"
      vPosition="optional (absolute, random, top, middle, bottom)"
      x="optional"
      y="optional"
      width="optional"
      height="optional"
      zOrder="optional"
      rotation="optional"
      opacity="optional"
      fillColor="#optional"
      lineColor="#optional"
      scaleMode="optional (absolute, exactFit, maintainaspectratio)"
      scaleX="optional"
      scaleY="optional"
      text="required"
      errorCorrectionLevel="optional (Low, Medium, Quartile, High)"
      inputMode="required (Binary, AlphaNumeric, Numeric)"
      version="optional (Auto, Version01, Version02, Version03
                  ... Version40)" />

Linear barcode element

Add a variety of barcode watermark elements to documents, perfect for embedding tracking numbers and other important metadata.

The XML structure is as follows. You can exclude any attributes labeled as “optional” from your code when not required. Keeping them with the “optional” label will result in an error:

<linearBarcode
      hPosition="optional (absolute, random, left, center, right)"
      vPosition="optional (absolute, random, top, middle, bottom)"
      x="optional"
      y="optional"
      width="optional"
      height="optional"
      zOrder="optional"
      rotation="optional"
      opacity="optional"
      fillColor="#optional"
      lineColor="#optional"
      scaleMode="optional (absolute, exactFit, maintainaspectratio)"
      scaleX="optional"
      scaleY="optional"
      text="required"
      barcodeType="required (Codabar, Code11, Code32, Code39, Code39Extended, Code93, Code93Extended, Code128, Code128A, Code128B, Code128C, GS1Code128)"
      omitStartStopSymbols="optional"
      disableCheckDigit="optional"
      showCheckDigit="optional"
      textLocation="optional (Bottom, None, Top)"
      barcodeToTextGapHeight="optional"
      fontFamilyName="optional"
      fontSize="optional"
      fontStyle="optional (regular, bold, italic, strikeout, underline)"
      textAlignment="optional (Default, Center, Justify, Left, Right)"
      margin="optional" />

PDF element

Use existing PDF files as watermark elements. An example of this could be a dynamic PDF generated from a Microsoft Word document and converted via Nutrient Document Converter, or a static PDF created manually.

The XML structure is as follows. You can exclude any attributes labeled as “optional” from your code when not required. Keeping them with the “optional” label will result in an error:

<pdf
      hPosition="optional (absolute, random, left, center, right)"
      vPosition="optional (absolute, random, top, middle, bottom)"
      x="optional"
      y="optional"
      width="optional"
      height="optional"
      zOrder="optional"
      scaleMode="optional (absolute, exactFit, maintainaspectratio)"
      scaleX="optional"
      scaleY="optional"
      rotation="optional"
      opacity="optional"
      lineColor="optional"
      lineWidth="optional"
      fillColor="optional"
      pdfFilePath="required" />

The PDF file path parameter expects the complete path of the PDF name relative to the current site, e.g. shared documents/static watermarks/company_logo.pdf.

Information

PDF-based watermark elements can only be applied to other PDF documents. It isn’t possible to apply PDF-based watermark elements to Microsoft Office file formats.

Rectangle element

A simple rectangle can be added as a watermark element.

The XML structure is as follows. You can exclude any attributes labeled as “optional” from your code when not required. Keeping them with the “optional” label will result in an error:

<rectangle
      hPosition="optional (absolute, random, left, center, right)"
      vPosition="optional (absolute, random, top, middle, bottom)"
      x="optional"
      y="optional"
      width="required"
      height="required"
      zOrder="optional"
      scaleMode="optional (absolute, exactFit, maintainaspectratio)"
      scaleX="optional"
      scaleY="optional"
      rotation="optional"
      opacity="optional"
      lineColor="optional"
      lineWidth="optional"
      fillColor="optional" />

Line element

A line can be added as a watermark element.

The XML structure is as follows. You can exclude any attributes labeled as “optional” from your code when not required. Keeping them with the “optional” label will result in an error:

<line
      hPosition="optional (absolute, random, left, center, right)"
      vPosition="optional (absolute, random, top, middle, bottom)"
      x="required"
      y="required"
      endX="required"
      endY="required"
      zOrder="optional"
      scaleMode="optional (absolute, exactFit, maintainaspectratio)"
      scaleX="optional"
      scaleY="optional"
      rotation="optional"
      opacity="optional"
      lineColor="optional"
      lineWidth="optional" />

Caveats

Different file formats come with unique limitations, and it’s important to be aware of potential issues when applying watermarks.

PDF is the most versatile format for watermarking, allowing for precise placement on individual pages. However, other file formats may have limitations.

  1. Modern Office formats only: Watermarking is supported only in modern Office formats (DOCX, XLSX, PPTX). Legacy formats (DOC, XLS, PPT) aren’t supported. Use Nutrient Document Converter to convert older documents to modern formats for watermarking.

  2. Layering/z-order: This is true for PDF as well, but make sure you don’t hide your watermarks behind your document’s content. For example, placing your watermark in the background of a non-transparent document, such as a scan, will hide the watermark.

Information

For Microsoft Excel and Word, watermarks are always located behind the document’s main content. However, they’re treated specially and they’re designed to be visible through the text.

  1. Targeting individual pages: PDF and PowerPoint files allow targeting specific pages for watermarks. However, in Microsoft Word and Excel, watermarks are applied to the entire section or worksheet. In Word, to target a specific page, it must be in its own section. In Excel, all pages in a worksheet share the same watermark, but different watermarks can be applied to different sheets.

  2. Mandatory Microsoft Word headers: Watermarks in Microsoft Word are applied via page headers. Ensure headers haven’t been removed from sections, as our software cannot add watermarks to sections without headers.

  3. Real-time watermarking in Microsoft SharePoint (on-premises): Due to the complexities of integrating with various on-premises versions of Microsoft SharePoint, Nutrient Document Converter manages the interaction between Office applications and real-time watermarking to ensure consistent behavior. Specifically, to prevent conflicts, co-authoring (simultaneous editing by multiple users) is disabled on document libraries where real-time watermarking is enabled and the Apply when editing setting is active.

    The Apply when editing setting is crucial for reliable real-time watermarking, especially with newer SharePoint versions. Because of how Office applications retrieve files, this setting ensures watermarks are consistently applied during the editing process, and it’s strongly recommended for real-time watermarking scenarios. However, this restriction does not apply to watermarks applied via SharePoint workflows, as those operate outside the real-time editing context.

  4. Office Web apps: For real-time watermarking, use Internet Explorer in combination with Office Web apps and set Default open behavior to Open in the client application rather than Open in the browser (found in Advanced Library Settings).

  5. Real-time watermarking on read-only files recommended: If real-time watermarking is applied every time a document is opened, the watermark could be reapplied every time the document is saved and opened again. To prevent this, use filters or enable real-time watermarking only on read-only documents or folders.

  6. RTF watermarks in Microsoft PowerPoint: RTF-based watermarks are supported in most file formats but are displayed as plain text in Microsoft PowerPoint without formatting.

  7. Microsoft Excel watermarks require one free header/footer slot without an image: In Excel, watermarks are applied via headers and footers. At least one header/footer slot must be free of images for watermarking to work. Nutrient Document Converter requires this empty slot.

Information

The SharePoint add-in model used in this guide has been deprecated by Microsoft and will be fully retired as of 2 April 2026. As a result, the instructions outlined here may no longer be valid or supported.
- We strongly recommend that new users leverage Nintex Automation Cloud for their workflow automation needs. To facilitate document conversion within this environment, we released the Nutrient Document Converter Xtension for Nintex Automation Cloud.
- Existing users who are still using the SharePoint add-in model are encouraged to migrate to Nintex Automation Cloud to ensure continued compatibility and support.

In this guide, you’ll learn how to add watermarks to documents using Nintex workflows. These workflow actions allow elements such as text, rectangles, images, PDF files, QR codes, barcodes, and other shapes to be added as a watermark to a wide variety of documents.

This article covers the watermarking of documents using Nintex workflows and Nintex Workflow for Office 365.

Using Nintex Workflow for Office 365 for watermarking

Prerequisites

Before you begin, make sure the following prerequisites are in place:

Note that this article is for the MS SharePoint Online version of Nintex Workflow.

Building the workflow

Follow the instructions below:

  1. Navigate to a site collection and document library of your choice. You can choose the option to create a new Nintex workflow. This example uses the standard document library that’s available on most site collections.

  2. Create the following workflow variables, which you’ll need later:

  • JSON (Text) — Contains the JSON, which is the command that will be sent to the conversion service.

  • API_KEY (Text) — A unique ID that will be used to look up your Nutrient Document Converter subscription details.

  • ResponseText (Text) — The status message returned by the conversion service.

  • ResponseCode (Integer): The status code returned by the conversion service.

    workflow variables

  1. You can then insert a Set Workflow Status action, edit it, and set it to Started. As MS SharePoint Online doesn’t show a separate status, adding this action will show you the status that the workflow has actually triggered, and it’ll also give you something to click to inspect the current status of the workflow.

    set workflow status

  2. You can then add a Build String action and set the Output to the JSON workflow variable. In the String field, enter the following:

[
  "sharepoint_file": [
    "site_url": "{Workflow Context:Current site URL}",
    "source_file_url": "{Current Item:Server Relative URL}",
    "destination_file_url": "{Current Item:Server Relative URL}.pdf"
  ],
  "output_format": "PDF",
  "fail_on_error": true
]

build string action

Pay attention to the following:

JSON notation — Note that we replaced the curly braces - { } - with square brackets [ ] due to a bug in Nintex Workflow for Office 365. If you have any concerns using square brackets, as they’re also used for array types, you can replace them with anything else, since you’ll fix this in a follow-up step.

Copy and paste — When copying and pasting the JSON code, ensure you paste it in Notepad and copy it back to strip out non-standard characters and formatting from being copied.

References — The text displayed in red is that of Nintex workflow references. After copy-pasting the code fragment, replace each Nintex reference using the advanced lookup facility located below the field.

Output file name — In this basic example, you’ll add .pdf to the end of the output path and file name. This isn’t particularly pretty, but to keep things simple, you aren’t including the Nintex workflow actions to strip off the old extension and add the new one. You can use whatever you like here as long as it’s a valid output path and file name.

  1. In an earlier step, you need to replace the square brackets with curly braces again. You can do this by using the Replace Substring in String action and configuring it as follows:

  • Search String — Enter the opening square bracket [.

  • Replace String — Enter the opening curly brace {.

  • String — Insert a reference to the workflow variable named JSON.

  • Output — Pick the JSON workflow variable to store the results in.

Click Save.

  1. You can now copy the workflow action using the action’s menu and by pasting it as the next action. Configure the newly pasted workflow action and replace the opening bracket with the closing bracket ‘]’.

You can do the same for the curly brace and replace ‘{’ with ‘}’, and click Save to save the action. You now have valid JSON that you can send to the conversion service.

  1. As the next step, you need to set the API_KEY. Insert a Set Workflow Variable action and configure it to set the API_KEY workflow variable to the API key you received by email when signing up for Nutrient Document Converter Services Online, e.g. decafbad-baad-baad-baad-decafbaaaaad.

Don’t try to use this particular key, as it won’t work. Ensure you don’t put curly braces around the key. Click Save to save the action.

  1. Next, insert a Web Request action and configure it as follows:

URLhttps://api.muhimbi.com/api/v1/operations/convert

Method — POST

Content type — application/json

Add header — Click Add header, specify API_KEY as the header name, and insert a reference to the API_KEY workflow variable for the header value.

Body — Select the Content option, and add a reference to the JSON workflow variable in the Data field.

Store response content in — ResponseText.

Click Save to save the action.

  1. Finally, insert another Set Workflow Status action and configure it with the text Completed. This should indicate when the workflow instance has completed its run.

  2. Save and publish the workflow by giving it a suitable name, and set Start Options to a value of your choice.

  3. Once published, open the document library the workflow is associated with, make sure a file of the supported type is present, and manually start the workflow. After a few seconds, the PDF file will show up next to the file the workflow was started on.

Troubleshooting

Although both Nintex Workflow for Office 365 and Nutrient Document Converter work very well together, there are a lot of moving parts in the workflow like custom generated JSON, customer-specific API keys, paths to the document libraries, etc. So, there are chances that you may encounter some issues when deploying the workflow. Some common issues and troubleshooting tips are provided below for your reference.

  • Check prerequisites — Double-check that the prerequisites listed in the beginning of this section are in place.

  • Log to History List — If it isn’t clear what’s wrong, log critical parts, such as the JSON workflow variable (after the replace operation), as well as the ResponseText workflow variable (after the web request) using the Log To History List workflow action. You can see the contents of this list by clicking on the Workflow Status column for the List Item the workflow is running on.

  • Send email — The amount of text that can be logged to the History List is limited (roughly 250 characters). For larger messages, use the Send an Email action instead to send an email with debug content in the body of the email to yourself.

  • Copy and paste — When copying the JSON fragment into your workflow, paste it into Notepad first to clean it, and then copy it from Notepad and paste it into your workflow. This is because browsers tend to insert hidden characters that aren’t filtered out by the Nintex workflow editor.

  • Nintex references — Make sure the Nintex workflow references in the JSON provided are replaced by actual Nintex workflow references. You can double-check if the references are active by logging the JSON workflow variable to the History List. You should see the actual paths and not {Current Item:Server Relative URL}.

  • Nutrient support — After double-checking all prerequisites and going over all troubleshooting steps in this section, if you’re still stuck, contact our Support team.

Finetuning

The workflow created in the previous section was to give a quick idea of how to use the converter. However, it’d benefit from error handling and a solution for a possible recursion problem where the workflow will be triggered for PDF files that it has created by itself.

Other operations

This section demonstrated how to invoke the Convert action on Nutrient Document Converter’s REST interface. Full examples are beyond the scope of this article, but you can find examples in the SharePoint section of our GitHub repository.

Using Nintex workflows for watermarking

Support for SharePoint Designer, a Web Services API, and a host of other watermarking functionality has been available for a while, but since version 5.1, we’ve added support for Nintex workflows as well.

In addition to the new PDF Watermarking Nintex Workflow Activity, we added activities for PDF security, PDF merging, and HTML-to-PDF conversion.

Similar to all other Nintex activities provided by Nutrient Document Converter, the watermark PDF activity integrates with Nintex workflow at a deep level. It supports SharePoint versions 2007, 2010, 2013, and 2019; it allows errors to be handled; and it even supports integration with Nintex iterators to deal with multiple items and loops.

For a comprehensive example and details about how to enable the Nintex workflow integration, refer to the blog post that discusses our generic Nintex PDF conversion activity.

nintex workflow nintex for office 365 set api key workflow activity watermark document watermark document watermark document

The fields supported by this workflow activity are as follows:

  • Destination Path — Enter the path to write the watermarked file to, either:

    • Leave it empty to use the same filename (and path) as the file that triggered the workflow.

    • A file name, without the full path, to write a differently named file to the same location as the source file.

    • A relative path to a subsite/document library/folder, e.g. Shared Documents/Some Folder/Some File.pdf.

    • An absolute path to a different site collection, e.g. /sites/Finance/Shared Documents/Some Folder/Some File.pdf. Ensure the path doesn’t include the host name, e.g. http://your site/.....

  • Watermark type — A number of different watermark types are supported. Unlike our individualSharePoint Designer workflow activities, all watermark types have been rolled up into a single Nintex activity. The functionality is largely the same. The following watermark types are supported.

    • Text — Add a text-based watermark with full control over the font type, size, style, rotation, and field codes, such as {PAGE}.

    • PDF — Add the first page of another PDF file as the watermark. This isn’t supported in Office file types.

    • QR code — Add a QR code as the watermark.

    • Linear barcode — Add a barcode watermark.

    • Image — Use a BMP, JPG, GIF, PNG, TIFF, WMF, or EMF / EMF+ file as a watermark.

    • RTF — Use RTF based text as a watermark

    • Ellipse — Add an ellipse-based watermark.

    • Line — Add a line-based watermark.

    • Composite — For complex watermarks, or watermarks consisting of multiple elements such as line, text, amd images, use the composite watermark in combination with our XML-based watermarking syntax.

  • Display — Either display the watermark always, or only when printing (when this is supported by the target file format).

  • Output List ID — If you wish to carry out further actions on the watermarked file, e.g. send it by email or perform a check-in, then you can optionally write the ID of the list the file was written to in a workflow variable of type string.

  • Output List Item ID — Similarly to PDF List ID, the Item ID of the watermarked file can optionally be written to a workflow variable of type Item ID (in SharePoint 2007) or Integer (in SharePoint 2010 and later versions).

  • Source List ID & List Item — The item that triggered the workflow is watermarked by default. You can optionally specify the ID of a different list and list item using workflow variables. Use the same data types as used by Output List ID and Output List Item ID.

  • Error handling — Similar to the way some of Nintex’s own workflow activities allow errors to be captured and evaluated by subsequent actions, all of Nutrient Document Converter’s workflow activities also allow the same. By default, this facility is disabled ,meaning that any error terminates the workflow.

Additional resources