Creating interactive tutorials using DocC
Table of contents
Good documentation is an absolute requirement when shipping a quality product. Developers need to be able to navigate your APIs easily, especially if you manage a complex iOS SDK with multiple platform targets, as we do at Nutrient. Some developers, myself included, learn new things by doing rather than reading. Enter DocC interactive tutorials.
We already have a blog post that covers our journey of generating DocC documentation for the multiple targets in Nutrient iOS SDK, which you can find here. An additional feature that’s available when using DocC is creating “code-along”-style interactive tutorials, similar to the ones created by Apple(opens in a new tab).
The first requirement is to have DocC set up in your framework or package, with your public interfaces documented using Xcode’s Markdown-based commenting syntax.
Having developers learn your framework and its use cases through an interactive code-along-style tutorial creates engagement and offer developers of different skill levels the ability to get to know your SDK.
In this blog post, you’ll create a basic interactive tutorial to help developers integrate Nutrient iOS SDK into a newly created iOS application.
Setting up the table of contents
In the project’s existing Documentation.docc folder, create a new folder called Tutorials(opens in a new tab), and define a table of contents for the new set of tutorials by creating the Nutrient.tutorial file. Inside the file, the Tutorials(opens in a new tab) directive defines the structure of the table of contents developers will use to access individual tutorial pages.
Tutorials(opens in a new tab) takes the name of the new tutorial as its parameter, typically matching the name of the framework or package being documented:
@Tutorials(name: "Nutrient")This is followed by an introduction and image to display beneath it using the Intro(opens in a new tab) and Image(opens in a new tab) directives:
@Intro(title: "Building a basic PDF viewer using Nutrient iOS SDK") {   These tutorials will guide you through the process of integrating Nutrient iOS SDK into a newly created iOS app and customizing the UI and other SDK functionality.
   @Image(source: "toc-ios-intro.png", alt: "Screenshot of an iOS device with the Nutrient viewer open.")}
DocC will calculate the estimated time based on the completion time you specify for every individual tutorial. This will be covered in more depth further down.

Next, define the different chapters of the tutorial using the Chapter(opens in a new tab) directive. Chapters can also include images and links to the individual tutorials using the TutorialReference(opens in a new tab) directive:
@Chapter(name: "Integrating the SDK and presenting a PDF document.") {   This guide will take you through the steps necessary to integrate Nutrient iOS SDK into a newly created application. By the end, you’ll be able to present a PDF document in the default Nutrient iOS SDK UI.
   @Image(source: "toc-ios-intro.png", alt: "Screenshot of an iOS device with the Nutrient viewer open.")
   @TutorialReference(tutorial: "doc:sdk-integration-ios")   @TutorialReference(tutorial: "doc:sdk-integration-vision-os")   @TutorialReference(tutorial: "doc:sdk-integration-mac-catalyst")}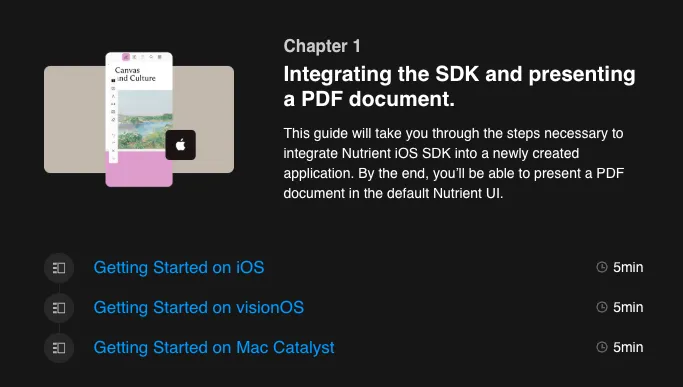
If you have additional resources you want to share with your reader, use the optional Resources(opens in a new tab) directive:
@Resources {   Explore more resources from Nutrient.
   @Videos(destination: "https://www.youtube.com/@pspdfkit5764/videos") {      Check out some of the other products Nutrient offers.
      - [Nutrient Web SDK](https://www.youtube.com/watch?v=wsOxMY9cA4M)   }
   @Downloads(destination: "https://www.nutrient.io/guides/ios/downloads/") {      Integrating manually? Download Nutrient iOS SDK here.   }
   @Documentation(destination: "https://www.nutrient.io/guides/ios/") {      View our iOS SDK API documentation.
      - [Nutrient iOS SDK API](https://www.nutrient.io/api/ios/documentation/overview)   }}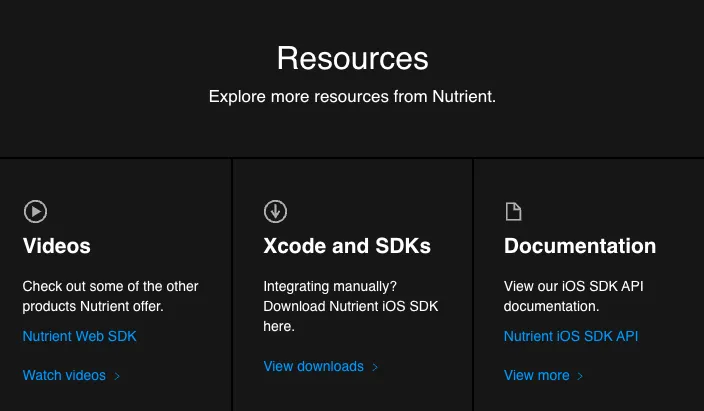
Your complete table of contents Nutrient.tutorial file will look like this:
@Tutorials(name: "Nutrient") {    @Intro(title: "Building a basic PDF viewer using Nutrient iOS SDK") {        These tutorials will guide you through the process of integrating Nutrient iOS SDK into a newly created iOS app and customizing the UI and other SDK functionality.
        @Image(source: "toc-ios-intro.png", alt: "Screenshot of an iOS device with the Nutrient viewer open.")    }
    @Chapter(name: "Integrating the SDK and presenting a PDF document.") {        This guide will take you through the steps necessary to integrate Nutrient iOS SDK into a newly created application. By the end, you’ll be able to present a PDF document in the default Nutrient iOS SDK UI.
        @Image(source: "toc-ios-intro.png", alt: "Screenshot of an iOS device with the Nutrient viewer open.")
        @TutorialReference(tutorial: "doc:sdk-integration-ios")        @TutorialReference(tutorial: "doc:sdk-integration-vision-os")        @TutorialReference(tutorial: "doc:sdk-integration-mac-catalyst")    }
    @Chapter(name: "Customize the UI and other SDK functionality") {        This guide will show you how to customize the PDFViewController instance on iOS.
        @Image(source: "ios-customize.png", alt: "Screenshot of an iOS device with the Nutrient viewer open.")
        @TutorialReference(tutorial: "doc:sdk-customization-ios")    }
   @Resources {      Explore more resources from Nutrient.
      @Videos(destination: "https://www.youtube.com/@pspdfkit5764/videos") {         Check out some of the other products Nutrient offer.
         - [Nutrient Web SDK](https://www.youtube.com/watch?v=wsOxMY9cA4M)      }
      @Downloads(destination: "https://www.nutrient.io/guides/ios/downloads/") {         Integrating manually? Download Nutrient iOS SDK here.      }
      @Documentation(destination: "https://www.nutrient.io/guides/ios/") {         View our iOS SDK API documentation.
         - [Nutrient iOS SDK API](https://www.nutrient.io/api/ios/documentation/overview)      }   }}
Creating tutorials
The next step is to create the individual tutorial pages the table of contents is linking to. First, create a new file called sdk-integration-ios.tutorial, and use the Tutorial(opens in a new tab) directive, optionally passing in the estimated time (in minutes) it would take to complete the tutorial. As mentioned above, the table of contents will automatically calculate the total completion time estimate for all the tutorials.
If you need to share resources with your reader, use the second parameter, called projectFiles, to point to a downloadable resource. The resource should be included in your Tutorials directory:
@Tutorial(time: 15, projectFiles: "quickstart-guide.pdf")An Xcode version requirement can optionally be specified using the XcodeRequirement(opens in a new tab) directive:
@XcodeRequirement(title: "Xcode 15", destination: "https://developer.apple.com/download/")Then, add an introduction to the tutorial using the Intro(opens in a new tab) directive. The introduction includes text and an image that will be used as the section’s background:
@Intro(title: "Getting Started on iOS") {   This guide will take you through the steps necessary to integrate Nutrient iOS SDK into a newly created iOS application. By the end, you’ll be able to present a PDF document in the default Nutrient iOS SDK UI.
   > Tip: Nutrient iOS SDK can be evaluated without a trial license key, but with [certain limitations](https://www.nutrient.io/sdk/try) (such as a red watermark added to documents). To evaluate without limitations, [get a trial key(https://www.nutrient.io/sdk/try).
   @Image(source: "toc-ios-intro.png", alt: "Screenshot of an iOS device with the Nutrient viewer open.")}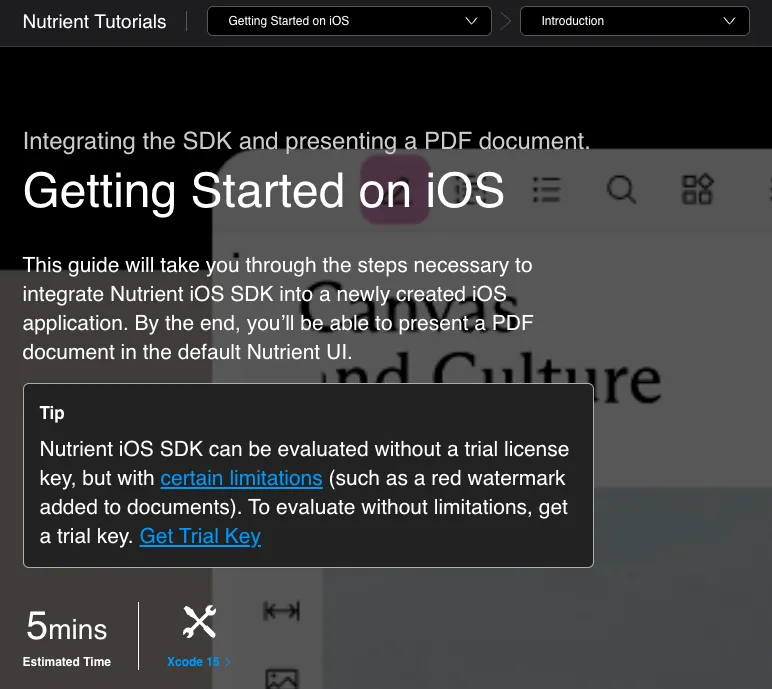
Following the introduction, add one or more Section(opens in a new tab) directives containing Steps(opens in a new tab) to organize the tutorial.
The first section will guide your reader through setting up their new Xcode project, and you can also choose to include an image next to the section title:
@Section(title: "Creating a New Xcode Project") {   @ContentAndMedia {      Xcode project setup and app creation.
      @Image(source: "toc-ios-intro.png", alt: "Screenshot of an iOS device with the Nutrient viewer open.")   }}
...
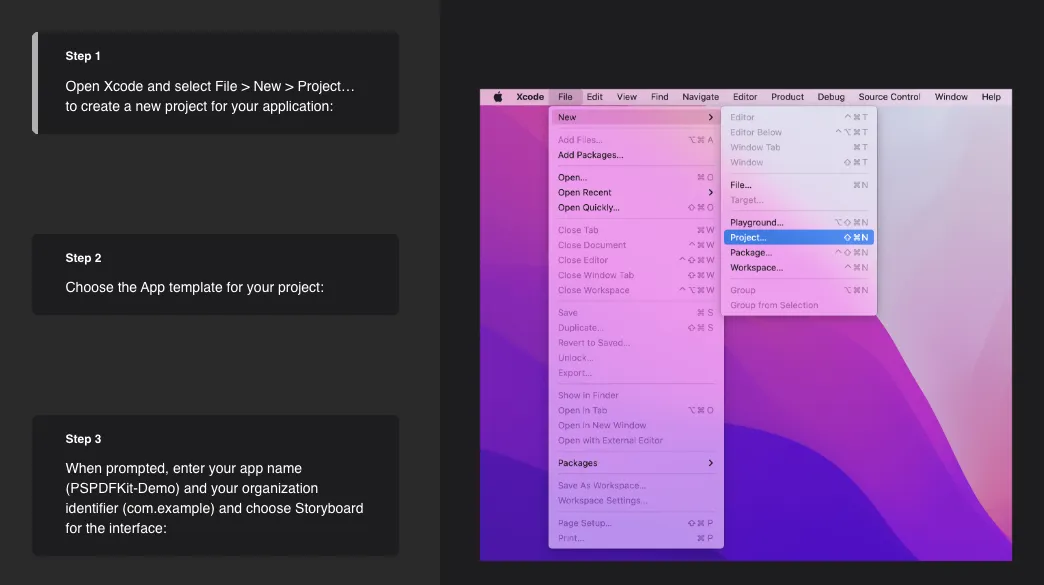
The Steps(opens in a new tab) directive contains the individual Step(opens in a new tab) directives. Step(opens in a new tab) directives are used to define a single task the reader should perform, using text to explain the step. Each Step directive also includes an image, video, or code snippet as context:
@Steps {   @Step {         Open Xcode and select File > New > Project... to create a new project for your application:
         @Image(source: "create-new-project.png", alt: "The Xcode File menu is open with New > Project selected.")   }
   @Step {         Choose the App template for your project:
         @Image(source: "app-template.png", alt: "The Xcode New app menu is shown with the 'App' application type selected.")   }
   @Step {         When prompted, enter your app name (PSPDFKit-Demo) and your organization identifier (com.example) and choose Storyboard for the interface:
         @Image(source: "app-options.png", alt: "The Xcode application options screen is shown with some details prefilled.")   }
   @Step {         Click Next and select the location to save the project.   }
   @Step {         Click Create to finish.   }}
Every step is shown with its corresponding asset to the right, which updates automatically as the reader scrolls.
The second section covers the process of adding the Nutrient Swift package to the iOS project created in the previous step, using the same Section(opens in a new tab), Steps(opens in a new tab), and Step(opens in a new tab) directives:
@Section(title: "Adding the Nutrient Swift Package") {   @ContentAndMedia {      Adding the Nutrient dependency to your Xcode app.
      @Image(source: "toc-ios-intro.png", alt: "Screenshot of an iOS device with the Nutrient viewer open.")   }
   @Steps {      @Step {            Open your application in Xcode and select your project’s Package Dependencies tab.
            @Image(source: "xcode-project-swift-packages.png", alt: "The Xcode Swift Dependencies tab is open with the 'add' button circled.")      }
      @Step {            Copy the PSPDFKit Swift package repository URL into the search field:            > Note: https://github.com/PSPDFKit/PSPDFKit-SP
            @Image(source: "add-package-url", alt: "The Xcode Swift Package Sources window is open with the PSPDFKit URL added to the Search field.")      }
      @Step {            In the Dependency Rule fields, select Branch > master, and then click Add Package.
            @Image(source: "swiftpm-branch-master", alt: "The Xcode Swift Package Sources window is open with the 'master' branch selected as the Dependency Rule.")
            > Tip: Using Branch > master will ensure you always use the latest available version of Nutrient iOS SDK. Alternatively, you can select Version > Up to Next Minor to update at your own pace.      }
      @Step {            After the package download completes, select Add Package.
            @Image(source: "add-package-finish.png", alt: "The Xcode Swift Package Sources window is open with PSPDFKit selected to be added to the 'PSPDFKit-Demo' target.")            PSPDFKit should now be listed under Swift Package Dependencies in the Xcode Project navigator.      }   }}
The final section includes some Swift code to show how to load a PDF document with Nutrient iOS SDK, using the same directives as the previous sections, but now including the Code(opens in a new tab) directive. DocC will generate a smooth transition between the Code(opens in a new tab) directives used for every step to show the changes occurring between every file as the reader scrolls through the steps.
The Code(opens in a new tab) directive requires the file name, as well as the location to the .swift file, as parameters. The .swift files should be included in your Tutorials(opens in a new tab) directory. To keep your tutorials organized, the source files don’t need to be placed in the root directory and can be placed inside subdirectories. Be sure to choose a naming convention for your .swift files that makes them easy for the reader to look up. An optional Image(opens in a new tab) can be included inside the Code(opens in a new tab) directive to show a preview of what the code would compile to:
@Section(title: "Displaying a PDF") {   @ContentAndMedia {      Displaying a PDF using Nutrient iOS SDK.
      @Image(source: "toc-ios-intro.png", alt: "Screenshot of an iOS device with the Nutrient viewer open.")   }
   @Steps {      @Step {            Optional: If you have a trial key or license key, add "import PSPDFKit" at the top of your AppDelegate file and set the key, like this:
            @Code(name: "03-license-01.swift", file: 03-license-01.swift)
            See our license key guide for more information.      }
      @Step {            Add the PDF document you want to display to your application by dragging it into your project. On the dialog that’s displayed, select Finish to accept the default integration options. You can use this Quickstart Guide PDF as an example.
            @Image(source: "drag-and-drop-document", alt: "Xcode is open with a PDF file being added to the PSPDFKit-Demo target.")      }
      @Step {            Import PSPDFKit and PSPDFKitUI at the top of your UIViewController subclass implementation:
            @Code(name: "03-import-02.swift", file: 03-import-02.swift)      }
      @Step {            Load your PDF document and display the view controller by implementing viewDidAppear in the ViewController.swift file like so:
            @Code(name: "03-load-pdf-03.swift", file: 03-load-pdf-03.swift) {               @Image(source: "swift-document-preview.png", alt: "Screenshot of an iOS device with the PSPDFKit viewer open and document loaded.")            }      }   }}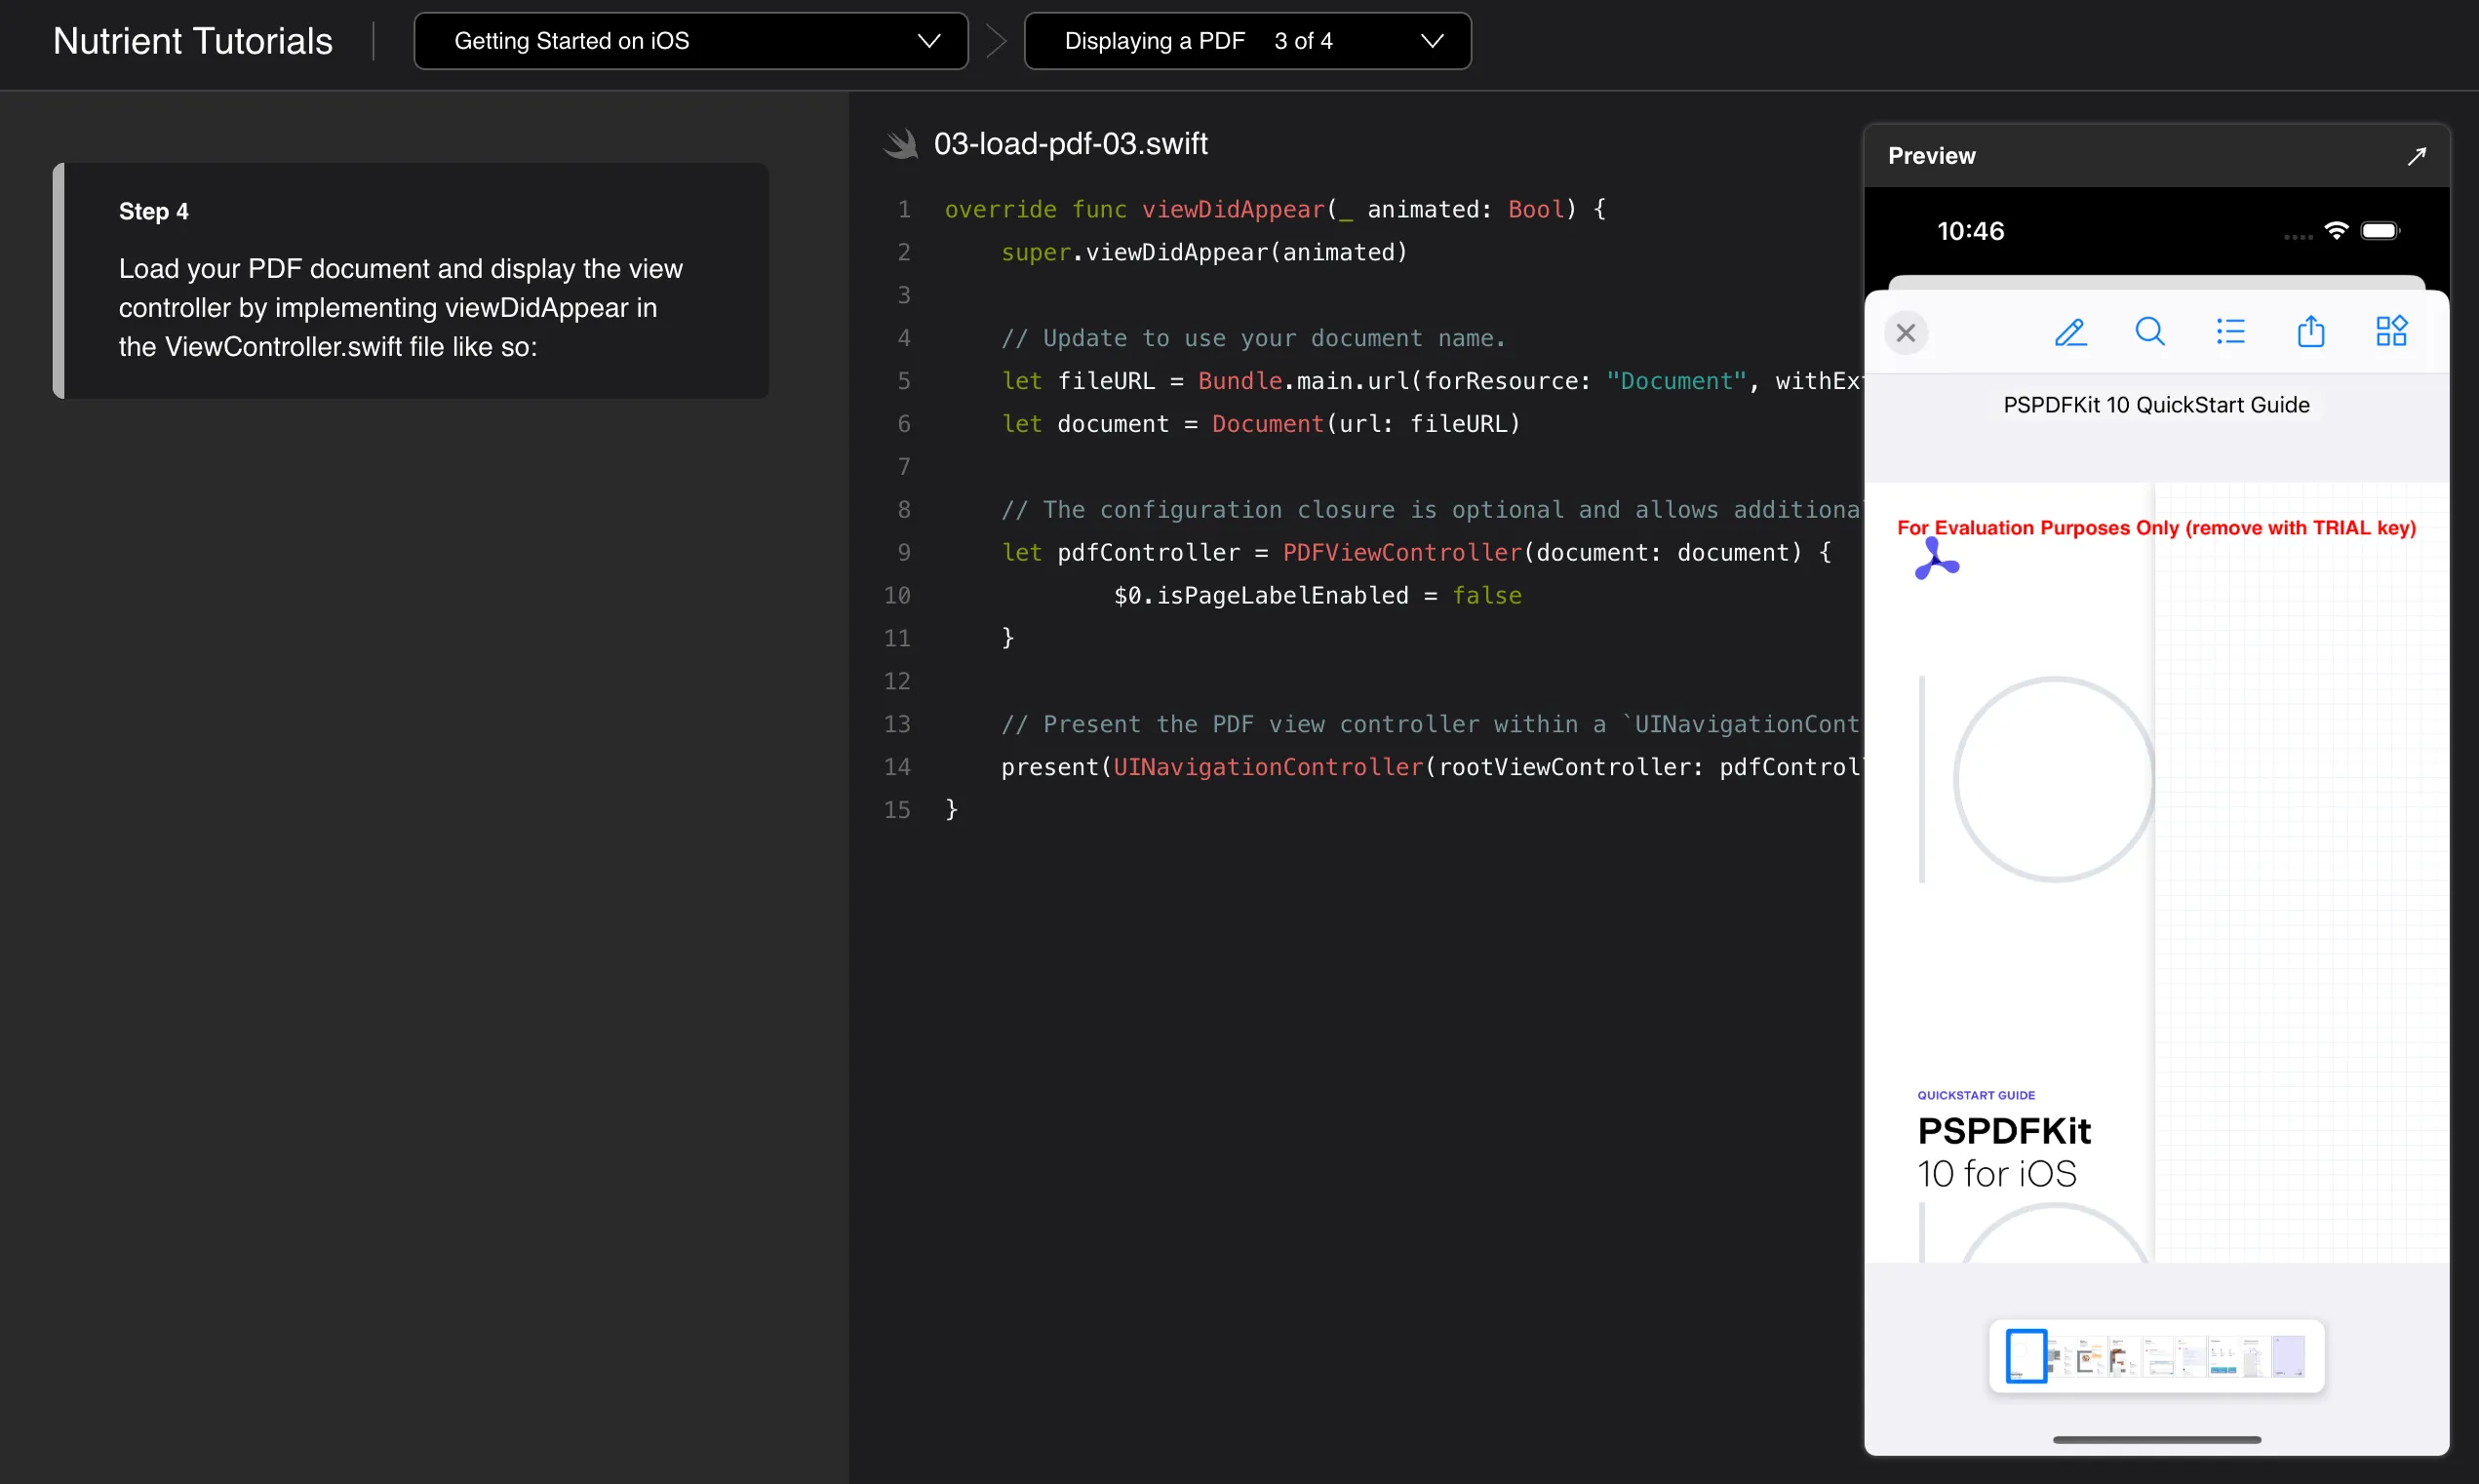
If you prefer to add an element of gamification to your tutorials, you can also include a small test at the end of your tutorial using the Assessment(opens in a new tab) directive:
@Assessments {   @MultipleChoice {      Nutrient iOS SDK also offers support for visionOS.
      @Choice(isCorrect: true) {            Yes
            @Justification(reaction: "That's right!") {               Nutrient SDK offers support for iOS, visionOS, and Mac Catalyst.            }      }
      @Choice(isCorrect: false) {            No
            @Justification(reaction: "Try again!") {               Remember, Nutrient iOS SDK supports multiple platforms.            }      }   }}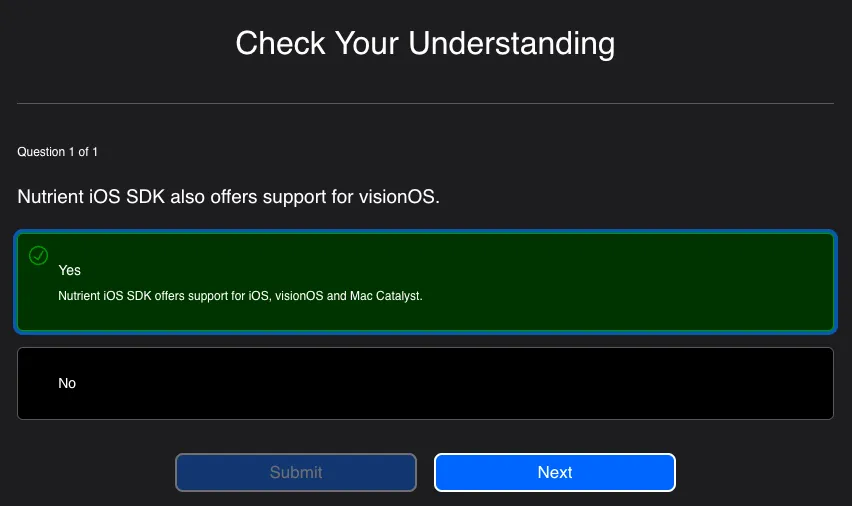
Generate and preview the interactive tutorial
To preview the interactive tutorial, use Swift-DocC’s docc preview command, passing in the location of the project’s .docc folder as the parameter:
xcrun docc preview 'Documentation.docc'You can then preview your interactive tutorial in the browser:
http://localhost:8080/tutorials/nutrientTutorials can also be hosted on a web server as a static site; refer to the Apple documentation(opens in a new tab) for more information.
That’s it! You’ve successfully created your first DocC interactive tutorial showing the reader how to create a new iOS application using Xcode, integrating the Nutrient Swift package, and finally, using the SDK to load a sample PDF document.
Conclusion
DocC interactive tutorials is well documented and easy to add to existing frameworks or packages, especially if they’re already set up for DocC documentation. It provides a great developer experience, offering engaging and hands-on examples of common use cases of your frameworks. Additionally, developers can follow the code-along style of the tutorials to get instant feedback while getting to know your frameworks.
DocC interactive tutorials supports even more directives that weren’t covered in this blog post. To learn more, head over to the official documentation(opens in a new tab) to explore these and start building your own tutorials!


