How to generate PDF invoices in Node.js using PDFKit

PDFKit is a JavaScript library for generating PDF documents in Node.js. This tutorial walks through creating dynamic PDF invoices by setting up a data model, generating static elements (header/footer), and adding dynamic content (customer information and item tables). PDFKit offers features like image embedding, font subsetting, and interactive forms. For more advanced functionality like digital signatures or annotations, consider Nutrient’s Document Engine or PDF Generation SDK.
A lot of Node.js web applications require dynamic PDF generation. When researching possible solutions, developers often stumble upon PDFKit(opens in a new tab), a JavaScript PDF generation library for Node.js and the browser.
In this tutorial, you’ll explore how to use PDFKit to generate PDF invoices with both static and dynamic data in your Node.js app. If you want to skip directly to the solution, you can take a look at the complete example on GitHub(opens in a new tab).
Introduction to PDFKit
PDFKit(opens in a new tab) is a powerful PDF generation library for Node.js and browser environments. For more complete solutions, our JavaScript PDF generator offers enterprise-grade features. With PDFKit, developers can generate complex documents with a few function calls, making it an ideal solution for creating professional-grade documents such as invoices, contracts, and reports.
Whether you need to generate a simple one-page document or a complex multi-page report, PDFKit provides the flexibility and functionality required. Its extensive API allows for precise control over the layout and content of your PDF files, ensuring that you can create documents that meet your exact specifications. As a robust pdf generation library, PDFKit is well-suited for a variety of use cases, from generating invoices to creating detailed reports.
Step 1 - Setting Up Your Development Environment
Before diving into PDF generation with PDFKit, you need to set up your project environment. Visual Studio Code(opens in a new tab) (VS Code) provides an ideal, user-friendly platform for this. Start by launching VS Code and creating a new JavaScript project. Once your folder is open in VS Code, follow these steps to initialize a new project:
- Open the integrated terminal in VS Code:
- You can do this by pressing `Ctrl + `` (the backtick key).
- Alternatively, go to the top menu and select
Terminal > New Terminal.
- Run the following command to create a new
npmpackage:
npm init -yThis command will create a package.json file in your project directory, which will manage your project’s dependencies and scripts.
Step 2 - Getting Started
Next, you’ll need to pull in the dependencies needed for your project. Run the following commands in the terminal:
mkdir pdfkit-invoicecd pdfkit-invoicenpm install pdfkitNow you’re ready to start creating your first invoice!
Step 3 - Setting Up the Data Model
To make your invoice generator reusable, design a simple data model in the form of a JavaScript object. This model will hold all the information needed to generate the invoice.
Create a file named index.js and add the following data model:
const invoice = { shipping: { name: 'John Doe', address: '1234 Main Street', city: 'San Francisco', state: 'CA', country: 'US', postal_code: 94111, }, items: [ { item: 'TC 100', description: 'Toner Cartridge', quantity: 2, amount: 6000, }, { item: 'USB_EXT', description: 'USB Cable Extender', quantity: 1, amount: 2000, }, ], subtotal: 8000, paid: 0, invoice_nr: 1234,};In the object above, there’s a shipping key that contains all the shipping information to print on the invoice. The items key contains an array of all items you want to print on the invoice (the amount is the sum for all pieces of this item in cents). The subtotal key contains the sum of all items in cents, and the paid field allows you to specify how much was already paid for this invoice. invoice_nr is used to identify the invoice.
Step 4 - Creating the Invoice Generator
With this data model, you’re now ready to generate a PDF file. Start by creating a function, createInvoice(invoice, path), which uses the invoice object to create a valid PDF invoice and then saves it to a file located at path.
Your invoice will consist of four visual parts:
- A header that contains information about your company, including your company’s logo.
- The address of the customer.
- A table of all ordered items.
- A generic footer to wrap up the invoice.
To create an empty PDF document, use the PDFDocument constructor of pdfkit. Then create stub methods for the four sections above. For now, start with generating the header and footer of the invoice:
const fs = require('fs');const PDFDocument = require('pdfkit');
function createInvoice(invoice, path) {  let doc = new PDFDocument({ margin: 50 });
  generateHeader(doc); // Invoke `generateHeader` function.  generateFooter(doc); // Invoke `generateFooter` function.
  doc.end();  doc.pipe(fs.createWriteStream(path));}
module.exports = {  createInvoice,};
The createInvoice function initializes the PDF, calls helper functions to add each section, and writes the output to a file.
Since you’re using Node.js, first export the createInvoice function from the createInvoice.js file and import it to the index.js file:
const { createInvoice } = require('./createInvoice.js');
createInvoice(invoice, 'invoice.pdf');
Step 5 - Adding static data to the PDF
Now that you have an empty PDF page, it’s time to fill it with more information. Start with the two static sections, Header and Footer.
The API of pdfjs requires you to chain all drawing commands on the PDFDocument instance. Images can be loaded using the .image() method:
function generateHeader(doc) {  doc.image('logo.png', 50, 45, { width: 50 })    .fillColor('#444444')    .fontSize(20)    .text('ACME Inc.', 110, 57)    .fontSize(10)    .text('123 Main Street', 200, 65, { align: 'right' })    .text('New York, NY, 10025', 200, 80, { align: 'right' })    .moveDown();}
function generateFooter(doc) {  doc.fontSize(    10,  ).text(    'Payment is due within 15 days. Thank you for your business.',    50,    780,    { align: 'center', width: 500 },  );}
The generateHeader function loads an image file called logo.png. Make sure to add this file to your project directory. You can use our demo image as an example.
The .image() and .text() methods take x and y as the second and third argument, respectively. Use those coordinates to lay out the text however you want.
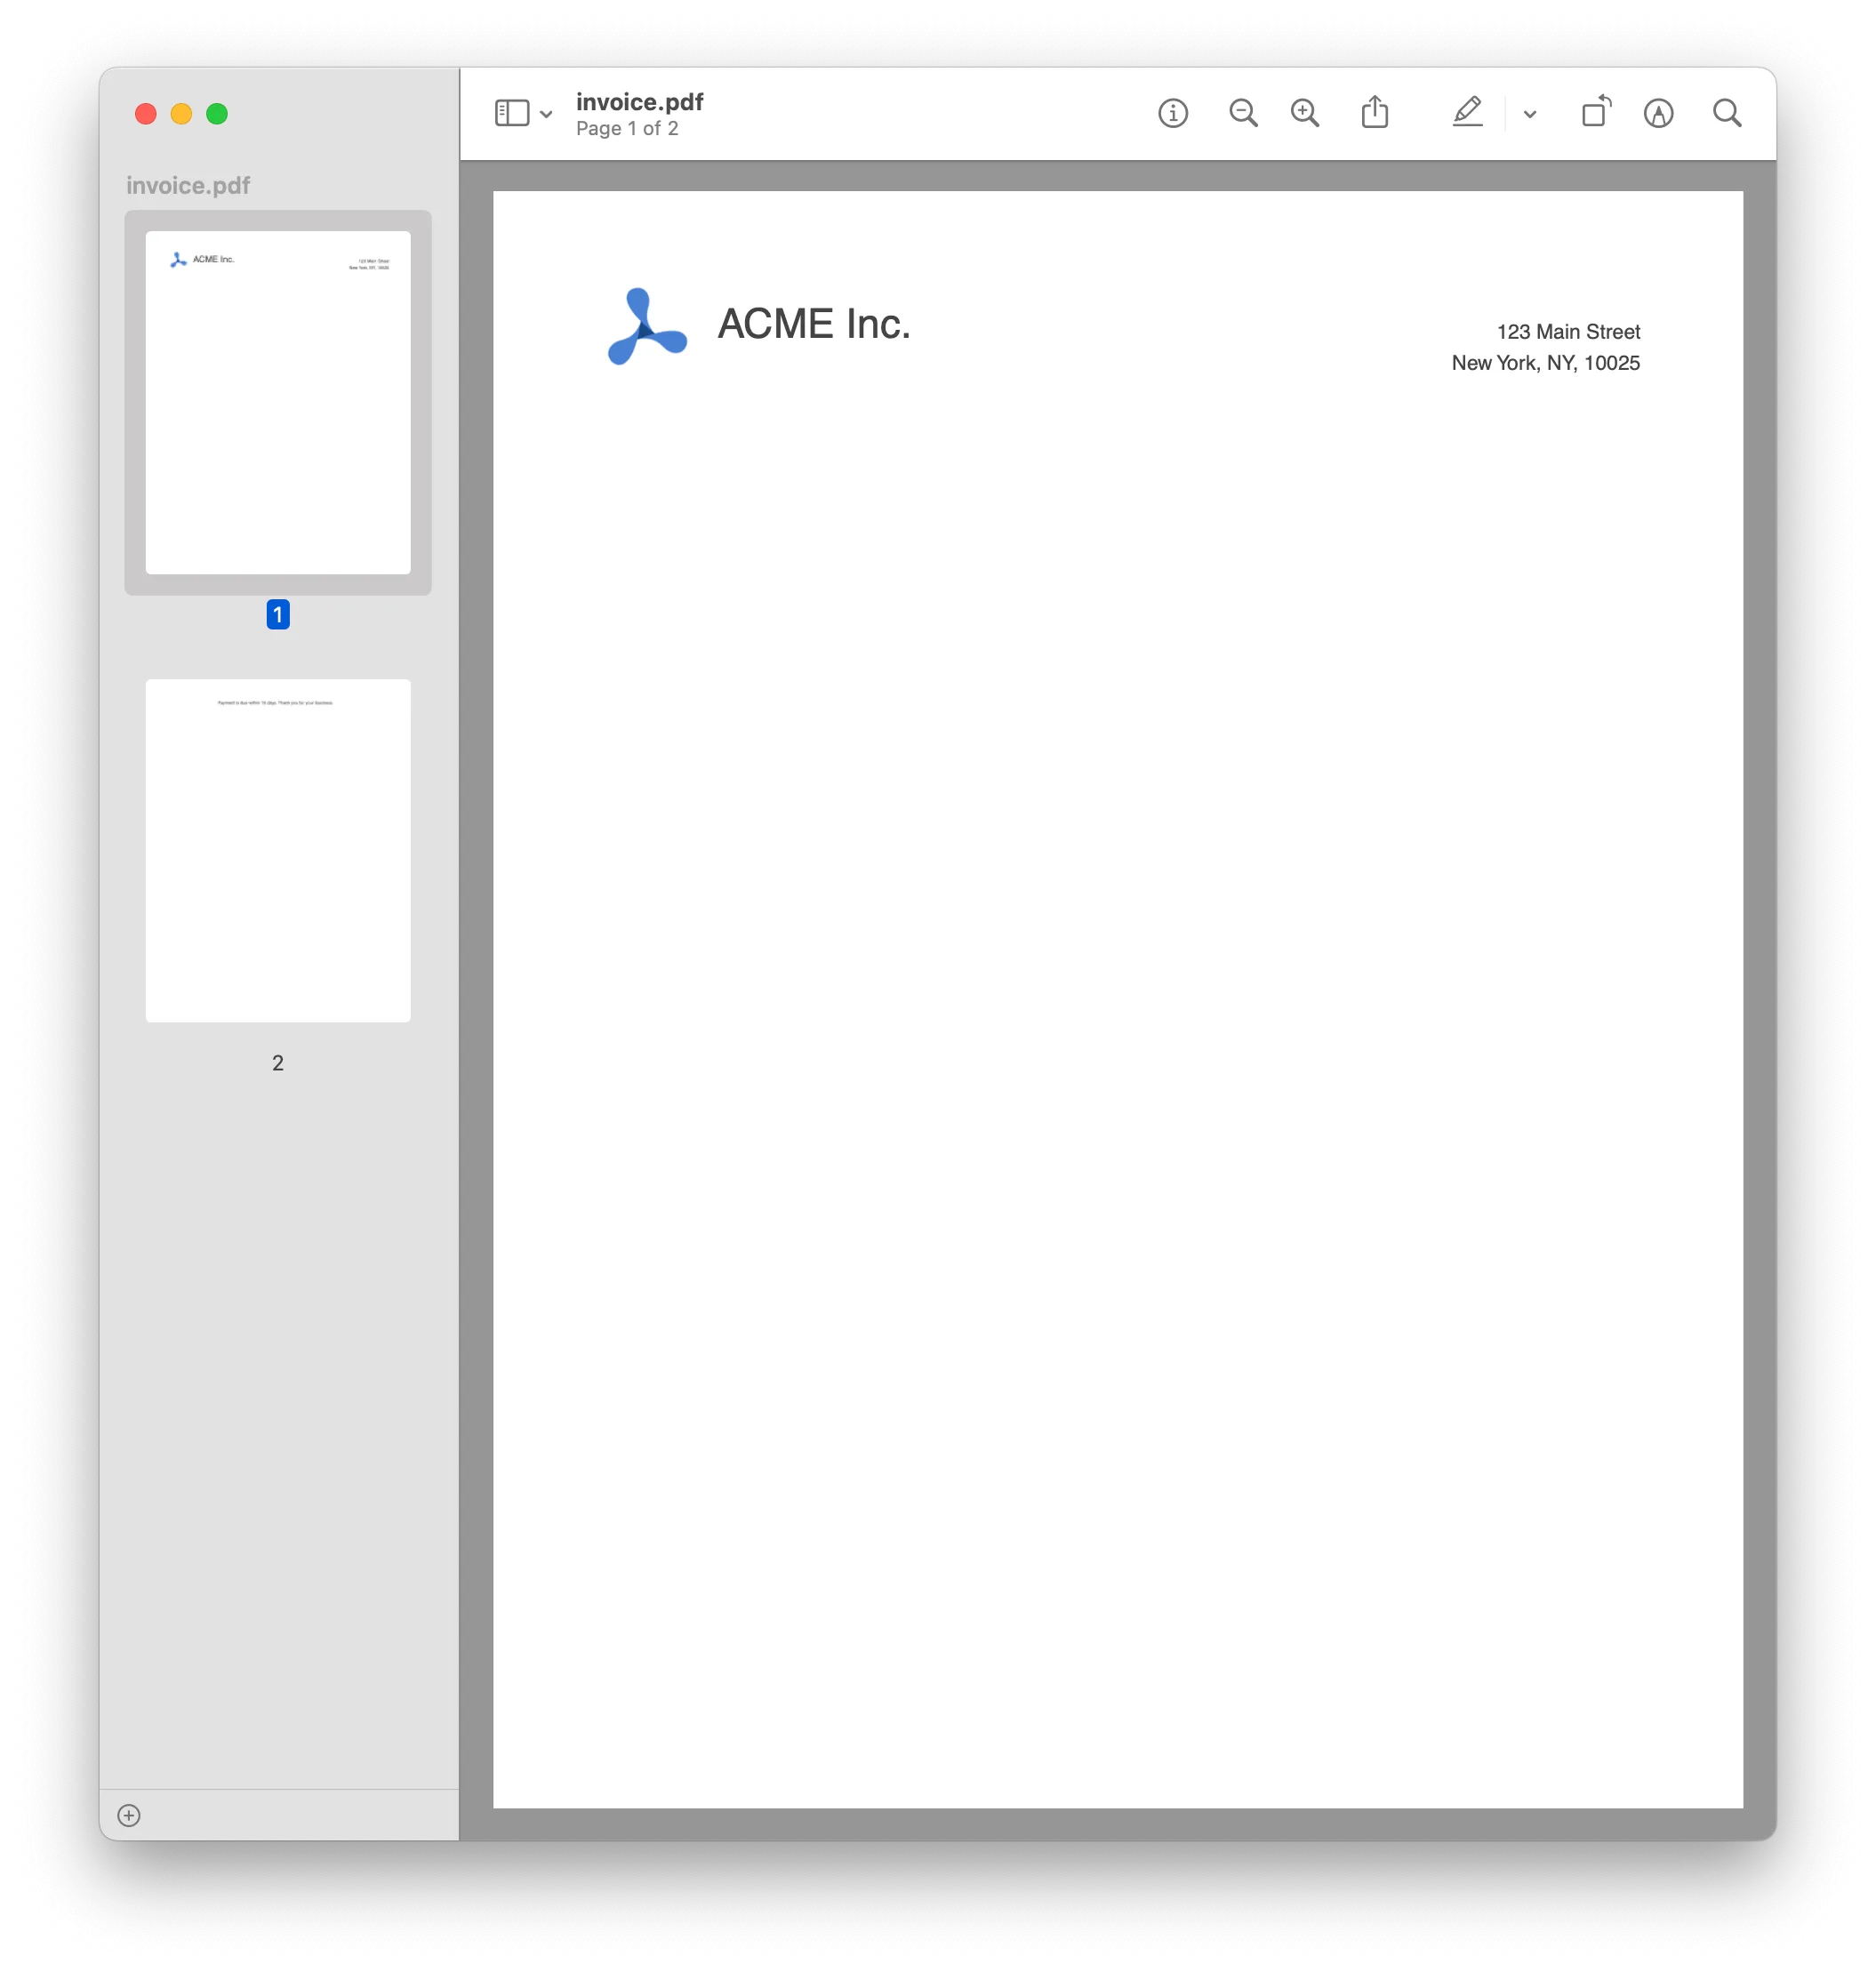
Run the Node.js script from your terminal by typing node index.js. This will generate the above PDF. But now you need to add dynamic data to it!
Step 6 - Adding dynamic data to the PDF
To add the dynamic bits to your PDF, you’ll rely on the data model outlined earlier. Start with the customer information section. Here, you want to print the address of your customer, which you can do by concatenating the dynamic values to the PDF rendering commands:
function generateCustomerInformation(doc, invoice) {  const customerInformationTop = 200;
  doc.fillColor('#444444').fontSize(20).text('Invoice', 50, 160);
  generateHr(doc, 185);
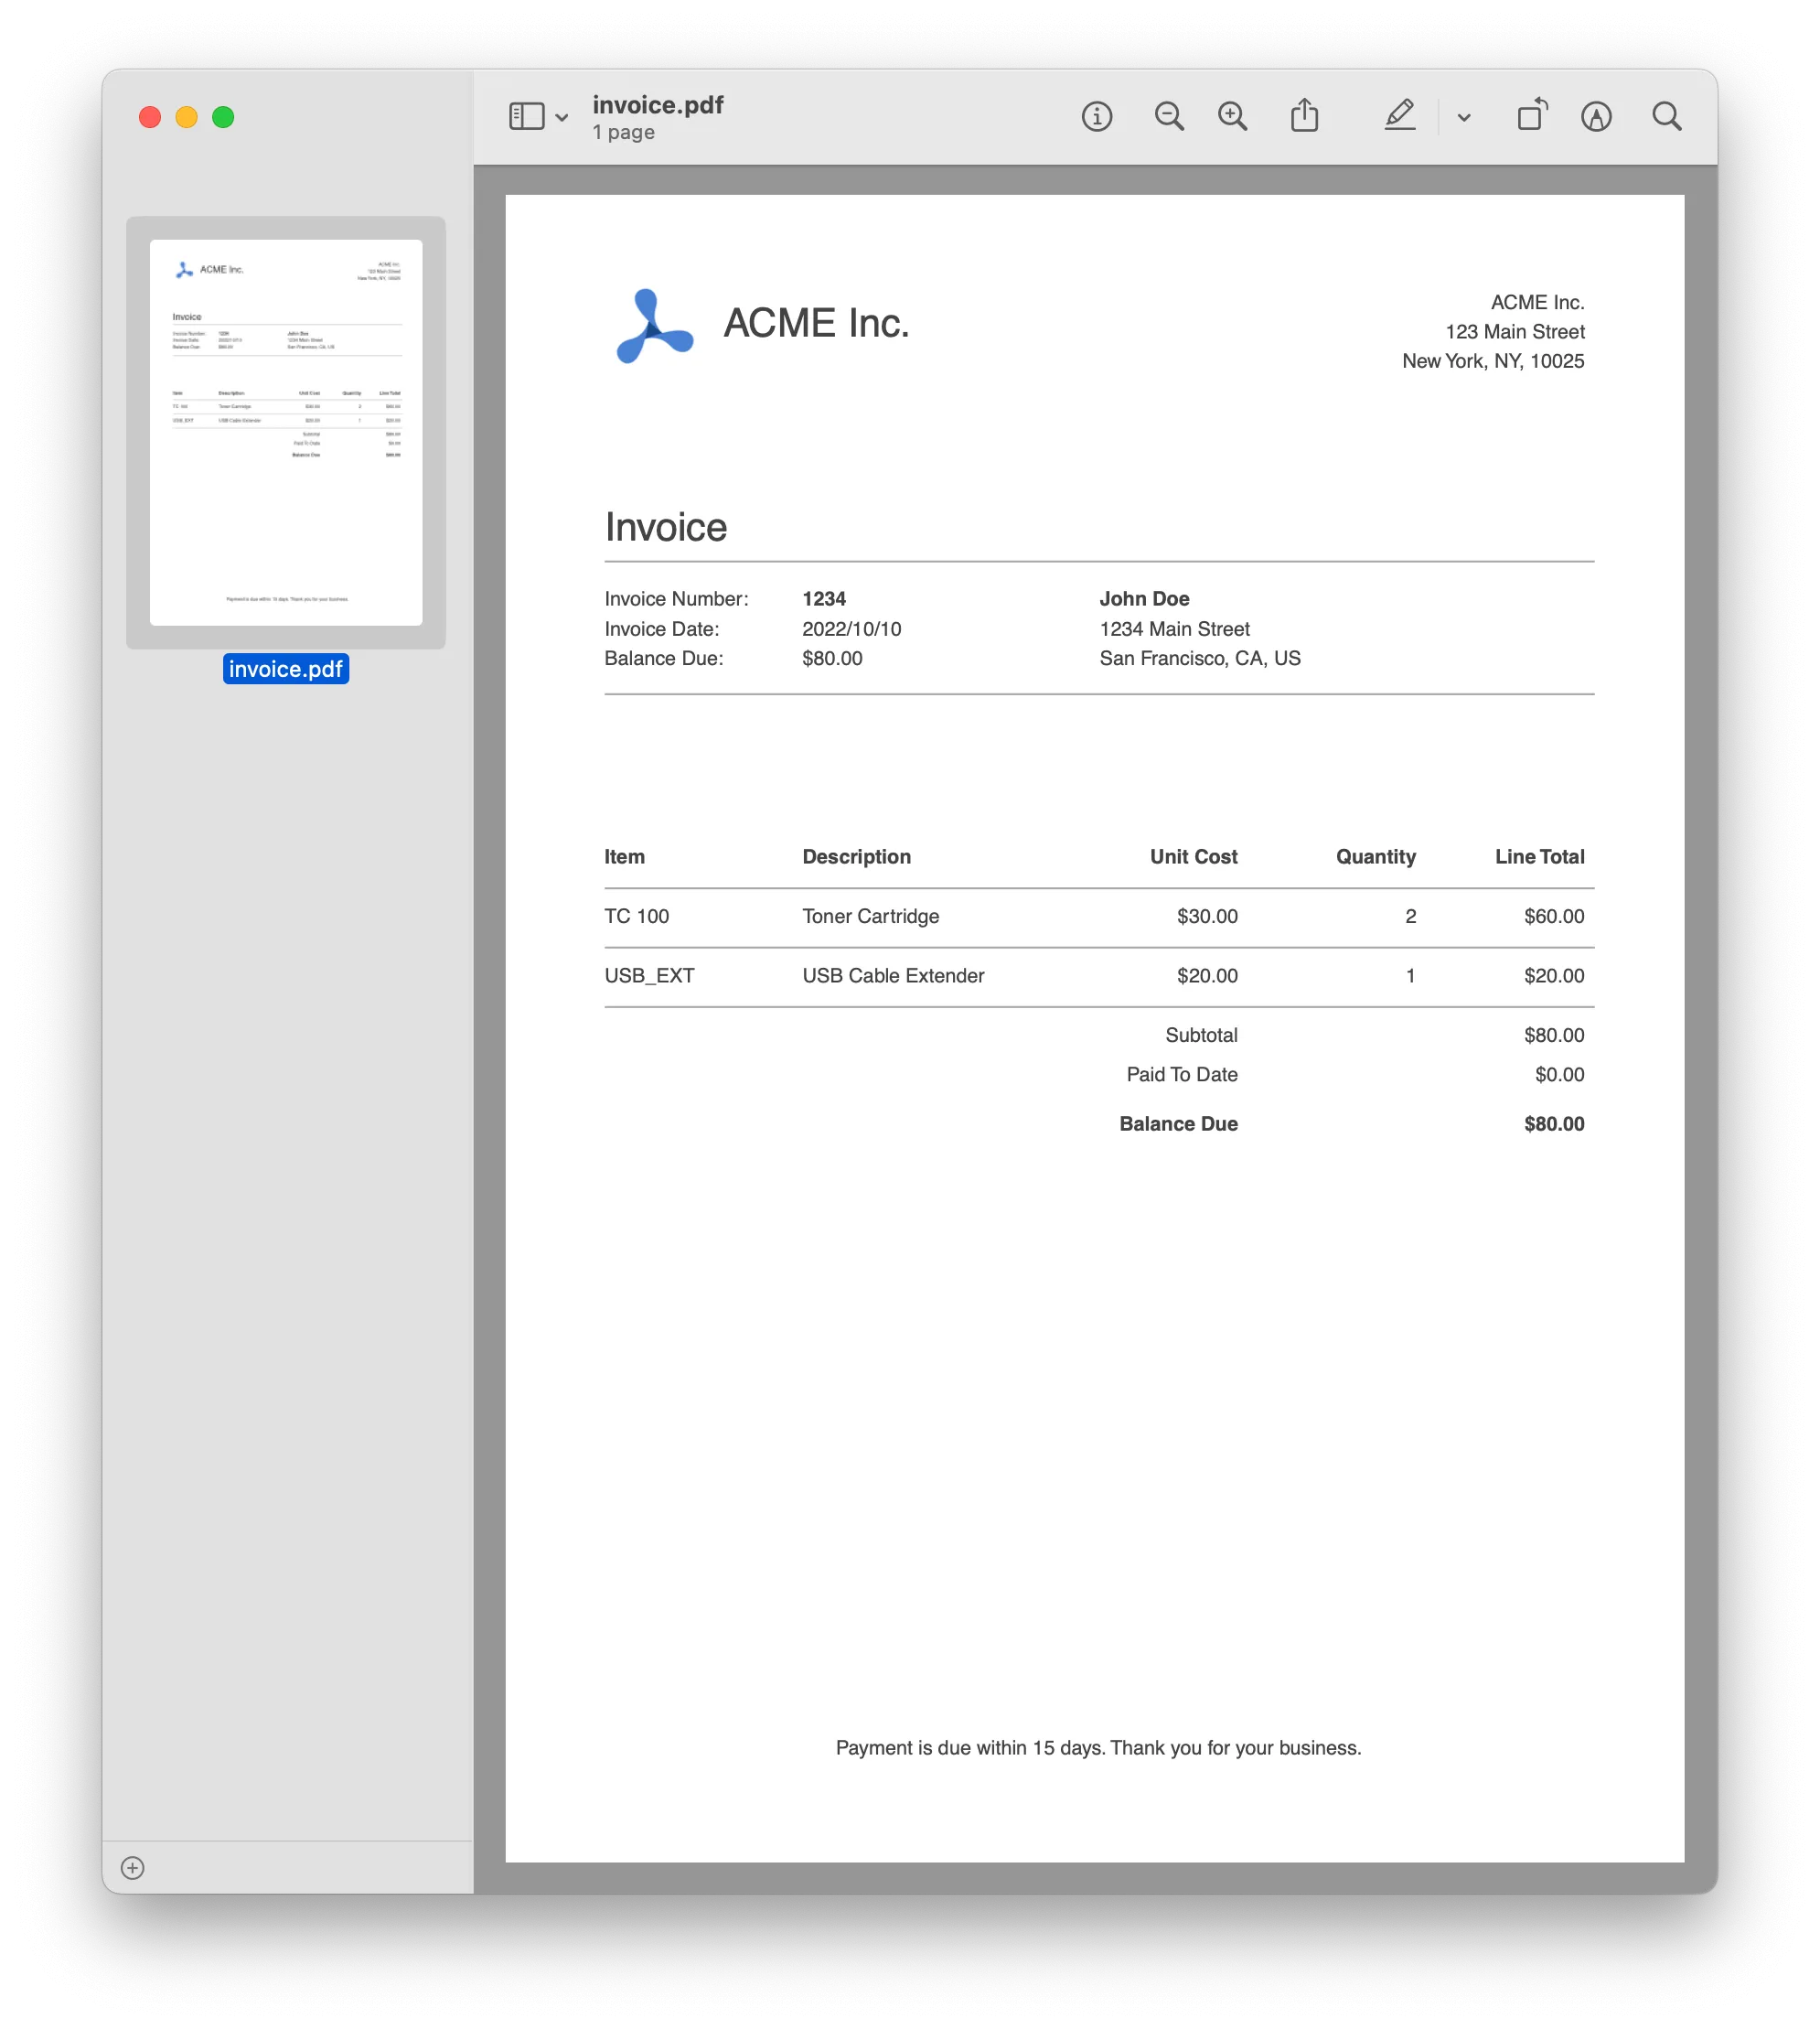
  doc.fontSize(10)    .text('Invoice Number:', 50, customerInformationTop)    .font('Helvetica-Bold')    .text(invoice.invoice_nr, 150, customerInformationTop)    .font('Helvetica')    .text('Invoice Date:', 50, customerInformationTop + 15)    .text(formatDate(new Date()), 150, customerInformationTop + 15)    .text('Balance Due:', 50, customerInformationTop + 30)    .text(      formatCurrency(invoice.subtotal - invoice.paid),      150,      customerInformationTop + 30,    )    .font('Helvetica-Bold')    .text(invoice.shipping.name, 300, customerInformationTop)    .font('Helvetica')    .text(invoice.shipping.address, 300, customerInformationTop + 15)    .text(      `${invoice.shipping.city}, ${invoice.shipping.state}, ${invoice.shipping.country}`,      300,      customerInformationTop + 30,    )    .moveDown();
  generateHr(doc, 252);}
The generateCustomerInformation function dynamically displays information based on the invoice object.
Step 7 - Creating the Invoice Table
For the table, you’ll use a helper function that draws one row of the column. You can later loop over all the items in your invoice model and create table rows for them. To make sure the helper renders everything in one row, set the y coordinate as an argument to the function. Every row will have five columns, c1 to c5:
function generateTableRow(doc, y, c1, c2, c3, c4, c5) { doc.fontSize(10) .text(c1, 50, y) .text(c2, 150, y) .text(c3, 280, y, { width: 90, align: 'right' }) .text(c4, 370, y, { width: 90, align: 'right' }) .text(c5, 0, y, { align: 'right' });}Use this helper function to render one row for every line item:
function generateInvoiceTable(doc, invoice) {  let i,    invoiceTableTop = 330;
  for (i = 0; i < invoice.items.length; i++) {    const item = invoice.items[i];    const position = invoiceTableTop + (i + 1) * 30;    generateTableRow(      doc,      position,      item.item,      item.description,      item.amount / item.quantity,      item.quantity,      item.amount,    );  }}
To keep the code examples in this post concise, we stripped out table headers and footers, along with some utility functions for formatting currency and dates. You can see the complete example code on GitHub(opens in a new tab).
In any case, once you add the table headers and footers, you’ll have a full invoice generated on demand using pdfkit in Node.js.
Adding Images to the PDF Document
PDFKit supports embedding images such as JPEG and PNG files directly into the PDF. To add an image, use the image() method on a PDFDocument instance. Here’s an example:
const PDFDocument = require('pdfkit');const fs = require('fs');
const doc = new PDFDocument();doc.pipe(fs.createWriteStream('output.pdf'));
// Embedding the image at specified coordinatesdoc.image('image.jpg', 100, 100);
// Additional content can go here
doc.end();
In this example, image.jpg is placed at coordinates (100, 100) on the PDF page. PDFKit will automatically scale the image to fit if you specify width and height parameters, like so: doc.image('image.jpg', 100, 100, { width: 200, height: 200 });
Font Subsetting
PDFKit also supports font subsetting, which means it only includes the characters used in the document within the embedded fonts. This can reduce file size, especially for documents that only need a limited set of characters or when using custom fonts.
Customizing the PDF Document Layout
With PDFKit, you have control over page layout, margins, and orientation. You can specify these options when creating the PDFDocument instance:
const doc = new PDFDocument({  margins: { top: 50, bottom: 50, left: 50, right: 50 },  size: 'A4',  layout: 'portrait', // 'portrait' or 'landscape'});doc.pipe(fs.createWriteStream('output.pdf'));
// Additional content here
doc.end();
In this example, the document is created with specified margins and an A4 page size in portrait orientation. If you need to add another page with the same or different settings, you can use the addPage() method.
Buffering Pages
The bufferPages option allows you to control when pages are written to the output file. This is useful for creating complex documents where you may need to manipulate or reorder pages before finalizing them.
Interactive Forms
PDFKit also supports basic interactive elements like text fields, checkboxes, and radio buttons, allowing you to create fillable forms within your PDFs. This feature can enhance user interaction within the PDF document, although the support is more limited than in dedicated form libraries.
Conclusion
PDFKit(opens in a new tab) allows us to generate PDF documents in Node.js and the browser. It’s ideally suited for tasks like dynamically generating PDF invoices for your web server. In the example above, you learned about PDFKit and used it to dynamically generate a PDF invoice from a simple object-based data model. You can check out the source code on GitHub(opens in a new tab).
PDFKit is a versatile PDF document generation library with a simple API. If you want to display the PDF in a powerful PDF viewer or add advanced functionality such as digital signatures or PDF annotations, we recommend you give Document Engine a try.
If you’re interested in automating the PDF generation process, take a look at our PDF Generation SDK or our PDF Generation API, both of which let you generate PDF invoices from an HTML document. We also have a blog post that guides you through generating PDFs from HTML with Node.js.
FAQ
Here are a few frequently asked questions about generating PDF invoices with Node.js.
How can I generate PDF invoices using Node.js?
You can generate PDF invoices using Node.js by leveraging libraries like PDFKit. These libraries provide APIs to create and customize PDF documents programmatically.
What are the steps to install and set up PDFKit in a Node.js project?
Install PDFKit using npm with npm install pdfkit. Then, require it in your Node.js script and use its methods to create and customize PDF documents.
Can I add custom styles and formatting to the PDF invoices?
Yes, PDFKit allows you to add custom styles, fonts, images, and layouts to the PDF invoices, giving you full control over the appearance and structure of the document.
How can I automate the generation of PDF invoices in a web application?
You can automate the generation of PDF invoices by integrating PDFKit with your web application, using it to generate and serve PDF documents dynamically based on user input or database records.


