


JavaScript PDF viewer tutorial with PDF.js
Table of contents

Build a JavaScript PDF viewer with PDF.js(opens in a new tab) for basic rendering, and then upgrade to Nutrient Web SDK for production features like annotations, forms, signatures, and collaboration. Start a free trial or launch the demo.
If you’re building a JavaScript PDF viewer from scratch, start with PDF.js for basic rendering, and then switch to Nutrient Web SDK when you need production features like annotations, forms, signatures, and collaboration.
Introduction to PDF.js
PDF.js is a JavaScript library from Mozilla that renders PDFs directly in the browser. It uses HTML5 and the Canvas API to display documents without plugins. Because it’s open source and actively maintained, many developers use it to add PDF viewing to their web apps. Later in this tutorial, you’ll see how to replace a custom PDF.js viewer with Nutrient Web SDK to get a full-featured, production-ready JavaScript PDF viewer.
With PDF.js, you can:
- Render PDF files accurately across different browsers.
- Integrate PDF viewing capabilities without external plugins or software.
- Build both simple and advanced PDF viewers tailored to your application’s needs.
Requirements
Before getting started, make sure you have the following installed:
- Node.js(opens in a new tab)
- A package manager like npm(opens in a new tab) (included with Node.js) or yarn(opens in a new tab).
Understanding PDF.js architecture
PDF.js operates through three main layers:
- Core — Interprets the binary format of PDFs and performs heavy parsing operations, often running in a web worker(opens in a new tab) to keep the main thread responsive.
- Display — Builds on the core layer and provides an API for rendering PDF pages into
<canvas>elements using JavaScript. - Viewer — A ready-to-use interface with features like search, rotation, and a thumbnail sidebar.
To use PDF.js, download a recent copy(opens in a new tab) and integrate it into your project.
Building a basic PDF viewer
PDF.js enables rendering of PDFs via AJAX and displaying them in a <canvas> element. Continue reading for a step-by-step guide to setting up a basic viewer.
Step 1 — Download PDF.js files
To render a specific page of a PDF into a <canvas> element, you can use the display layer.
To get started:
- Extract all the files in the downloaded copy of PDF.js.
- Move
pdf.mjsandpdf.worker.mjsfrom thebuild/folder of the download to a new empty folder. - Create an
index.htmlfile and anindex.jsfile.
The HTML file needs to point to the pdf.mjs source code and to the custom application code (index.js).
Creating the HTML file
Create the
canvaselement, which you want to render the PDF inside of:<!-- Canvas to place the PDF --><canvas id="canvas" class="canvas__container"></canvas>Create a toolbar inside the
<header>element to add navigation and zoom controls to the website. Add some icons for the previous (<), next (>), and zoom buttons. For that, you’ll use the Font Awesome(opens in a new tab) library; all you need to do is include the CDN link for it. Then add the following code to theindex.htmlfile:<!DOCTYPE html><html lang="en"><head><meta charset="UTF-8" /><meta http-equiv="X-UA-Compatible" content="IE=edge" /><meta name="viewport" content="width=device-width, initial-scale=1.0" /><title>PDF Viewer in JavaScript</title><linkrel="stylesheet"href="https://cdnjs.cloudflare.com/ajax/libs/font-awesome/6.6.0/css/all.min.css"integrity="sha512-Kc323vGBEqzTmouAECnVceyQqyqdsSiqLQISBL29aUW4U/M7pSPA/gEUZQqv1cwx4OnYxTxve5UMg5GT6L4JJg=="crossorigin="anonymous"referrerpolicy="no-referrer"/><link rel="stylesheet" href="style.css" /></head><body><header><ul class="navigation"><li class="navigation__item"><!-- Navigate to the Previous and Next pages --><a href="#" class="previous round" id="prev_page"><i class="fas fa-arrow-left"></i></a><!-- Navigate to a specific page --><input type="number" value="1" id="current_page" /><a href="#" class="next round" id="next_page"><i class="fas fa-arrow-right"></i></a><!-- Page Info -->Page<span id="page_num"></span>of<span id="page_count"></span></li><!-- Zoom In and Out --><li class="navigation__item"><button class="zoom" id="zoom_in"><i class="fas fa-search-plus"></i></button><button class="zoom" id="zoom_out"><i class="fas fa-search-minus"></i></button></li></ul></header><!-- Canvas to place the PDF --><canvas id="canvas" class="canvas__container"></canvas><!-- Load PDF.mjs --><script src="./pdf.mjs" type="module"></script><script src="index.js" type="module"></script></body></html>
Loading the PDF
In your
index.jsfile, add the following line to import theGlobalWorkerOptionsclass from the PDF.js library:import { GlobalWorkerOptions } from "https://cdn.jsdelivr.net/npm/pdfjs-dist@4.5.136/build/pdf.min.mjs";Set the
workerSrcproperty onGlobalWorkerOptionsto point to the worker script. This configuration is essential for PDF.js to operate correctly:GlobalWorkerOptions.workerSrc ="https://cdn.jsdelivr.net/npm/pdfjs-dist@4.5.136/build/pdf.worker.min.mjs";In your
index.jsfile, create a variable to hold the PDF document and usedocument.querySelectorto access DOM elements. Additionally, set up an object to maintain the initial state of the application:const pdf = "document.pdf";const pageNum = document.querySelector("#page_num");const pageCount = document.querySelector("#page_count");const currentPage = document.querySelector("#current_page");const previousPage = document.querySelector("#prev_page");const nextPage = document.querySelector("#next_page");const zoomIn = document.querySelector("#zoom_in");const zoomOut = document.querySelector("#zoom_out");const initialState = {pdfDoc: null,currentPage: 1,pageCount: 0,zoom: 1,};Pass the name of your PDF document to the
pdfvariable.Use the
pdfjsLib.getDocument(pdf)method to load the PDF file, with thepdfparameter being the path to the PDF file. Then, use the.promise.then()method to handle the promise. The.then()method takes a callback function that will be called when the promise is fulfilled. Here, you can access the PDF file and set theinitialState.pdfDocto the PDF:// Load the document.pdfjsLib.getDocument(pdf).promise.then((data) => {initialState.pdfDoc = data;console.log("pdfDocument", initialState.pdfDoc);pageCount.textContent = initialState.pdfDoc.numPages;renderPage();}).catch((err) => {alert(err.message);});This API makes heavy use of
Promise, a JavaScript feature for handling future values. If you’re not familiar with this pattern, check out the MDN web docs(opens in a new tab). After loading the document, set the text content of thepageCountto the number of pages in the document.As you can see, there’s a function called
renderPage(). Use this function to render the current page of your document:
// Render the page.const renderPage = () => {  // Load the first page.  console.log(initialState.pdfDoc, "pdfDoc");  initialState.pdfDoc.getPage(initialState.currentPage).then((page) => {    console.log("page", page);
    const canvas = document.querySelector("#canvas");    const ctx = canvas.getContext("2d");    const viewport = page.getViewport({      scale: initialState.zoom,    });
    canvas.height = viewport.height;    canvas.width = viewport.width;
    // Render the PDF page into the canvas context.    const renderCtx = {      canvasContext: ctx,      viewport: viewport,    };
    page.render(renderCtx);
pageNum.textContent = initialState.currentPage; });};- Now that the PDF has been initialized, invoke
getPage()on the document instance. The returnedPromiseresolves with apageobject you can use to render the first page of your document. - To draw something on the canvas, use the
canvas.getContext()method. This method returns a context object you can use to draw on the canvas. - The
getViewport(scale)method returns a viewport object that represents the page at the given scale. - Use the viewport information to set the dimensions of the
<canvas>element, and then start the page renderer with therender(options)API. - At the end, set the text content of the page number to the current page. This will dynamically update the page number.
Navigating through the PDF pages
Until now, you’ve only rendered the first page of your PDF document. Now, you’ll work on making the previous and next icons functional when a user clicks them:
const showPrevPage = () => {  if (initialState.pdfDoc === null || initialState.currentPage <= 1) return;  initialState.currentPage--;  // Render the current page.  currentPage.value = initialState.currentPage;  renderPage();};
const showNextPage = () => {  if (    initialState.pdfDoc === null ||    initialState.currentPage >= initialState.pdfDoc._pdfInfo.numPages  )    return;
  initialState.currentPage++;  currentPage.value = initialState.currentPage;  renderPage();};
// Button events.previousPage.addEventListener("click", showPrevPage);nextPage.addEventListener("click", showNextPage);
As you can see, the showPrevPage and showNextPage functions are similar. They both check if the current page is the first or last page, and if it is, they do nothing. Otherwise, they decrement or increment the current page and then render the page.
Displaying a specific page
Here, you can specify which page to render based on a user input. You’re using the keydown event to listen for the Enter key — keypress is deprecated and behaves inconsistently for non-printable keys, so prefer keydown (or keyup) and check event.key === "Enter". When the user presses the Enter key, you’ll get the page number from the currentPage input and check if it’s between the ranges of PDF pages. If it is, you’ll set the currentPage to the desired page and render the page:
// Keydown event.currentPage.addEventListener("keydown", (event) => {  if (initialState.pdfDoc === null) return;
  if (event.key === "Enter") {    // Get the new page number and render it.    let desiredPage = currentPage.valueAsNumber;    initialState.currentPage = Math.min(      Math.max(desiredPage, 1),      initialState.pdfDoc._pdfInfo.numPages,    );
    currentPage.value = initialState.currentPage;    renderPage();  }});
For cases when a user types a number that’s either negative or greater than the number of pages, set the currentPage to the first or last page, respectively, and display the page.
Adding a zoom feature to PDF.js
You’re done navigating through the PDF pages. Now, you’ll add the zoom feature:
// Zoom events.zoomIn.addEventListener("click", () => {  if (initialState.pdfDoc === null) return;  initialState.zoom *= 4 / 3;  renderPage();});
zoomOut.addEventListener("click", () => {  if (initialState.pdfDoc === null) return;  initialState.zoom *= 2 / 3;  renderPage();});
Similar to how it is with navigation, when the user clicks the zoomIn or zoomOut buttons, you’ll increment or decrement the zoom value and then render the page.
Serving your website
Make sure to copy a PDF file into the folder and rename it to
document.pdf.Install the
servepackage:Terminal window npm install --global serveServe the contents of the current directory:
Terminal window serve -l 8080 .Navigate to http://localhost:8080 to view the website.
Embedding the PDF.js viewer in an HTML window
While the display layer provides fine-grained control over which parts of a PDF document are rendered, there are times when you might prefer a ready-to-use viewer. Luckily, PDF.js has you covered. In this part, you’ll integrate the PDF.js default viewer into the website.
Go back to the
pdfjs-distfolder you downloaded earlier.Copy the entire
web/folder into a new directory.Create a
build/folder inside the new directory and copy thepdf.mjsandpdf.worker.mjsfiles there.Create an
index.htmlfile that will include the viewer via an<iframe>. Locate this file in the root of your project.This enables you to easily embed the viewer into an existing webpage. The viewer is configured via URL parameters, a list of which can be found here(opens in a new tab). For this example, you’ll only configure the source PDF file, and you no longer need the
index.jsfile:<!DOCTYPE html><html><head><meta charset="UTF-8" /><title>PDF.js Example</title></head><body><iframesrc="/web/viewer.html?file=document.pdf"width="1000px"height="1000px"style="border: none"/></body></html>For more advanced features — like saving the PDF document to your web server again — you can start modifying the
viewer.htmlfile provided by PDF.js. You can find theviewer.htmlfile inside theweb/folder.Now, place your PDF file inside the
webdirectory.Run
serve -l 8080 .from the root directory to serve the contents of theindex.htmlfile, and navigate to thehttp://localhost:8080/web/viewer?file=document.pdfURL to view the PDF. According to the name of your local PDF file, you can changedocument.pdfto your PDF file name.Your file directory will now look like this:
pdfjs-viewer-example ├── build | └── pdf.mjs | └── pdf.worker.mjs ├── web | └── viewer.html | └── document.pdf | └── ...other files └── index.html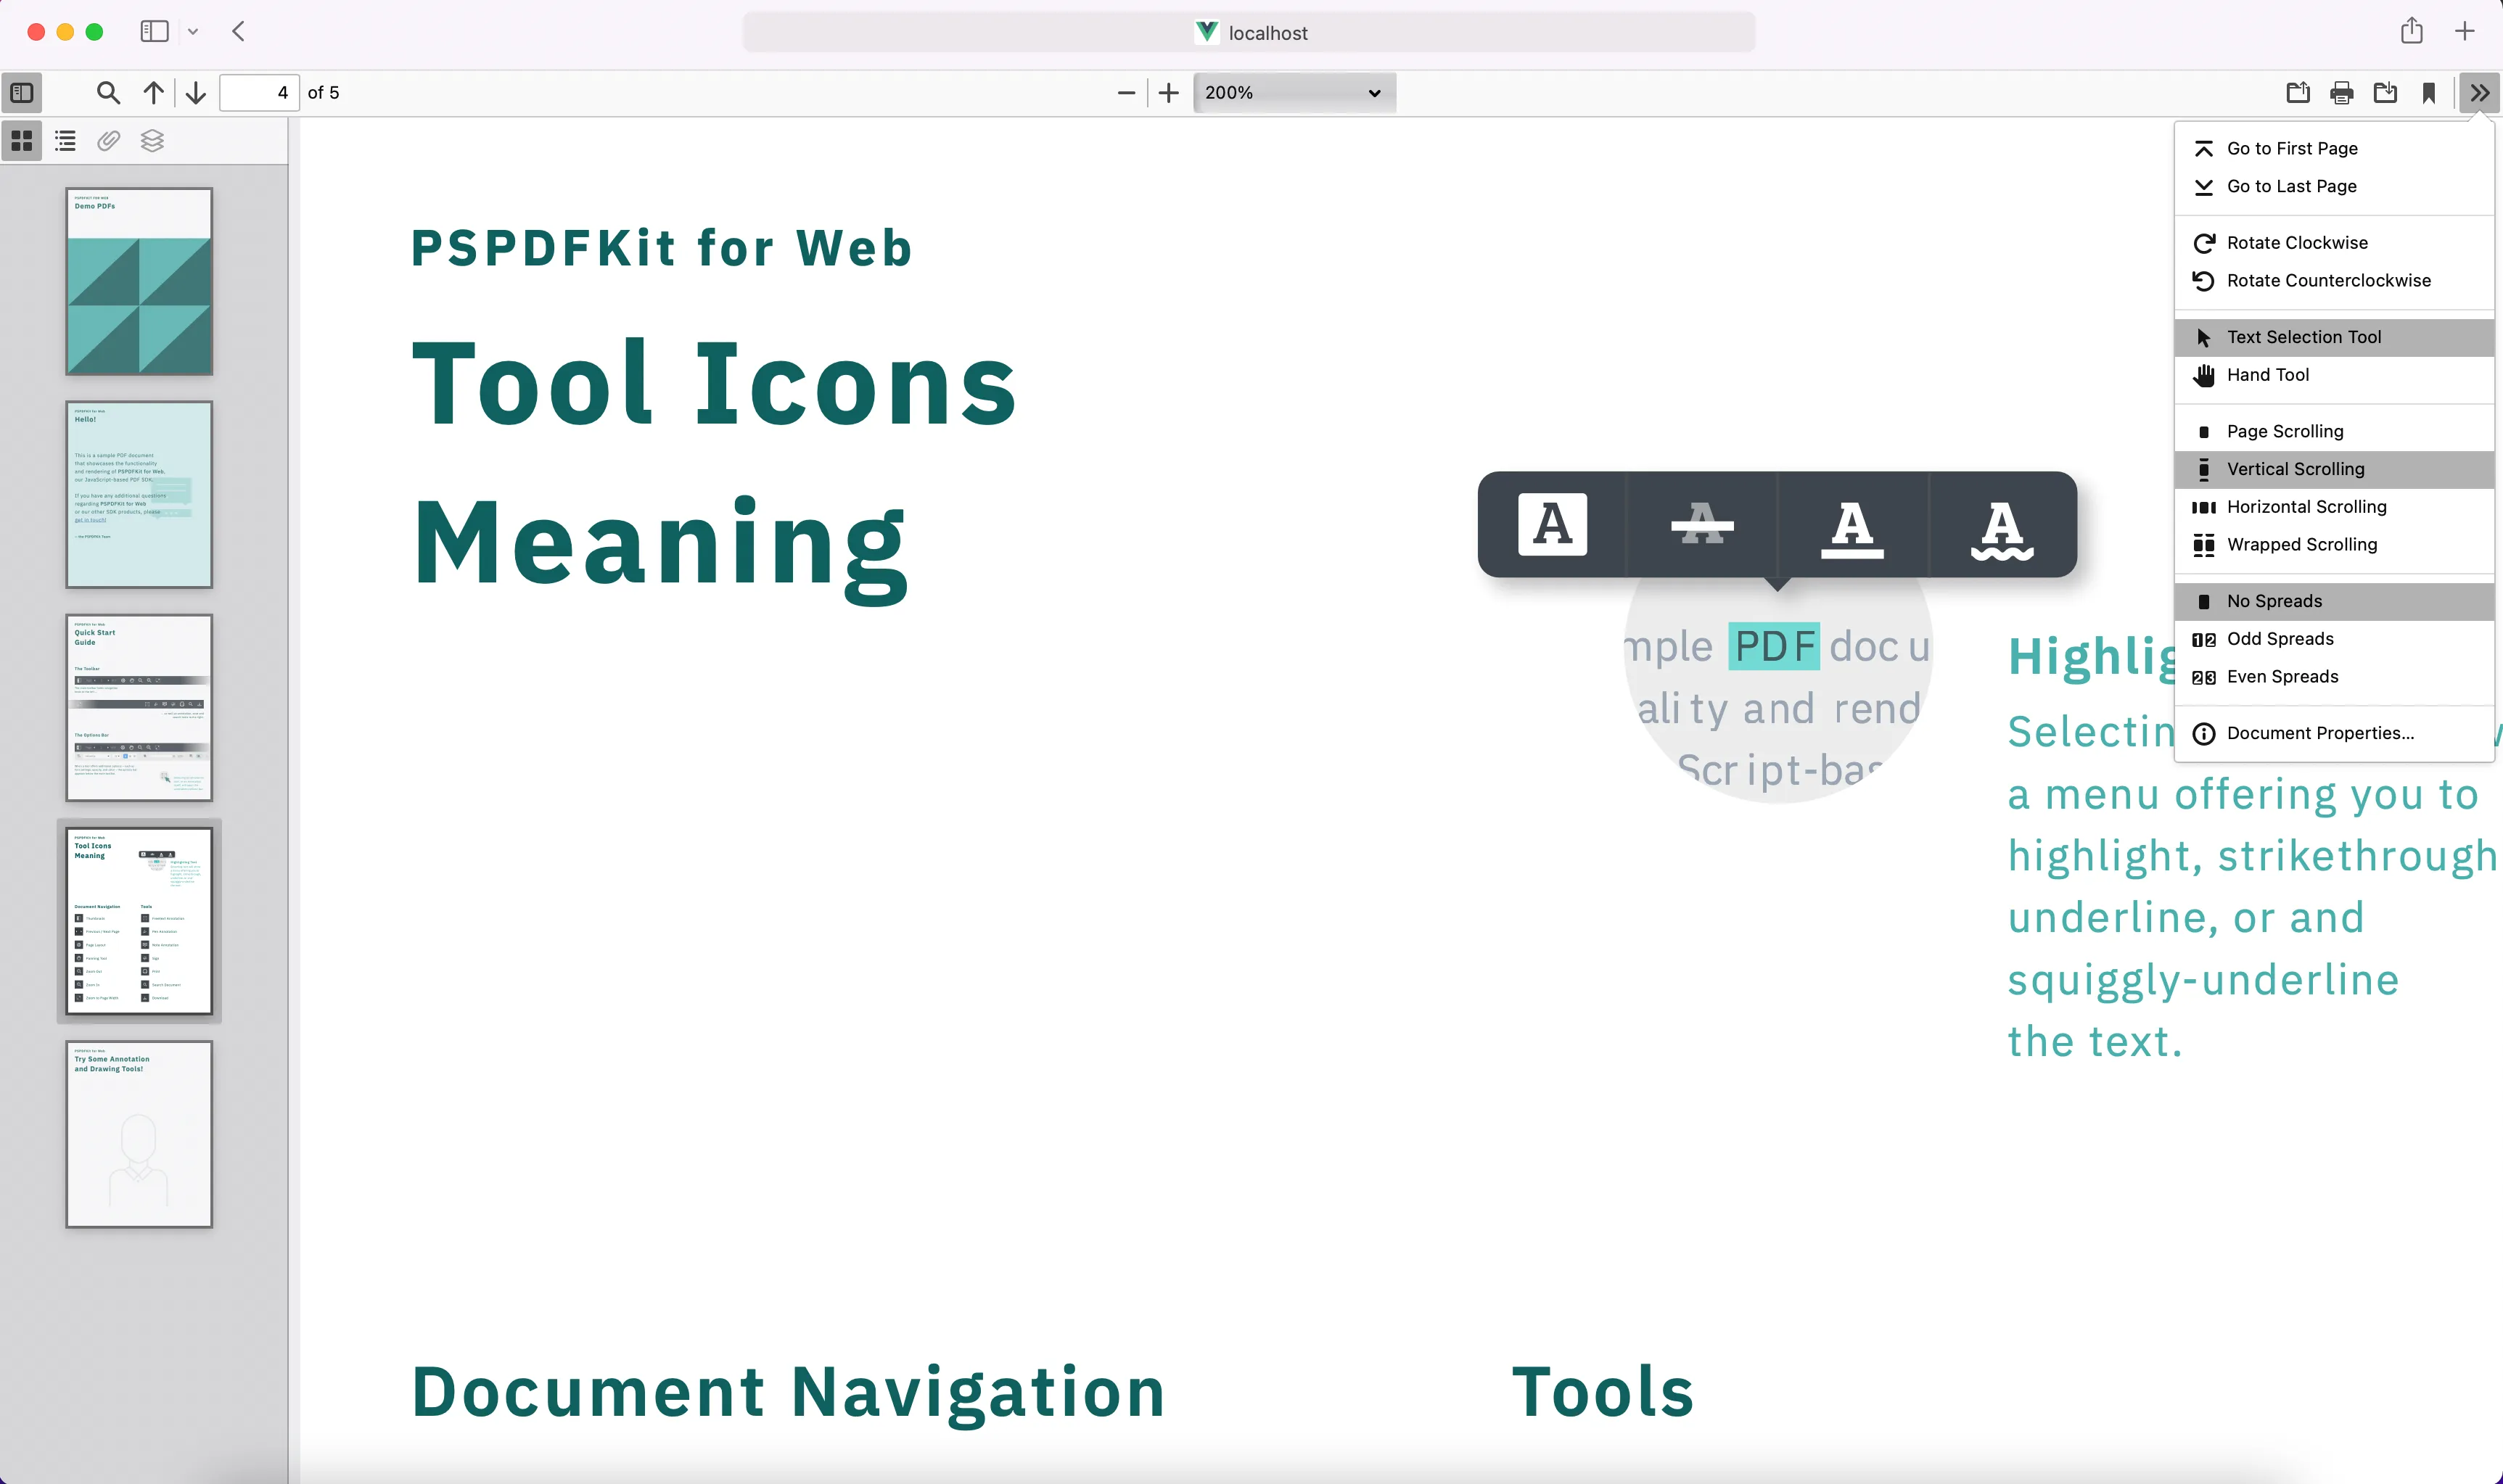
You can access the demo applications on GitHub(opens in a new tab).
PDF.js limitations
PDF.js works well for basic viewing, but lacks production features:
- Annotations — No built-in user interface (UI) for creating or editing annotations. Nutrient includes a full annotation toolkit.
- Forms — Limited form support; buttons and submit actions often fail. Nutrient handles AcroForms reliably.
- Mobile — No pinch-to-zoom or touch gestures. Nutrient is mobile-optimized out of the box.
- Collaboration — No sync layer. Nutrient offers real-time collaboration via Instant.
- Signatures — No digital signature support. Nutrient includes signing and validation.
- View modes — Only continuous scroll. Nutrient offers single-page, two-page, and fullscreen modes.
- Render fidelity — Known issues with complex PDFs. Nutrient uses a commercial rendering engine tested against thousands of documents.
Building a JavaScript PDF viewer with Nutrient
Nutrient Web SDK (formerly PSPDFKit for Web) is a commercial viewer with 30+ built-in features. Instead of building on top of PDF.js, you get a production-ready viewer from day one.
| Feature | PDF.js | Nutrient |
|---|---|---|
| Basic PDF rendering | Yes | Yes |
| Annotation tools | No | Yes |
| Form filling | Limited | Yes (AcroForms) |
| Document collaboration | No | Yes (real time with Instant) |
| PDF editing | No | Yes |
| Digital signatures | No | Yes (visible and invisible) |
| Search functionality | Basic | Advanced |
| Customizable UI | Limited | Highly customizable |
| Security features | Basic | Advanced, with encryption and redaction |
| Best for | Prototypes, internal tools | Customer-facing, enterprise apps |
| Support | Community | Commercial support with SLAs |
Use PDF.js for simple or internal tools, and Nutrient Web SDK for customer-facing or enterprise JavaScript PDF viewers.
Nutrient Web SDK runs in standalone mode using WebAssembly to render and edit documents directly in the browser. This approach eliminates the need for a server, plugins, or internet access, offering a serverless solution with the following benefits:
- Faster setup — No servers to deploy or maintain.
- Lower infrastructure costs — Rendering and processing are handled by the client.
- Enhanced security — Documents remain on the client side, avoiding network transfer.
You can evaluate Nutrient Web SDK without a trial license key, but with some limitations, such as a red watermark on documents. For an unrestricted evaluation, obtain a trial key(opens in a new tab).
Nutrient doesn’t collect data during your evaluation. For a comprehensive introduction, you can watch our getting started with Nutrient video guide(opens in a new tab).
Adding Nutrient to your project
Install the @nutrient-sdk/viewer package via npm. If you prefer, you can also download the SDK manually:
npm i @nutrient-sdk/viewerpnpm add @nutrient-sdk/vieweryarn add @nutrient-sdk/viewerTo run Nutrient Web SDK in the browser, copy the required library files (artifacts) to your assets folder:
cp -R ./node_modules/@nutrient-sdk/viewer/dist/ ./assets/Make sure your assets/ folder contains:
nutrient-viewer.js(entry point)- A
nutrient-viewer-lib/directory with the required runtime assets
Integrating into your project
Add the PDF document you want to display (e.g.
document.pdf) to the root of your project. You can use our demo document as an example.Add an empty
<div>element to your HTML where the viewer will mount:<div id="nutrient" style="height: 100vh;"></div>Import the SDK and initialize it using
NutrientViewer.load():
<!DOCTYPE html><html lang="en">  <head>    <title>Nutrient PDF Viewer</title>    <meta name="viewport" content="width=device-width, initial-scale=1.0" />  </head>  <body>    <div id="nutrient" style="height: 100vh;"></div>
    <script type="module">      import "./assets/nutrient-viewer.js";
      const baseUrl = `${window.location.protocol}//${window.location.host}/assets/`;
      NutrientViewer.load({        container: "#nutrient",        document: "document.pdf",        baseUrl,      })        .then((instance) => {          console.log("Nutrient Viewer loaded", instance);        })        .catch((error) => {          console.error(error.message);        });    </script>  </body></html>
You can serve the application with the serve package like you did for PDF.js.
You should now have our JavaScript PDF viewer up and running in your web application. If you hit any snags, don’t hesitate to reach out to our Support team for help.

If you want to download Nutrient manually or integrate it as a module, you can check out our JavaScript getting started guide.
Conclusion
PDF.js is great for learning and prototypes. For production JavaScript PDF viewers with annotations, forms, or signatures, start a free trial of Nutrient Web SDK, or launch the demo.
Related tutorials: Angular ・ Vue.js ・ React ・ Electron ・ jQuery
Related reading:
- Complete guide to PDF.js — In-depth setup, rendering, and customization reference for PDF.js
- Top five document viewers for developers — Comparison of DOCX and PDF viewer libraries beyond PDF.js
- How to choose the best PDF viewer for your business — Business-focused evaluation guide for PDF viewer SDKs
FAQ
See our step-by-step migration guide for side-by-side code comparisons covering viewer setup, search, annotations, forms, and more.
PDF.js is an open source JavaScript library from Mozilla that renders PDFs in the browser using HTML5 and canvas, without plugins.
Download the library, include pdf.mjs and pdf.worker.mjs in your project, and then use pdfjsLib.getDocument() to load a PDF and render it on a canvas element.
PDF.js works for prototypes and internal tools. For production apps needing annotations, forms, or signatures, Nutrient Web SDK ships these features built in, with commercial support.
Yes. Nutrient runs entirely in the browser using WebAssembly — documents never leave the client. You can deploy it on-premises for regulated industries like finance or healthcare.


