


How to convert HTML to PDF in React with jsPDF
Table of contents

Convert HTML to PDF in React without a server. This guide covers importing jsPDF(opens in a new tab), referencing JSX with useRef, and exporting a PDF — plus custom page sizes, multiple pages, and custom fonts. jsPDF works for basic needs but lacks external CSS support and requires a font converter for non-standard fonts.
What can jsPDF convert to PDF?
The live demo examples(opens in a new tab) demonstrate that jsPDF can render images, shapes, tables, styled text, and multilingual content as PDF. It also supports multipage output with page breaks, password protection, and annotations. Page orientation — landscape or portrait — is configurable.
Setting up jsPDF for HTML to PDF in React
This tutorial uses Vite(opens in a new tab) to scaffold the React project:
npm create vite@latest convert-html-to-pdf -- --template reactChange to the newly created directory and install the jspdf package through npm or yarn:
cd convert-html-to-pdfnpm i jspdfpnpm add jspdfyarn add jspdfStep-by-step: Convert HTML to PDF in React
Now, open the
App.jsxfile and replace the default code with the following:import jsPDF from 'jspdf';// Initialize a new instance of `jsPDF`:const doc = new jsPDF();The constructor accepts configuration options for paper size, orientation, and units. Defaults are A4, portrait, and millimeters.
Pass an object to the constructor to override the defaults:
const doc = new jsPDF({orientation: 'landscape', // or "portrait"unit: 'px', // "mm", "cm", "in" also supportedformat: [612, 792], // US Letter in px [width, height]});You’ll find all the available options in the jsPDF documentation(opens in a new tab).
The
html()(opens in a new tab) method converts an HTML element to PDF. It takes an HTML element and an options object that includes acallbackproperty. Use theuseRef()(opens in a new tab) hook to get a reference to the HTML element.The
doc.save()method takes the name of the PDF file as an argument and downloads the file to the user’s computer:doc.html(html_element, {async callback(doc) {await doc.save('pdf_name');},});
Adding the markup
jsPDF renders the report template below. A button click triggers the PDF generation.
Create a new file called ReportTemplate.jsx and add the following code:
import SalesChart from './sales-chart.png';
const styles = { img: { width: '100%' }, h1: { marginBottom: '1rem' } };
export default function ReportTemplate() {  return (    <div      style={{        padding: '40px',        background: 'white',        color: 'black',      }}    >      <h1 style={styles.h1}>Sales Report 2025</h1>      <img src={SalesChart} style={styles.img} alt="Sales chart" />    </div>  );}
Add a sample image to the src folder and name it sales-chart.png.
Generating the PDF
Next, wire up the button click handler in App.jsx. Import the useRef hook and the ReportTemplate component:
import { useRef } from 'react';import jsPDF from 'jspdf';import ReportTemplate from './ReportTemplate';
function App() {  const reportTemplateRef = useRef(null);
  const handleGeneratePdf = () => {    const doc = new jsPDF({      format: 'a4',      unit: 'px',    });
    // Adding the fonts.    doc.setFont('Inter-Regular', 'normal');
    doc.html(reportTemplateRef.current, {      async callback(doc) {        await doc.save('document');      },    });  };
  return (    <div>      <button className="button" onClick={handleGeneratePdf}>        Generate PDF      </button>      <div ref={reportTemplateRef}>        <ReportTemplate />      </div>    </div>  );}
export default App;
Run npm run dev and click the button to generate a PDF.
Adding custom fonts
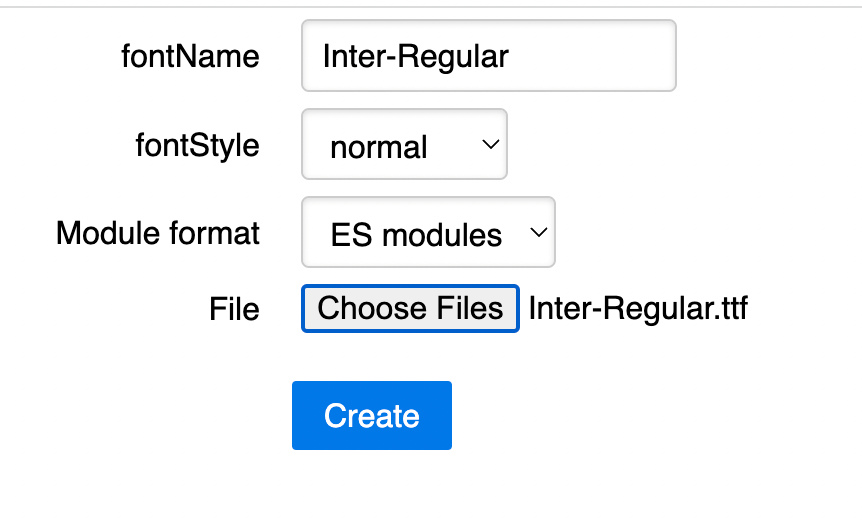
jsPDF supports 14 standard PDF fonts. To add custom fonts, you need to use a font converter. Navigate to this font converter(opens in a new tab) and upload .ttf files.
Select Choose Files to choose the fonts you want to add. Then click Create to convert them. You don’t need to modify the fontName, fontStyle, or Module format fields.
The font converter generates a JavaScript file with the provided .ttf file as a Base64-encoded string and some code for jsPDF. Add the generated JavaScript file to your project.
To activate the custom font, use the setFont()(opens in a new tab) method:
doc.setFont('Inter-Regular', 'normal');The font name is visible in the converter before you generate the JavaScript file. Repeat this process for each additional font.
Known limitations of jsPDF
| Limitation | Workaround |
|---|---|
| External CSS is not automatically loaded | Apply styles via inline CSS or imported stylesheets at build time, or ensure styles are rendered in the DOM before calling html(). |
| Custom fonts require manual conversion | Use jsPDF’s font converter tool to generate font files compatible with jsPDF and embed them manually. |
| Large or complex HTML content may overflow or get cut off | Manually implement pagination logic, or split content into smaller sections before rendering to PDF. |
| Sparse official documentation | Rely on community examples and GitHub issues, or inspect jsPDF source code for advanced use cases. |
For enterprise-grade features like text search, annotations, redaction, digital signatures, and pixel-perfect rendering, consider using a dedicated solution, such as the Nutrient React PDF SDK.
Advanced HTML-to-PDF techniques in React
Beyond basic export, jsPDF supports plugins for tables, encryption, and styled captures.
Capture styled components with html2canvas
When your component relies on external CSS (flex/grid, classes, web fonts), jsPDF’s html() method ignores those styles. A common workaround is to rasterize the node with html2canvas(opens in a new tab) and embed the result as an image. Extract this into a helper so any component can call it.
Create a helper file (src/utils/pdfHelpers.js):
import html2canvas from 'html2canvas';import jsPDF from 'jspdf';
/** * Generates an A4 PDF snapshot of a DOM node with full CSS support. * @param {HTMLElement} node – the element to capture * @param {string} filename – optional, defaults to "styled.pdf" */export async function downloadStyledPdf(node, filename = 'styled.pdf') {  const canvas = await html2canvas(node, { useCORS: true, scale: 2 }); // higher scale = crisper output  const imgData = canvas.toDataURL('image/png');  const pdf = new jsPDF({ unit: 'px', format: 'a4' });
  const pageWidth = pdf.internal.pageSize.getWidth();  const pageHeight = (canvas.height * pageWidth) / canvas.width;
  pdf.addImage(imgData, 'PNG', 0, 0, pageWidth, pageHeight);  pdf.save(filename); // → defaults to styled.pdf}
The helper rasterizes the element, converts it to PNG, and places it on an A4 page. The output defaults to styled.pdf.
html2canvas is pixel-based, so vector text becomes an image. For crisp text, use server-side rendering or a true PDF layout engine.
Use the helper in your component:
import { useRef } from 'react';import { downloadStyledPdf } from './utils/pdfHelpers';import ReportTemplate from './ReportTemplate';
export default function App() {  const reportRef = useRef(null);
  const handleStyledExport = async () => {    if (reportRef.current) {      await downloadStyledPdf(reportRef.current); // saves styled.pdf    }  };
return ( <> <button onClick={handleStyledExport}>Export Styled PDF</button> <div ref={reportRef}> <ReportTemplate /> </div> </> );}- Drawbacks — The PDF is an image, so text can’t be searched or selected. For vector text, fall back to
doc.html().
Generate paginated tables with jspdf-autotable
If you export spreadsheets or invoices, install the jspdf-autoTable(opens in a new tab) plugin:
npm i jspdf-autotableimport jsPDF from 'jspdf';import { autoTable } from 'jspdf-autotable';
export default function App() { // 1. Build your rows (array-of-arrays) const dataArray = [ ['Ada Lovelace', 'ada@example.com', 'UK'], ['Grace Hopper', 'grace@navy.mil', 'USA'], ['Alan Turing', 'alan@bletchley.gov', 'UK'], ];
const pdf = new jsPDF(); autoTable(pdf, { head: [['Name', 'Email', 'Country']], body: dataArray, styles: { fontSize: 10 }, }); pdf.save('table.pdf');}head defines the header row, and body supplies one nested array per data line. autoTable sizes columns, paginates overflow rows, and repeats the header on every new page. The styles object applies global cell formatting — here, the font size is 10px.
Encrypt and password-protect your PDF (built in)
Since jsPDF v2.5, encryption is native(opens in a new tab) and no extra plugin is required. Supply a userPassword, an ownerPassword, and a permissions array when you instantiate the document.
Basic encryption
import jsPDF from 'jspdf';
const doc = new jsPDF({  encryption: {    userPassword: 'user123', // required to open the file    ownerPassword: 'admin456', // controls editing rights    permissions: [      'print',      'modify',      'copy',      'annot-forms', // allowed actions    ],  },});
doc.text('Top-secret numbers', 20, 20);doc.save('protected.pdf');- Algorithm — 128-bit AES is the default (stronger than the old RC4-40).
- Permissions — Omit an item to disallow it. Available flags:
print,print-low-resolution,modify,copy,annot-forms,fill-forms.
Granular permissions
Limit users to low-resolution printing only:
const doc = new jsPDF({ encryption: { userPassword: 'viewer', ownerPassword: 'masterkey', permissions: ['print-low-resolution'], encryptionType: 128, // AES-128 (default) },});Change encryption strength
const legacyDoc = new jsPDF({ encryption: { userPassword: 'secret', encryptionType: 40, // RC4-40 — smaller file, legacy compatibility },});Best practice — Stick with AES-128 for modern apps. Use RC4-40 only when you must support very old PDF readers.
Add metadata to your PDF
import { useRef } from 'react';import jsPDF from 'jspdf';import ReportTemplate from './ReportTemplate';
export default function App() {  const reportRef = useRef(null);
  const handleExport = async () => {    if (reportRef.current) {      const pdf = new jsPDF({        orientation: 'portrait',        unit: 'px',        format: 'a4',      });
      await pdf.html(reportRef.current, {        async callback(doc) {          // Set PDF metadata properties.          doc.setProperties({            title: 'Sales report 2025',            subject: 'Quarterly numbers',            author: 'ACME Corp',            keywords: 'react, pdf, sales',            creator: 'React app',          });
          // Save the PDF file.          doc.save('report.pdf');        },      });    }  };
  return (    <>      <button onClick={handleExport}>Export PDF</button>      <div ref={reportRef}>        <ReportTemplate />      </div>    </>  );}
doc.setProperties() embeds metadata (title, subject, author, keywords, creator) into the PDF. Viewers like Acrobat display these fields and search engines can index them. doc.save("report.pdf") then streams the file to the browser as a download.
Alternative: Build PDFs with @react-pdf/renderer
If you need flexbox layouts, external fonts, and vector text without html2canvas, @react-pdf/renderer(opens in a new tab) takes a different approach — you define your PDF as React components instead of converting existing HTML.
Install it:
npm i @react-pdf/rendererCreate a PDF document component:
import {  Document,  Page,  Text,  View,  StyleSheet,  PDFDownloadLink,} from '@react-pdf/renderer';
const styles = StyleSheet.create({  page: { padding: 40 },  title: { fontSize: 24, marginBottom: 12 },  row: {    flexDirection: 'row',    justifyContent: 'space-between',    marginBottom: 6,  },});
function InvoicePdf({ items }) {  return (    <Document>      <Page size="A4" style={styles.page}>        <Text style={styles.title}>Invoice</Text>        {items.map((item, i) => (          <View key={i} style={styles.row}>            <Text>{item.name}</Text>            <Text>${item.price}</Text>          </View>        ))}      </Page>    </Document>  );}
// Use `PDFDownloadLink` in your app to trigger a download.export default function App() {  const items = [    { name: 'Widget A', price: 25 },    { name: 'Widget B', price: 40 },  ];
  return (    <PDFDownloadLink      document={<InvoicePdf items={items} />}      fileName="invoice.pdf"    >      {({ loading }) =>        loading ? 'Generating...' : 'Download Invoice PDF'      }    </PDFDownloadLink>  );}
Tradeoffs vs. jsPDF
- Pros — Supports flexbox, custom fonts via
Font.register(), and vector text out of the box. No html2canvas needed. - Cons — You can’t convert existing HTML/DOM elements. You must rewrite your layout using React PDF’s own
<View>,<Text>, and<Image>primitives. Heavier bundle than jsPDF.
Use @react-pdf/renderer when you’re building a PDF from scratch (invoices, reports). Use jsPDF when you want to export an existing HTML page as-is.
Comparing HTML-to-PDF libraries for React
| Use case | jsPDF | @react-pdf/renderer | Puppeteer / Playwright | pdf-lib | Nutrient React Viewer |
|---|---|---|---|---|---|
| Client-only export | ✅ | ✅ | ❌ (server) | ✅ | ✅ |
| External CSS | ❌ | ❌ | ✅ | ❌ | —* |
| Vector text | ✅ | ✅ | ✅ | ✅ | ✅ |
| Complex layout (flex/grid) | 🚫 | ✅ | ✅ | 🚫 | ✅ |
| Password protection | ✅ | 🚫 | ✅ | 🚫 | ✅ |
| File size | Small | Medium | Large | Small | Medium |
| Learning curve | Low | Medium | Medium | Medium | Medium |
* The Nutrient React viewer renders existing PDF content, so external CSS limitations don’t apply.
Conclusion
jsPDF handles basic HTML-to-PDF export in React, including custom fonts, encryption, and styled-component capture. When you need viewing, searching, commenting, redacting, or signing, the Nutrient React viewer works with any React project and includes 30+ tools and a customizable UI.
For server-side automation, the DWS Processor API provides the same capabilities, and the open source MCP server lets AI assistants call those endpoints using natural-language prompts.
Start a free trial or launch the live demo to try the viewer.
FAQ
jsPDF handles basic HTML-to-PDF export. Beyond that, its feature set is limited. The Nutrient React viewer renders PDFs with high fidelity and supports full-text search, annotation, redaction, digital signatures, form filling, and permission controls — all in one package. If your project needs more than static exports, Nutrient covers those use cases.
Not directly. html() only sees styles already in the DOM. Inline your critical rules, or rasterize with html2canvas. For accurate CSS rendering, use a headless browser or the Nutrient React viewer instead.
Since v2.5, you can pass a userPassword, an ownerPassword, and a permissions array when creating a document. Refer to the section on encrypting and password protection above.
Yes. The viewer itself is a client-side bundle. Cloud features (like the Processor API) are optional and can be self-hosted for fully on-premises deployments.


