How to Load OBJ Files with MTL in Android
Table of contents

Working with 3D models in Android can be very challenging with the OpenGL APIs — especially when it comes to dealing with OBJ file formats. In this blog post, we’ll simplify this process by utilizing the power of Three.js(opens in a new tab) to load OBJ files in Android.
Disclaimer
Using this method is only recommended if your goal is to statically or dynamically load 3D (.obj) files in parts of your application. This isn’t intended for games or applications with heavy graphics usage. If your purpose is game development, consider looking into game development engines like Unity(opens in a new tab) or Godot(opens in a new tab).
Three.js
Three.js(opens in a new tab) is a powerful JavaScript library for manipulating and rendering 3D models in different formats. It uses WebGL under the hood, and it’s easier to use than OpenGL on Android, so we’ll use it to render our OBJ files. Since Three.js is a JavaScript library, for it to work in Android, we’ll use a web view and load the JavaScript and HTML resources from the Android assets folder.
Android Project Setup
Create a new empty project in Android Studio and add a web view that will be used to display the OBJ file. The first thing we’ll do is add internet permissions that are needed by the WebView to load our assets. In the AndroidManifest.xml file, add this permission:
<uses-permission android:name="android.permission.INTERNET" />Setting Up the Layout
Next, we’ll set up our layout by adding a single web view to replace everything inside the activity_main.xml file:
<?xml version="1.0" encoding="utf-8"?><Webview xmlns:android="http://schemas.android.com/apk/res/android" xmlns:tools="http://schemas.android.com/tools" android:layout_width="match_parent" android:layout_height="match_parent" android:id="@+id/three_web_view" tools:context=".MainActivity"/>Main Activity
Inside MainActivity.kt is where everything will take place. We’ll first load the HTML and JavaScript files from the assets folder into the web view using loadScene(). This will set up the 3D scene and have it ready to start receiving our OBJ files:
class MainActivity : AppCompatActivity() {   private lateinit var webView: WebView   override fun onCreate(savedInstanceState: Bundle?) {       super.onCreate(savedInstanceState)       setContentView(R.layout.activity_main)       // Set up the web view.       initWebView()   }
   @SuppressLint("SetJavaScriptEnabled")   private fun initWebView() {       webView = findViewById(R.id.three_web_view)       webView.settings.apply {           javaScriptEnabled = true           allowFileAccess = true           allowContentAccess = true       }
      // Load the web resources.      loadScene()   }   ...
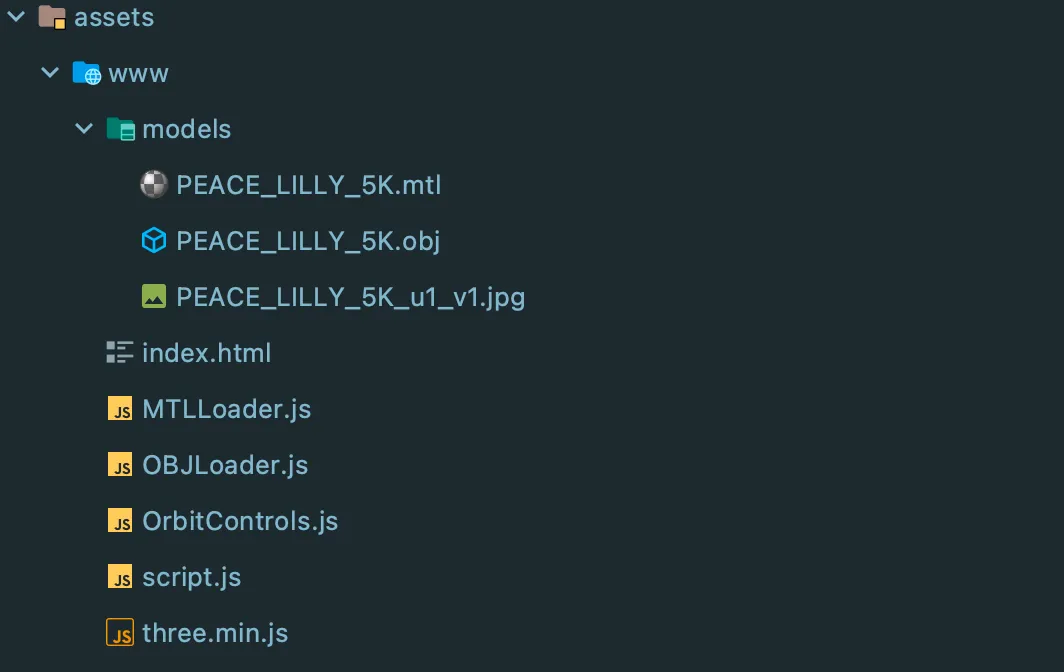
Android studio doesn’t create the assets folder by default, so we’ll have to create it manually at the path <ProjectRoot>/src/main/assets. Inside your assets folder, create the subfolders shown below and add the required index.html along with the Three.js-related JavaScript files that will do all the heavy lifting of rendering the OBJs. The image below shows the directory structure for our web resources.

HTML and JavaScript
Before we continue on Android, let’s first prepare our web assets. The index.html file is our entrypoint into the 3D scene, and all the required JavaScript files are loaded through the script tags. The loaded files are:
script.js, which contains our business logic.- The main Three.js library file,
three.min.js(no longer supported). OBJLoader.js(opens in a new tab), which handles the loading of OBJ files.MTLLoader.js(opens in a new tab), for loading the MTL files.OrbitController.js(opens in a new tab), for controlling rotation, zooming, and panning.
<html><head> <meta http-equiv="Content-Type" content="text/html; charset=windows-1252"> <title>Demo scene</title> <style> body { margin: 0; background-color: #efefef; } </style></head><body><script src="./three.min.js"></script><script src="./OBJLoader.js"></script><script src="./MTLLoader.js"></script><script src="./OrbitControls.js"></script><script src="./script.js"></script></body></html>script.js is the only JavaScript file that will be modified. It contains the scene initialization logic and the OBJ loading function called from Android:
var scene = new THREE.Scene();var camera = new THREE.PerspectiveCamera(  75,  window.innerWidth / window.innerHeight,  0.1,  1000,);
camera.position.z = 2;
var renderer = new THREE.WebGLRenderer();renderer.setSize(window.innerWidth, window.innerHeight);document.body.appendChild(renderer.domElement);var controls = new THREE.OrbitControls(camera, renderer.domElement);
controls.enableDamping = true;controls.dampingFactor = 0.25;controls.enableZoom = true;
// Set up lighting.var keyLight = new THREE.DirectionalLight(0xffffff, 1.0);keyLight.position.set(-50, 0, 50);
var fillLight = new THREE.DirectionalLight(0xffffff, 1.0);fillLight.position.set(50, 0, 50);
var backLight = new THREE.DirectionalLight(0xffffff, 1.0);backLight.position.set(50, 0, -50).normalize();
var topLigh = new THREE.DirectionalLight(0xffffff, 0.7);topLigh.position.set(0, 50, 0);
// Add lighting to the scene.scene.add(keyLight);scene.add(fillLight);scene.add(backLight);scene.add(topLigh);
// Set background color.scene.background = new THREE.Color(0xefefef);
var mtlLoader = new THREE.MTLLoader();
function loadModel(path, model) {  try {    var selectedObject = scene.getObjectByName(name);    if (selectedObject) {      scene.remove(selectedObject);    }  } catch (error) {    console.error(error.message);  }  mtlLoader.setTexturePath(path);  mtlLoader.setPath(path);  mtlLoader.load(`${model}.mtl`, function (materials) {    materials.preload();    var objLoader = new THREE.OBJLoader();    objLoader.setMaterials(materials);    objLoader.setPath(path);    objLoader.load(`${model}.obj`, function (object) {      scene.add(object);    });  });}
function animate() {  requestAnimationFrame(animate);  controls.update();  renderer.render(scene, camera);}
animate();
Next, we’ll load our web assets.
Loading Resources
After the HTML and JavaScript files are added to the assets folder, we can load the assets into a web view. When this is done, we’ll be ready to load the OBJ files.
Note that for resources to be loaded correctly, they must all share the same secure HTTP origin. The androidx.webkit(opens in a new tab) library provides a way to achieve this through WebViewAssetLoader(opens in a new tab). It intercepts the resource loading to fake an HTTP origin, and this origin must be a secure HTTPS URL, unless android:usesCleartextTraffic is set to true in the AndroidManifest.xml(opens in a new tab).
Now, add the WebKit dependencies to your project:
dependencies { ... implementation 'androidx.webkit:webkit:1.2.0'}Then, build the web view asset loader object as follows:
val assetLoader = WebViewAssetLoader.Builder() .addPathHandler("/assets/", AssetsPathHandler(this)) .build()The assetLoader is initialized with the absolute base path to the resources and a PathHandler(opens in a new tab) to produce responses for the registered path. In this case, we’ll use the AssetPathHandler(opens in a new tab) because our resources are accessed from the Android assets folder. Our assets are now hosted under http(s)://appassets.androidplatform.net/assets/, and the code below shows how the WebViewAssetLoader(opens in a new tab) is used with the web view:
private fun loadScene() {  // Build the web view asset loader.   val assetLoader = WebViewAssetLoader.Builder()       .addPathHandler("/assets/", AssetsPathHandler(this))       .build()// Load the web resources from assets through the standard URL provided// by the `WebViewAssetLoader`.   webView.loadUrl("https://appassets.androidplatform.net/assets/www/index.html")   webView.webViewClient = object : WebViewClient() {       override fun onPageFinished(view: WebView?, url: String?) {           loadObjModel()       }
       override fun onLoadResource(view: WebView?, url: String?) {           super.onLoadResource(view, url)       }
       @SuppressWarnings("deprecation") // For API < 21.       override fun shouldInterceptRequest(           view: WebView?,           url: String?       ): WebResourceResponse {           return assetLoader.shouldInterceptRequest(Uri.parse(url))!!       }
       @RequiresApi(21)       override fun shouldInterceptRequest(           view: WebView?,           request: WebResourceRequest?       ): WebResourceResponse? {           return assetLoader.shouldInterceptRequest(request!!.url)       }   }}
Now that the assets are loaded, it’s time to load the files.
Loading OBJ Files
At this point, when you run the application on an emulator or a physical device, you should see an empty white screen. If there are errors in the web view, please doublecheck your assets path or internet permissions.
To load an OBJ file, we’ll call a JavaScript function from Android and provide it with the path and the file name of the OBJ file we want to load. The OBJ file should share the same root folder as the HTML and JavaScript resources. In this case, we store our OBJ files in assets/www/models. Also, we need to make sure the MTL file is on the same relative path and has the same name as the OBJ file.
The code snippet below shows how the OBJ 3D model is loaded onto the Three.js scene from Android:
private fun loadObjModel() { val action = "javascript:loadModel('https://appassets.androidplatform.net/assets/www/index.html/models/','PEACE_LILLY_5K')" webView.loadUrl(action)}Conclusion
In this post, we looked at how to load OBJ files in Android using the JavaScript library Three.js(opens in a new tab). You can use this approach if some of your app’s features require rendering simple 3D models. Though we only dealt with OBJ files here, other 3D formats supported by Three.js can also be loaded using this approach with little modification.
I hope this helps simplify working with 3D models in Android applications.
ℹ️ Note: The demo code is intended for demonstration purposes only, and additional optimization is required before using it in production.
You can find the demo application on GitHub(opens in a new tab).


