


Fill PDF forms with SharePoint data and merge attachments using Power Automate
Table of contents

Microsoft has enhanced Microsoft Lists forms(opens in a new tab) to improve data collection and management. Users can now create forms directly from the Lists home, SharePoint, or the Lists app in Teams, with the underlying list automatically generated. Conditional branching enables dynamic question display based on prior answers, ensuring relevance. Additional field types — including location data, image uploads (with mobile camera integration), lookup columns, and file attachments — enrich data collection. Form creators can receive notifications upon new submissions, limit responses per user, and schedule form availability with specific start and end dates.
However, printing Microsoft Lists forms to PDF has historically presented challenges, and Microsoft has yet to offer a seamless solution for this requirement. So, this article will cover how to convert SharePoint form responses into PDFs and merge attachments into a single file. By leveraging Power Automate, users can extract form responses, format them into a structured document, and generate a downloadable PDF. Additionally, attachments submitted with the form can be merged into the same file, ensuring all relevant data is consolidated efficiently.
Step 1: Building and customizing the SharePoint list
The first step in this process is to build and customize the SharePoint list in Microsoft Forms. This demo will use the Job application tracker template and add an attachment control.

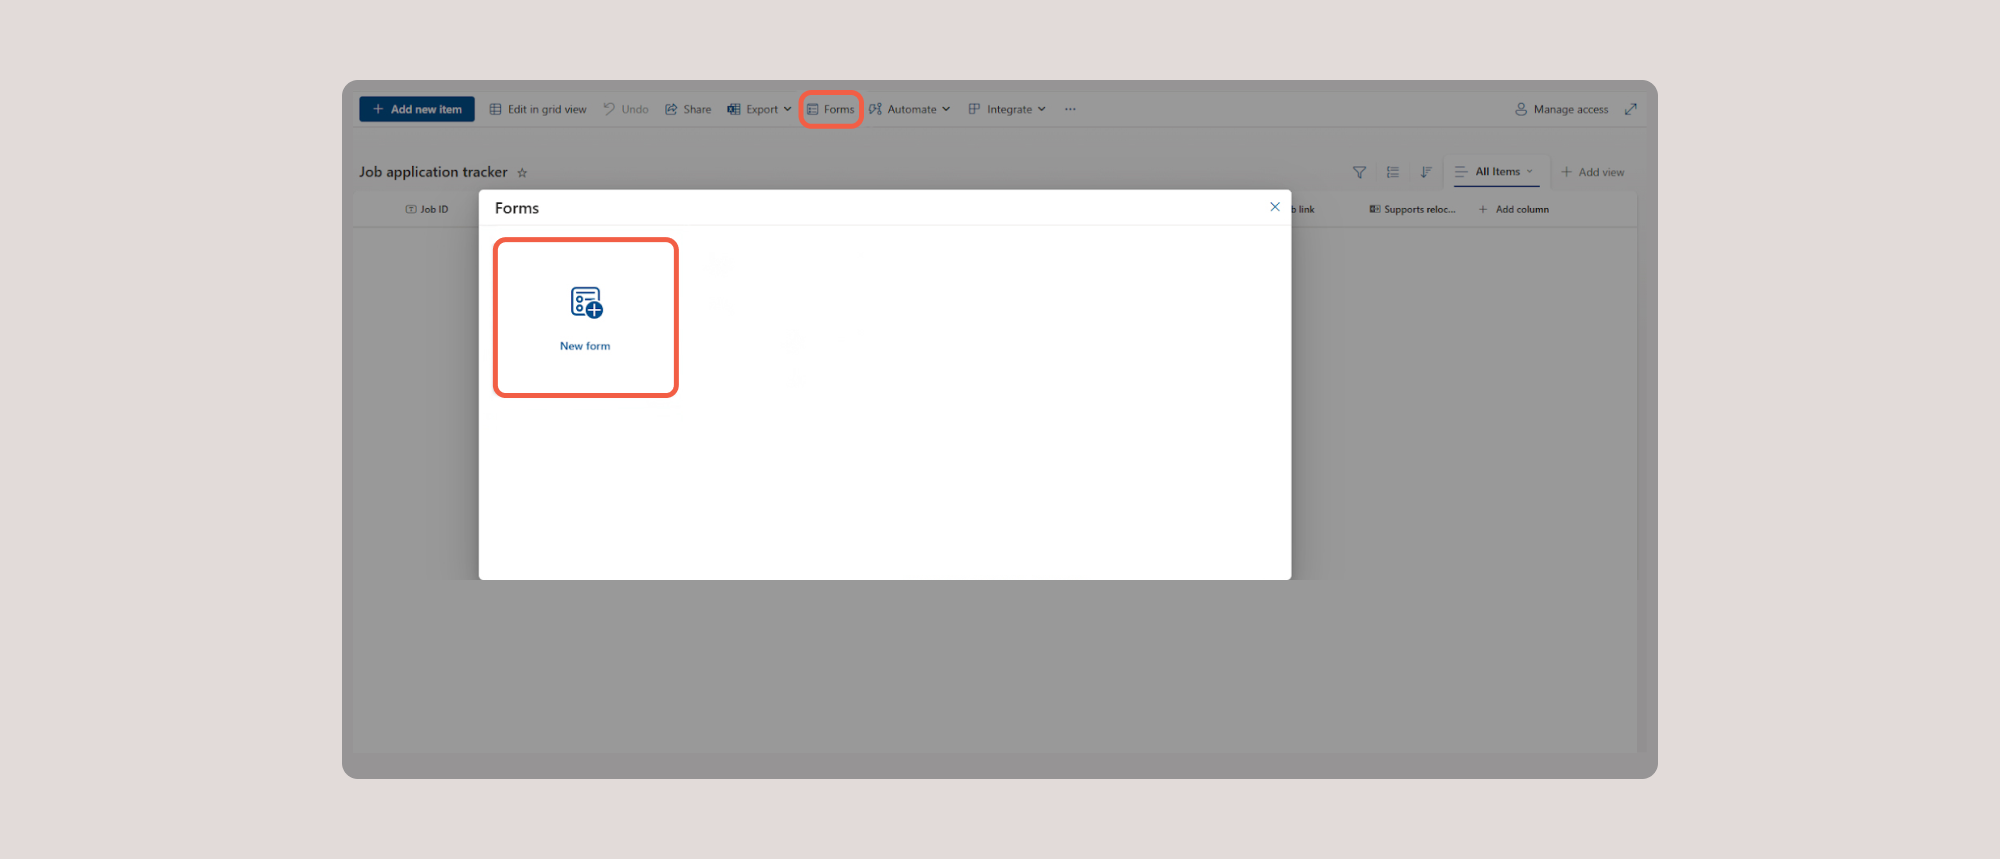
Step 2: Adding a new form
Go to Forms and select New form. This will allow you to design a structured input form that captures the required details. Customize the form fields to match the columns in your SharePoint list and ensure that the attachment control is enabled for users to upload documents.
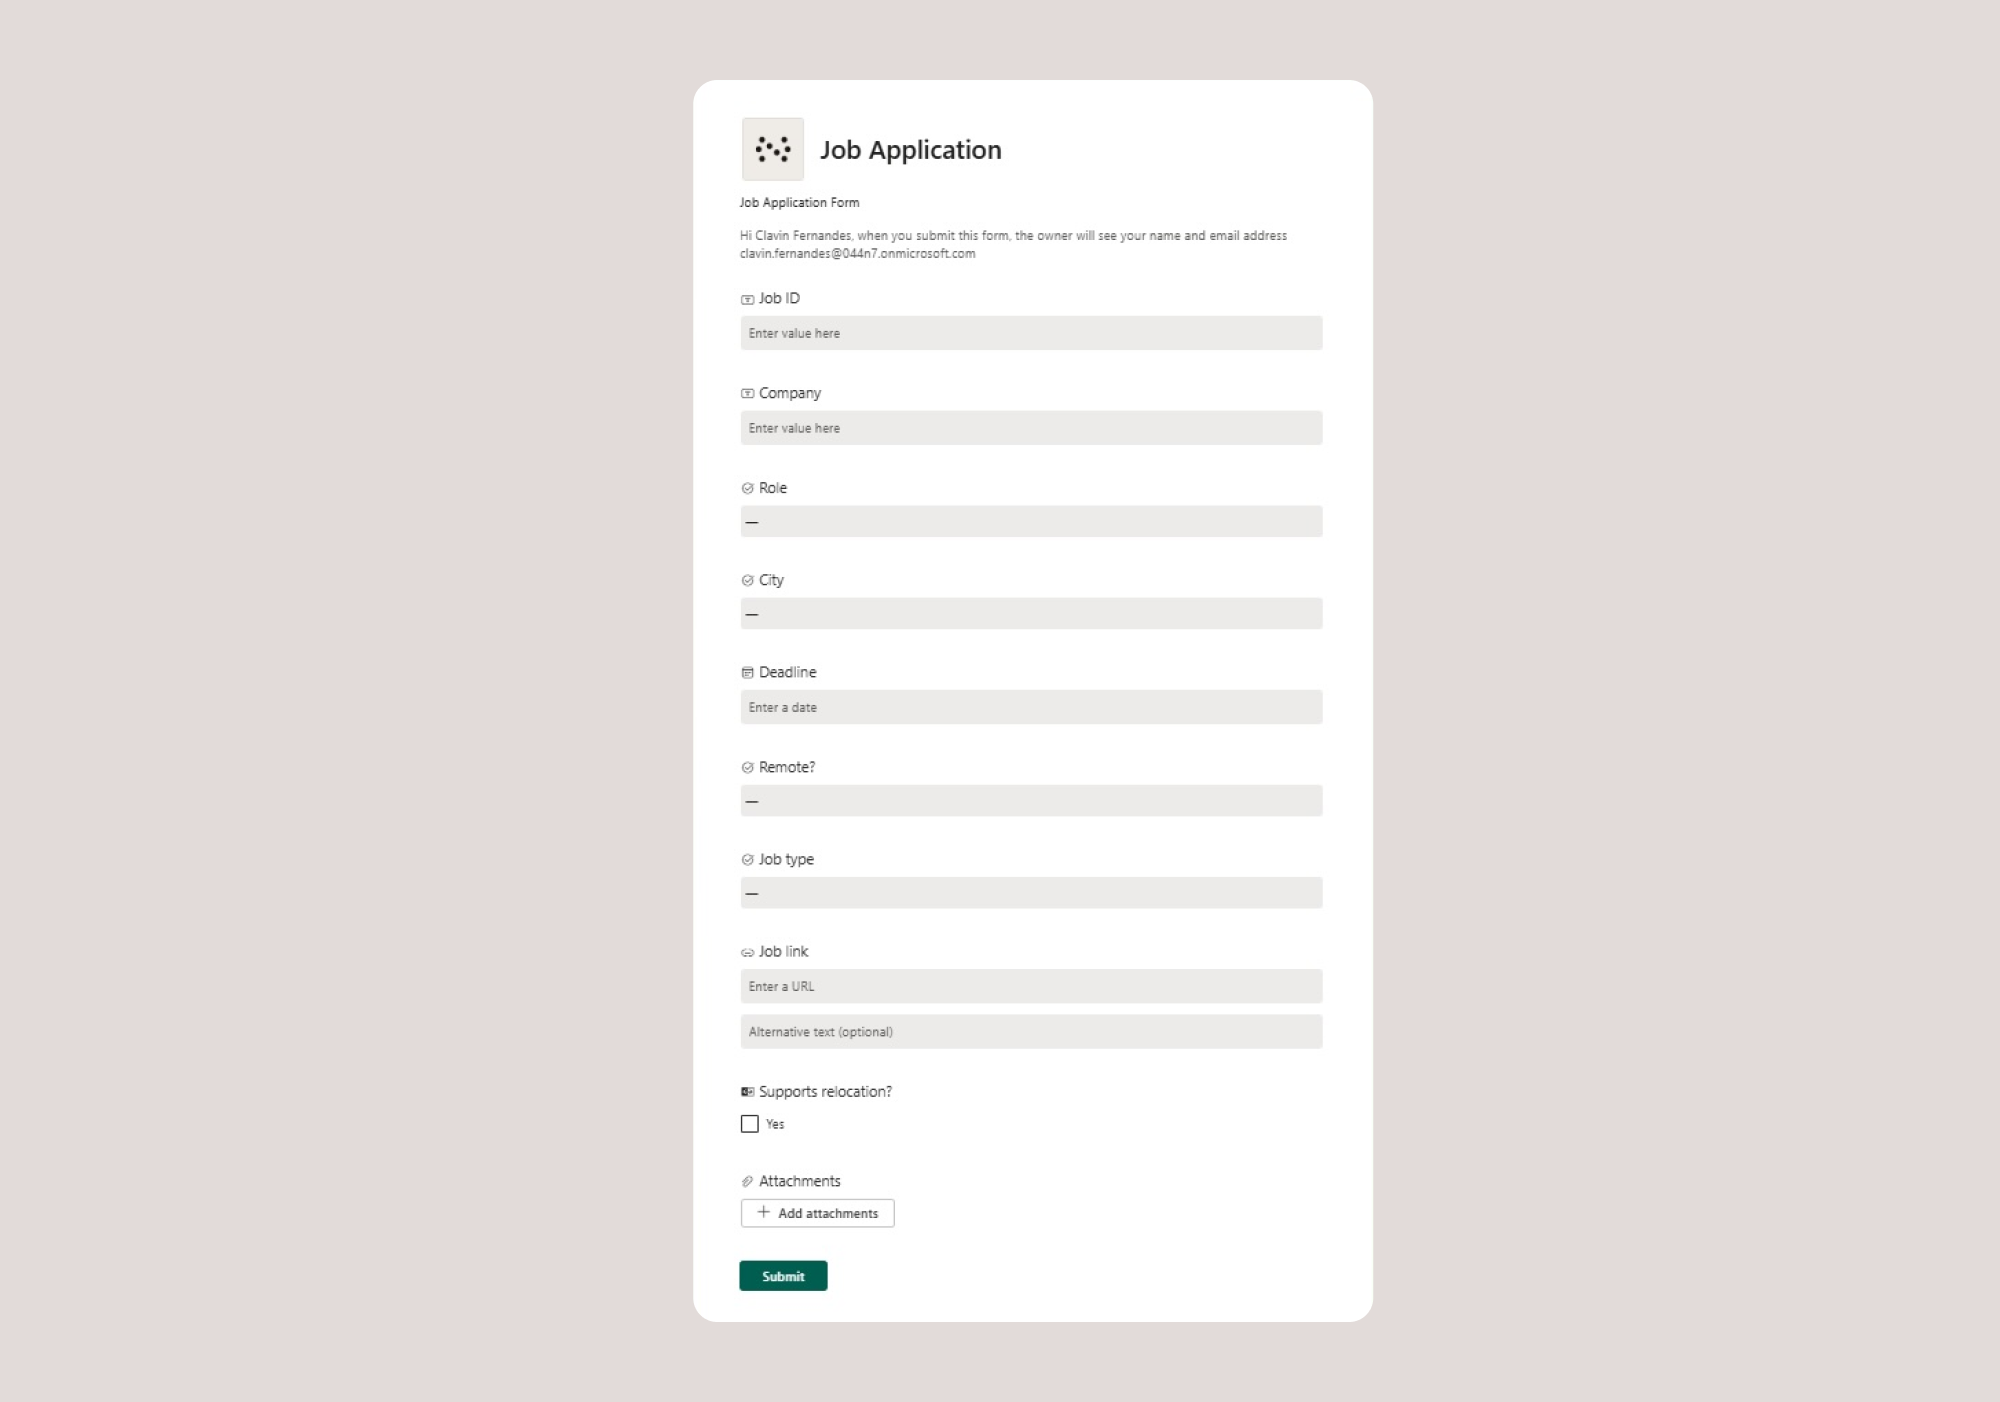
The form will look like what’s shown in the following screenshot.
Step 3: Creating a fillable PDF form
Next, you need to build the fillable PDF form. You can use Nutrient’s Document Editor for SharePoint or any PDF editor of your choice.
You can find the fillable form here(opens in a new tab).
Step 4: Exporting PDF form data as XML using Power Automate
The next step in the process is to create a Power Automate flow that exports the PDF form data as an XML file. Below is a screenshot illustrating the expected output.

Steps
- Manually trigger a flow — The user starts the flow manually.
- Get file content using path — Retrieves the PDF file from SharePoint.
- Export PDF Forms Data
- Action:
Export PDF Forms Data - Source file name:
document (Filled).pdf(file name to process) - Source file content:
Body(output from Get file content using path) - Output data format:
XML
- Action:
- Compose - Convert Base64 to String — Converts the extracted Base64-encoded XML into a readable text format.
Example XML output:
<?xml version="1.0" encoding="utf-8"?><fields xmlns:xfdf="http://ns.adobe.com/xfdf-transition/"> <JOBID>1235</JOBID> <COMPANY>Nutrient</COMPANY> <ROLE>Jr UX Designer</ROLE> <CITY>Seattle</CITY> <Deadline>04/03/2025</Deadline> <Remote>Fully remote</Remote> <URL>https://www.nutrient.io/demo/pdf-form-creator</URL> <CHECKBOX>Value 8</CHECKBOX></fields>Now that you have the template as XML, you can create another Power Automate flow to import the SharePoint list item into a PDF template.
Step 5: Creating a Power Automate flow to fill the PDF and merge attachments
The image below shows a high-level flow overview.
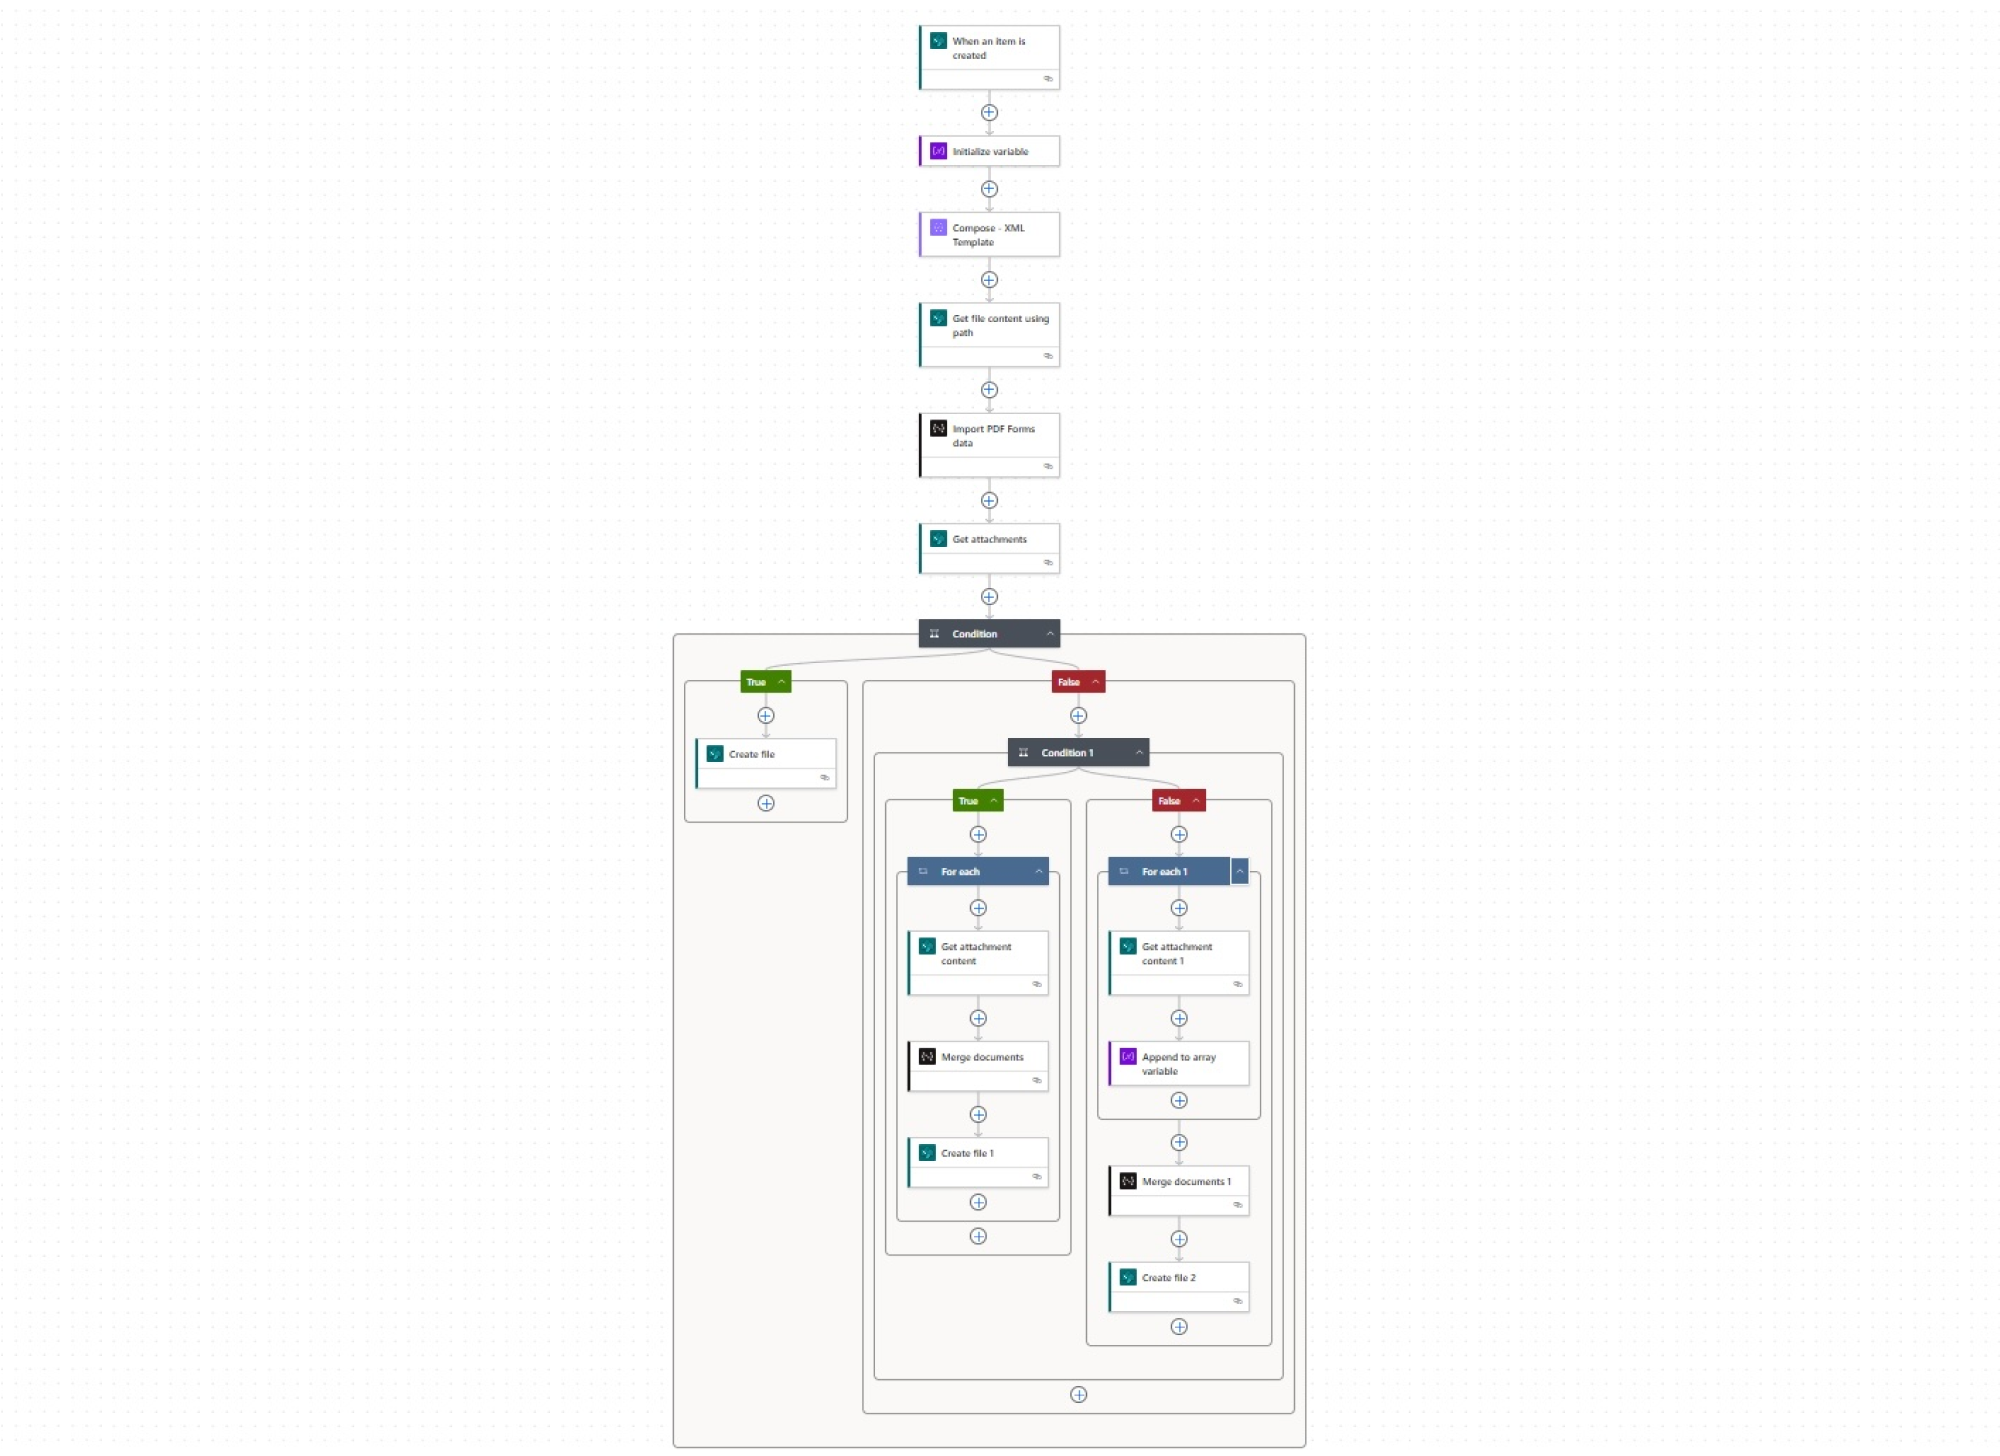
- When an item is created — This trigger starts when a new job application is added to Job application tracker in SharePoint.

- Initialize variable — An array variable (
attachArr) to store attachments.

- Compose - XML Template — This step structures the data into an XML format. Use the XML you created in step 4 above.

For the checkbox, you need to first check the box and log the results in Compose. If the result is Value 8, set the logic to check if it’s true. Otherwise return an empty string.
- Get file content using path — Retrieves the PDF form content.

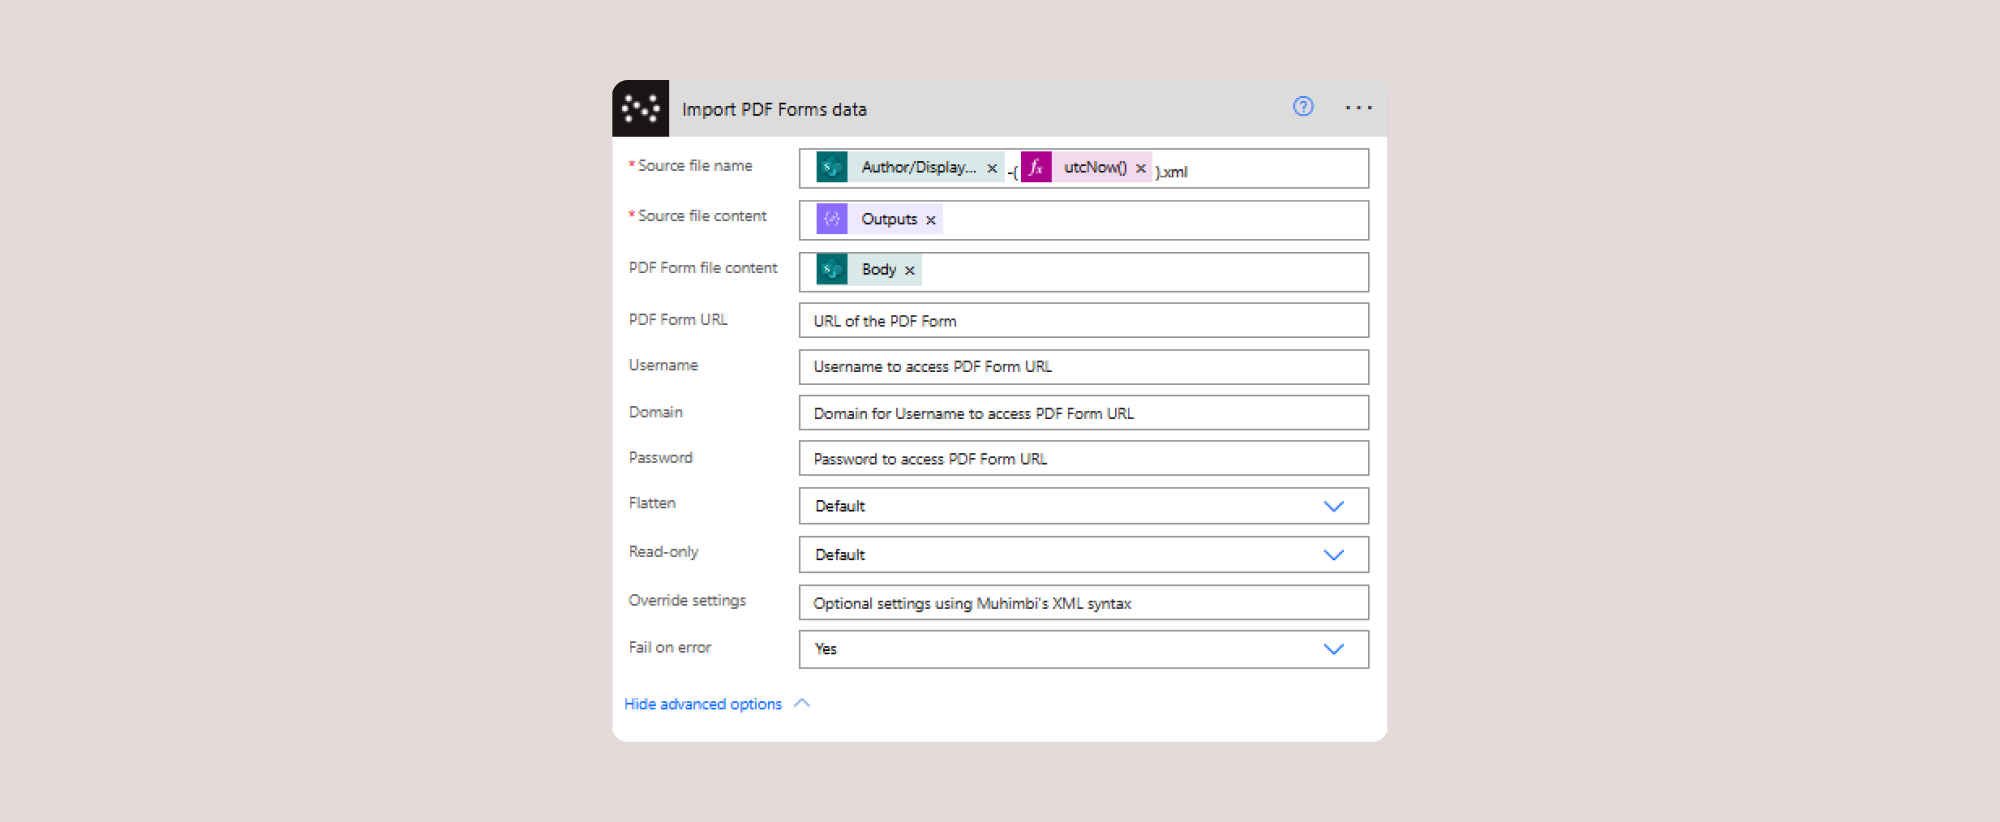
Import PDF Forms data — This step processes the structured XML data and maps it to the corresponding fields in the PDF form.
- Source file name: The file is dynamically named using the author’s display name and timestamp (the
utcNowfunction) to ensure uniqueness. - Source file content: This pulls the structured XML output from the previous step.
- PDF Form file content: The output of the Get file content using path action.
- Flatten: This setting determines if the form fields should remain editable or be locked upon completion.
- Read-only: Specifies whether the form fields should be editable or view-only after data import.
Conditional logic: Checking for attachments
To handle attachments, use a Condition action in Power Automate. This step checks whether attachments exist by evaluating their count:
- If no attachments, create a single PDF.
- If attachments exist, merge them into the final document.
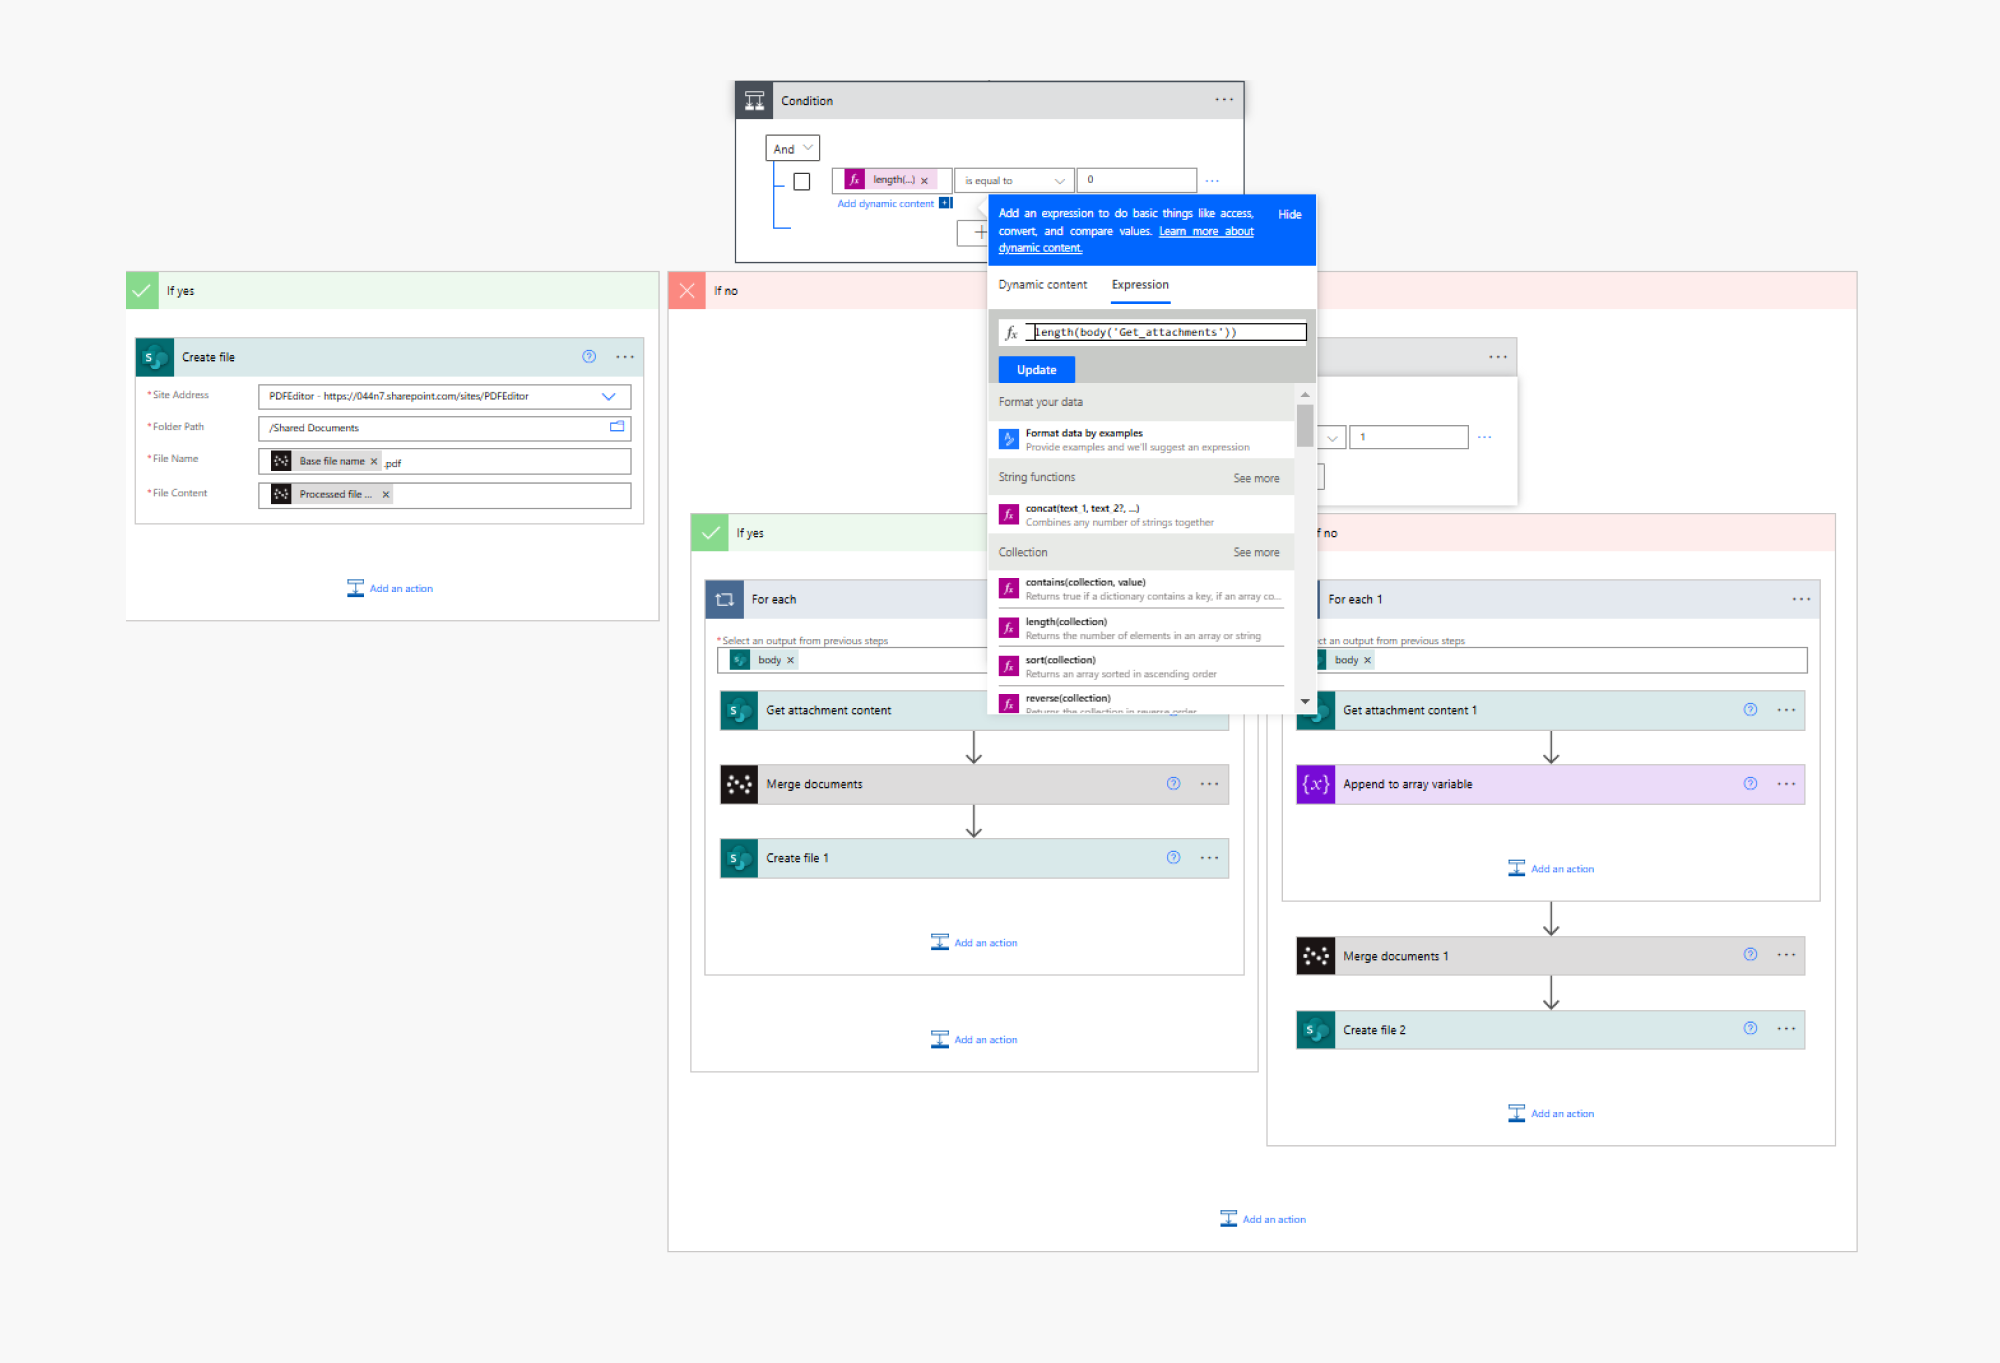
If the length of the attachments array is 0, no attachments exist, and the flow proceeds with just the form data and creates the file in SharePoint.
If attachments are found, they’re processed using conditional branches to merge them before creating the final PDF.
Once the attachment check is complete, the flow proceeds.
If only one attachment exists:
- Retrieve the attachment content.
- Merge it into the final PDF document.
- Create the final file and store it.
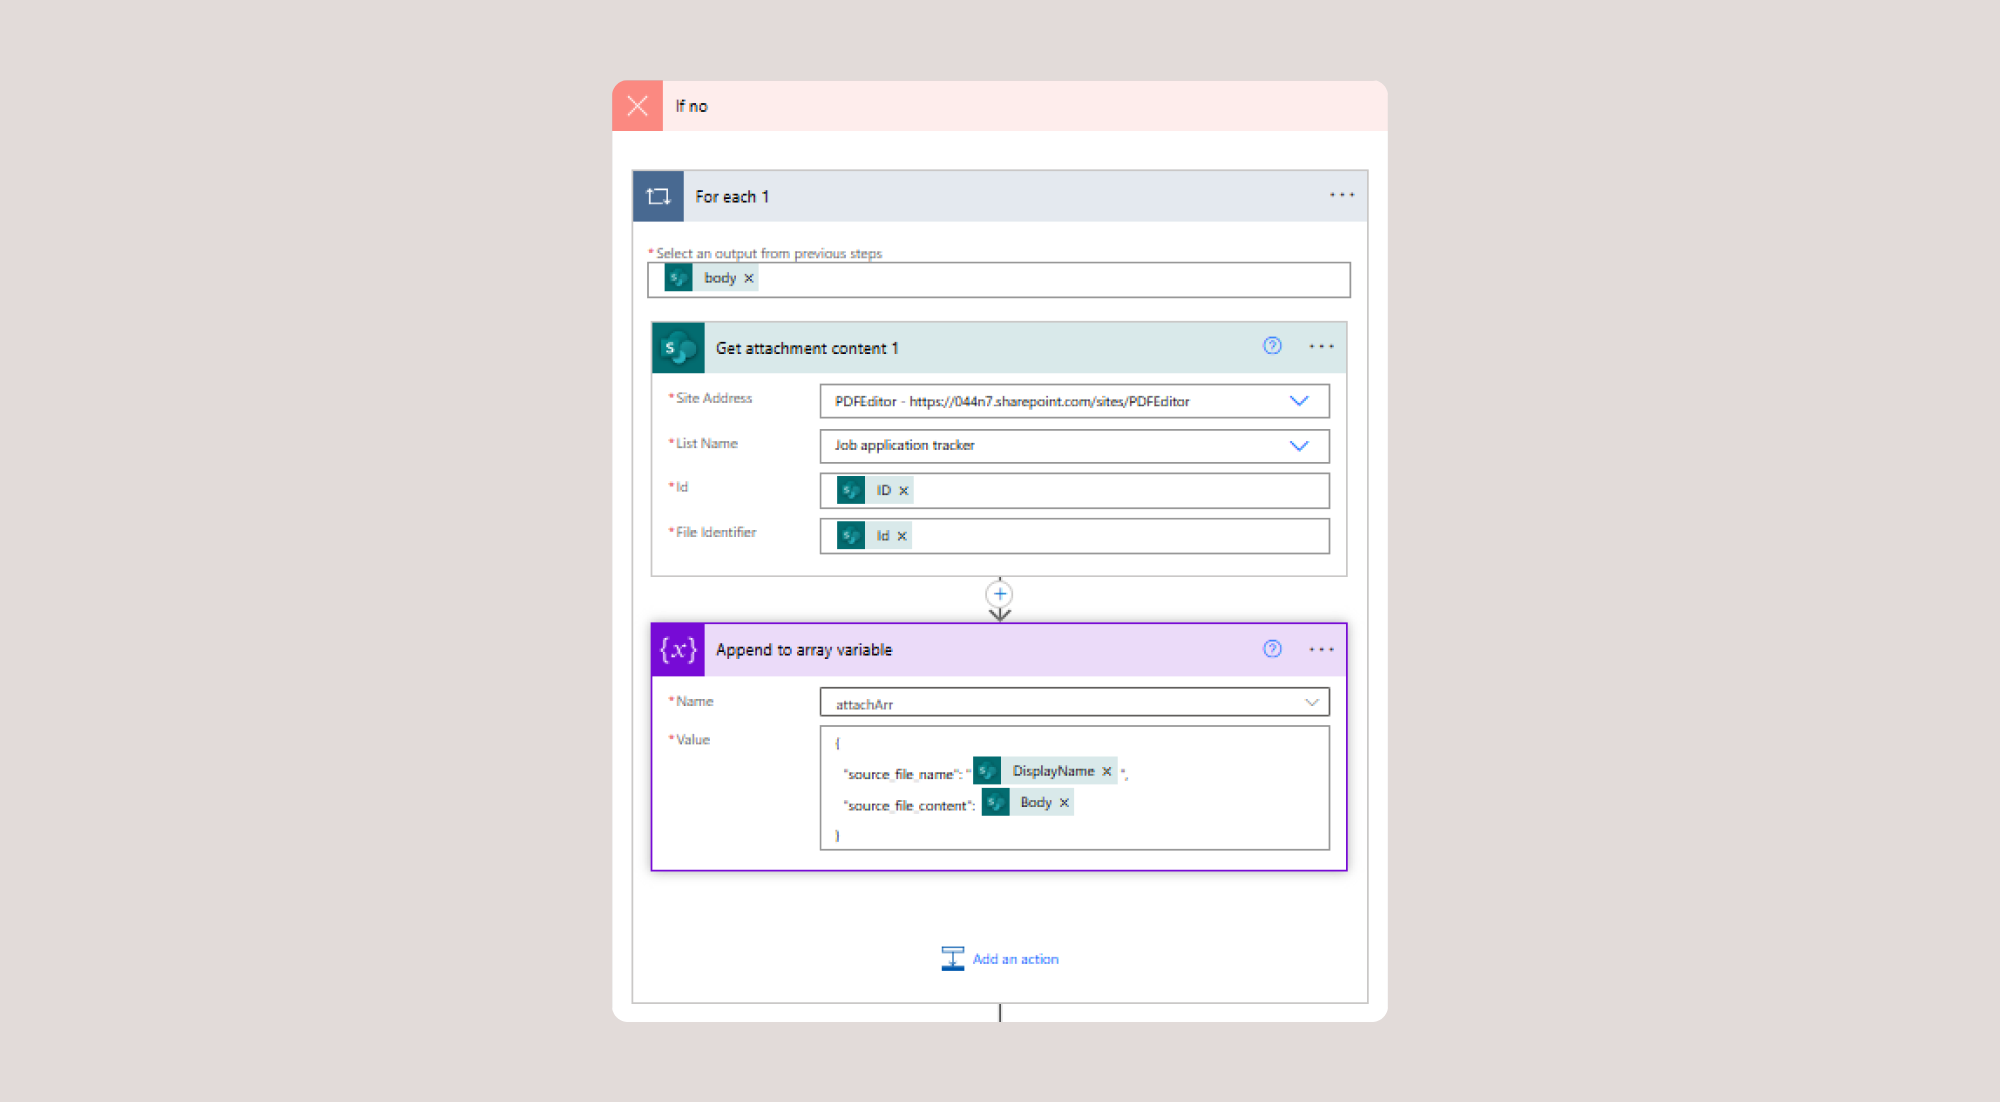
If there are multiple attachments, for each attachment:
- Retrieve the attachment content from SharePoint using Get attachment content.
- ID is the output of the trigger.
- Id is the output of the Get attachment action.

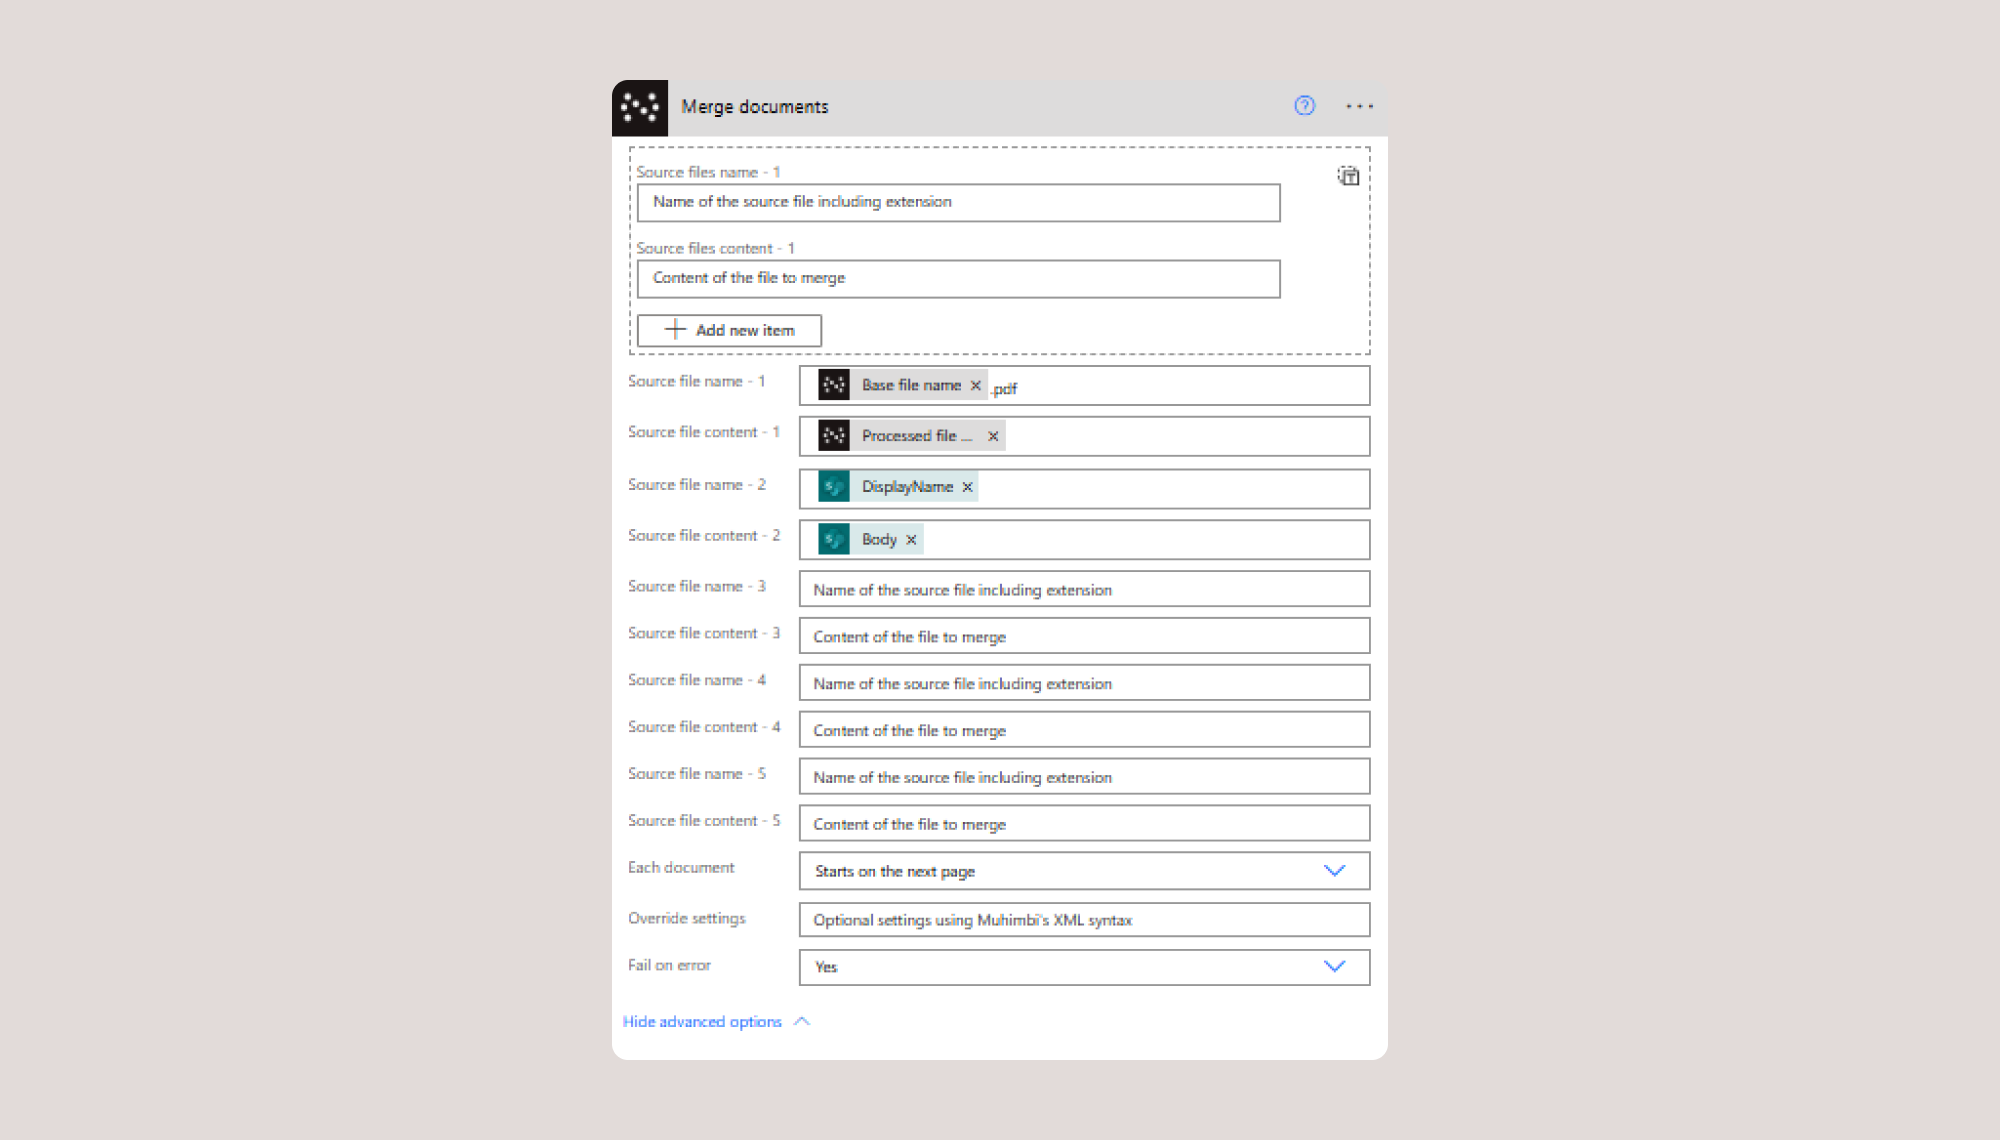
Merge documents:
- Use Nutrient’s document merging capabilities.
This action merges multiple document files into a single PDF file using Nutrient’s PDF processing capabilities.
Source files:
- Source file name - 1:
Base file name.pdf— The output of the Import PDF Forms data action. - Source file content - 1:
Processed file content— The output of the Import PDF Forms data content. - Source file name - 2:
DisplayName— The output of the Get attachments action. - Source file content - 2:
Body(file content) — The output of the Get attachment content.
- File Name:
Processed file_name.pdf— Uses dynamic content and the output of the Nutrient merge action. - File Content:
Processed file content— Contains the final merged PDF document output of the Nutrient merge action.

Appending attachments to an array variable
To handle multiple attachments dynamically, use the Append to array variable action. This step stores each attachment’s name and content in a structured format before merging.
Configuration details:
- Variable name —
attachArr - Value format —
{ "source_file_name": "@{items('For_each_1')?['DisplayName']}", "source_file_content": "@{body('Get_attachment_content_1')}" }- Display name — Output of the Get attachments action.
- File content — Output of the Get attachments content.
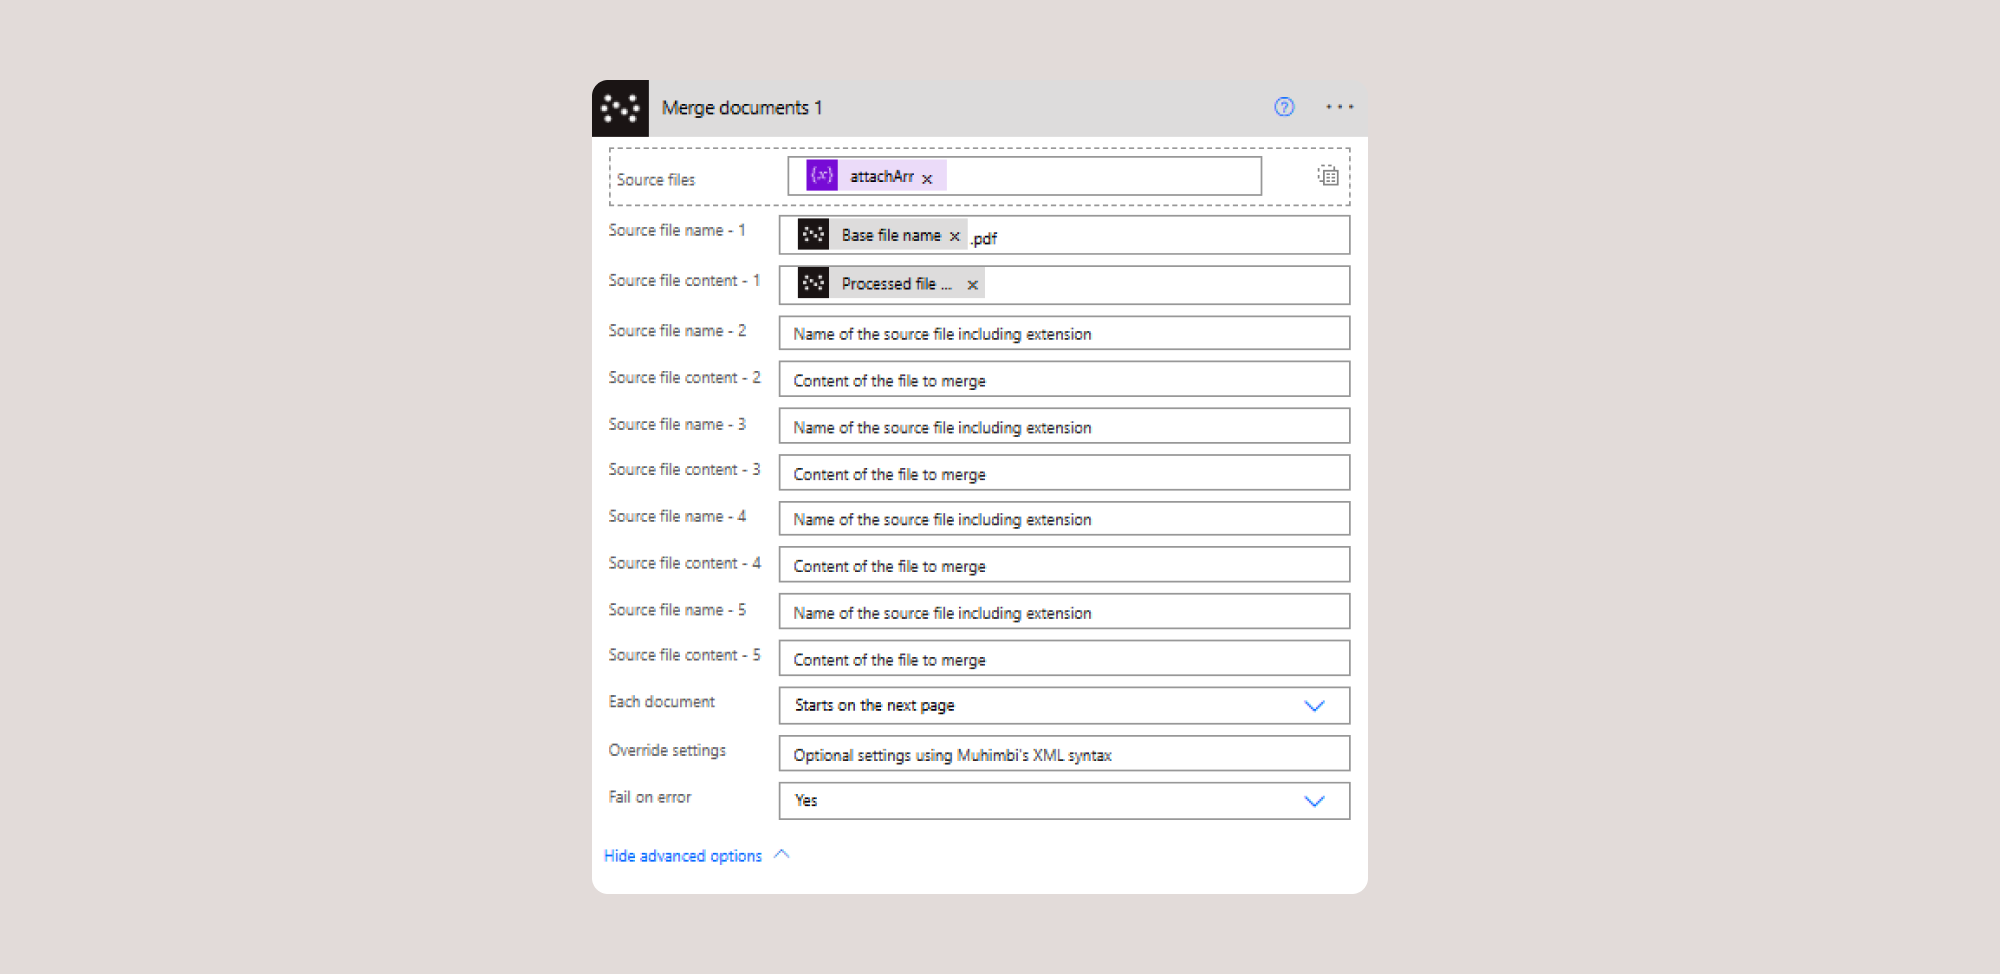
Outside the Apply to Each loop, add the Merge documents 1 action:
- Source files: Uses the
attachArrarray variable that holds all fetched attachments. - Source file name -1:
Base file name.pdf, which is the output of the Import PDF Forms data action. - Source file content -1:
Processed file content, which is the output of the Import PDF Forms data action.
- Create file 1 action: This action saves the processed and merged PDF file to SharePoint for storage and future access.
- File Name:
Processed file_name.pdf— Uses dynamic content and the output of the Nutrient merge action. - File Content:
Processed file content— Contains the final merged PDF document output of the Nutrient merge action.

Conclusion
Now that the process is set up, you can submit the form, including any necessary attachments. Power Automate will automatically import the form data, merge any attached files, and generate a final PDF. This document will then be stored in the designated destination document library, making it easily accessible for further use.
By implementing this workflow, organizations can streamline form submissions, ensure consistency in document formatting, and improve overall document management in SharePoint.
This solution not only simplifies data handling but also enhances productivity by automating repetitive tasks. Give it a try, and see how Power Automate transforms your document workflows!


